How to Self-Host MinIO on Coolify in 2026 (With the Full Admin UI Back)
 Hasan Aboul Hasan
Published 2026-06-17
Updated 2026-06-26
Hasan Aboul Hasan
Published 2026-06-17
Updated 2026-06-26
Coolify dropped MinIO from its catalog and the community console lost its admin tools. This guide deploys a security-patched MinIO server plus the full OpenMaxIO admin console on Coolify, then proves it works with a real S3 test you run from your own machine.
- A security-patched MinIO server running on Coolify
- The full MinIO admin console back: buckets, users, policies, access keys (not the stripped object-browser-only version)
- Storage your apps reach over a normal HTTPS domain
- A copy-paste Python test that proves reads, writes, and presigned URLs all work
Two things broke recently if you self-host object storage. Coolify removed MinIO from its one-click catalog, and MinIO gutted the admin UI out of the community edition. Old guides no longer work.
I run MinIO in production, so I rebuilt it properly on Coolify. Current, patched, with the full admin console back. Then I tested every operation with a real S3 client until it all passed. This guide is the exact setup I landed on: paste-ready files, plus every trap I hit so you can skip them. Object storage is one box on that VPS. Standing up the whole stack, and keeping it alive when an upstream walks away like MinIO just did, is what I teach in Self Hosting 2.0.
Two containers, two steps. Let's go.
Your two domains (optional)
Drop in the S3 API domain and the console domain you'll use for this install. We'll plug them into every copyable block on this page so you can paste with no edits. Values stay in your browser only, nothing leaves this page.
Values stay in your browser only, nothing leaves this page.
What happened to MinIO (30-second version)
You only need this because it explains a couple of odd choices below:
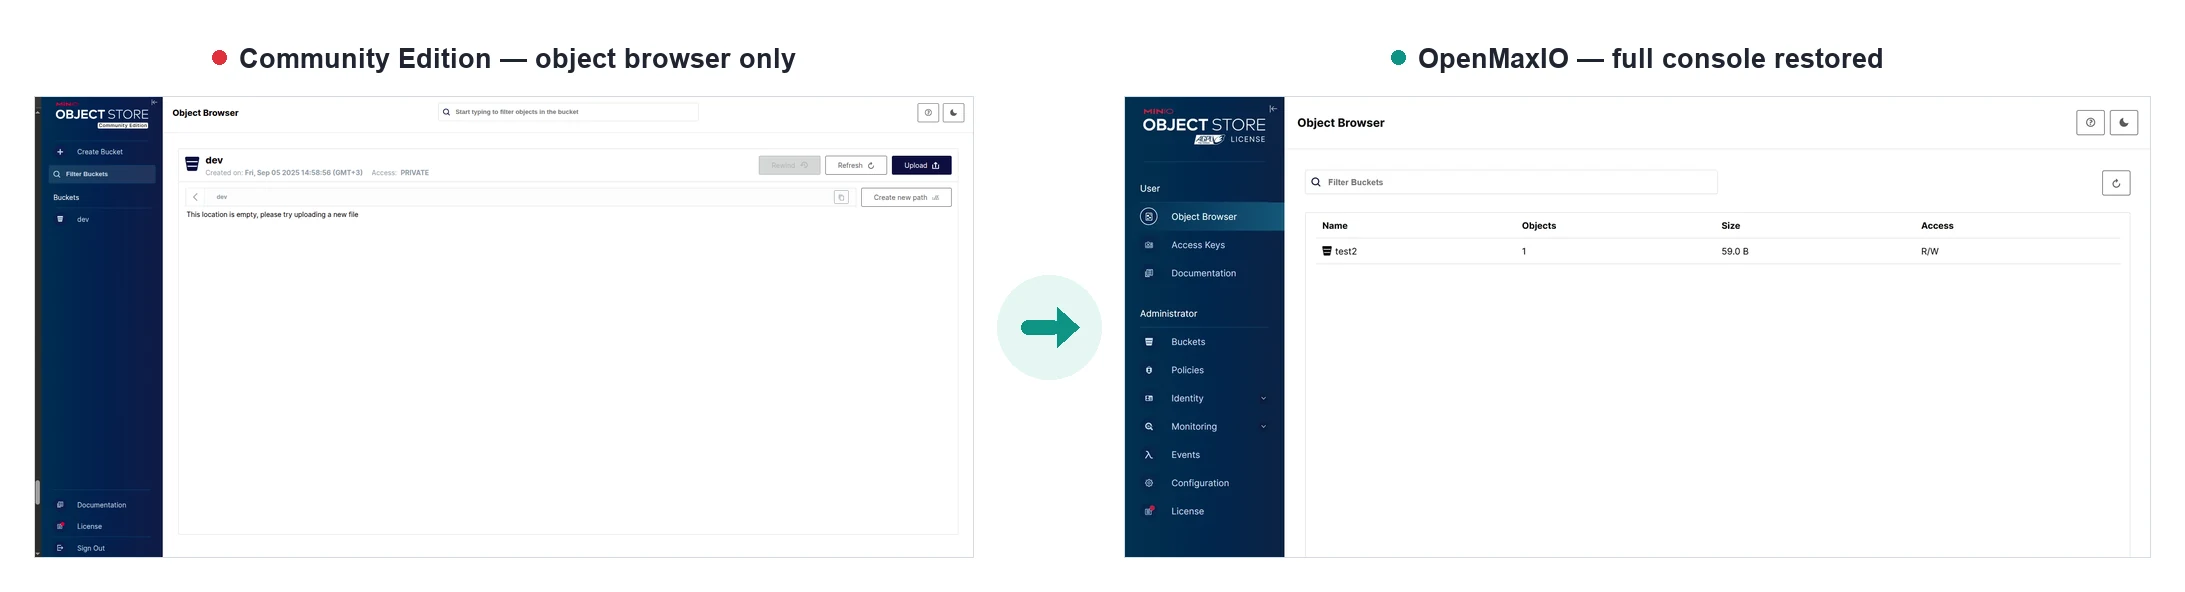
- The community console was stripped to an object browser only. The last release with the full console was
RELEASE.2025-04-22. - MinIO went source-only and stopped publishing Docker images around October 2025. The last published image,
RELEASE.2025-09-07, carries an unpatched high-severity security hole (a CVE, the public ID for a known vulnerability). The fix shipped inRELEASE.2025-10-15, which was never published as an official image. - The
minio/miniorepo was archived in April 2026, and Coolify dropped it from the catalog.
The point: the MinIO server still works perfectly. It's the project that's frozen, no patches, no images. So we'll use a patched image someone rebuilt from source, plus a community fork for the UI.
What you'll build
MinIO server Required
Stores data, speaks S3.
OpenMaxIO console Optional
The admin UI.
- MinIO server is the actual product. Run only this and you have working storage; your apps point at its domain.
- OpenMaxIO console is the admin UI. One thing to know: the console was always a separate program from the server. Think of it as a detachable remote control. Old MinIO just shipped it taped to the box. When MinIO stripped the bundled console, the community forked the last full version as OpenMaxIO. So when the UI looks exactly like the MinIO console you remember, that's because it is that console. Just the complete version.
That's one service. Real setups run several on one VPS, sharing RAM, SSL, and backups without stepping on each other. That orchestration is the spine of Self Hosting 2.0. This guide is one self-contained piece of it.
🧭 No Coolify yet, or new to running a VPS? Self Hosting 2.0 takes you from a blank server to a full stack, databases, email, storage, and backups, the same way this guide does MinIO.
Step 1: Create it on Coolify
This assumes Coolify is already running. If it isn't, install Coolify first, then come back here.
In Coolify: open your project, click + New, choose Docker Compose Empty, paste the compose below, and Save. Read the comments. Every odd-looking line is solving a real problem.
services:
  minio:
    image: hasanaboulhasan/minio:RELEASE.2025-10-15T17-29-55Z   # mirror of coollabsio's patched build (see note below)
    command: server /data --console-address ":9001"
    environment:
      - SERVICE_FQDN_MINIO_9000
      - MINIO_ROOT_USER=${SERVICE_USER_MINIO}
      - MINIO_ROOT_PASSWORD=${SERVICE_PASSWORD_MINIO}
      # Do NOT set MINIO_BROWSER=off. It hides the Object Browser inside the OpenMaxIO console.
      # Two more env vars are REQUIRED, but add them in Coolify's env UI (see "Add two URL env vars" below), not here.
    volumes:
      - minio-data:/data
    healthcheck:
      test: ["CMD", "mc", "ready", "local"]
      interval: 10s
      timeout: 5s
      retries: 5

  console:
    image: hasanaboulhasan/openmaxio-console:v1.7.6   # prebuilt; swap for your own if you build one
    environment:
      - SERVICE_FQDN_CONSOLE_9090
      - CONSOLE_MINIO_SERVER=http://minio:9000   # internal hop; plain http on the private net is fine
      - CONSOLE_PBKDF_PASSPHRASE=${SERVICE_PASSWORD_PBKDFPASS}
      - CONSOLE_PBKDF_SALT=${SERVICE_PASSWORD_PBKDFSALT}
    # distroless image has no shell, so a healthcheck can't run and would falsely show "unhealthy". Disable it.
    healthcheck:
      disable: true
    depends_on:
      minio:
        condition: service_healthy

volumes:
  minio-data:
Quick read of what you just pasted. Two services. minio is the server. console is the OpenMaxIO admin UI, an image I built, since OpenMaxIO ships code but no ready-made image. Both live on my Docker Hub on purpose: if an upstream image disappears, this guide still works. Given this whole saga, that's a real risk.
⚠ Provenance: my minio image is a straight mirror of coollabsio/minio:RELEASE.2025-10-15, the patched MinIO release Coolify's founder rebuilt from source. The last official image shipped the security hole; the patched one was never published officially. Want ongoing patches instead of a pinned release? cgr.dev/chainguard/minio:latest drops straight in.
Set a domain on each service
Point a DNS A-record for each subdomain at your server. Then open each service in Coolify and paste its domain into the Domains field. No port needed. The SERVICE_FQDN_MINIO_9000 and SERVICE_FQDN_CONSOLE_9090 lines in the compose already tell Coolify which port each domain maps to.
Paste this into the minio service's Domains field:
https://s3.example.com
And this into the console service's Domains field:
https://console.example.com

Add two URL env vars (this is the big trap)
This trap looks impossible until you know it. With everything else right, S3 calls fail with:
InvalidAccessKeyId: The Access Key Id you provided does not exist in our records.
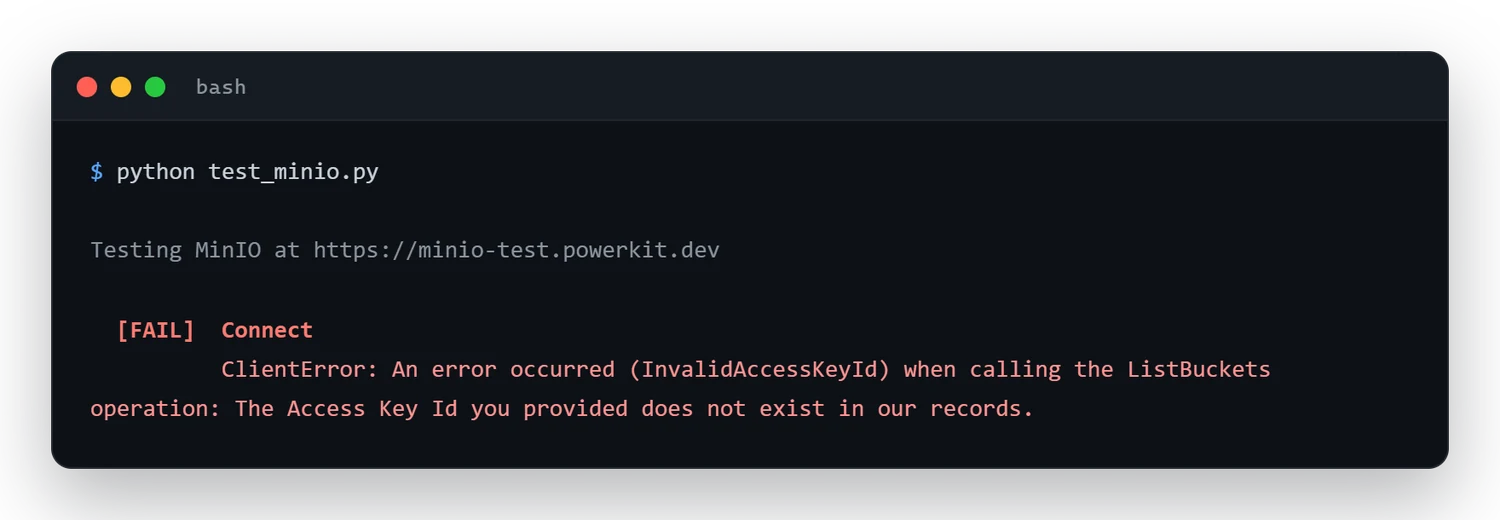
⚠ That error is lying. Your keys are fine. AWS Signature V4 locks every request to the server's hostname. It's like a key cut for one exact lock. Your client cuts it for s3.example.com. But behind a proxy, MinIO is holding a different lock: it doesn't know s3.example.com is its own front door. The key doesn't turn, so it blames the key.
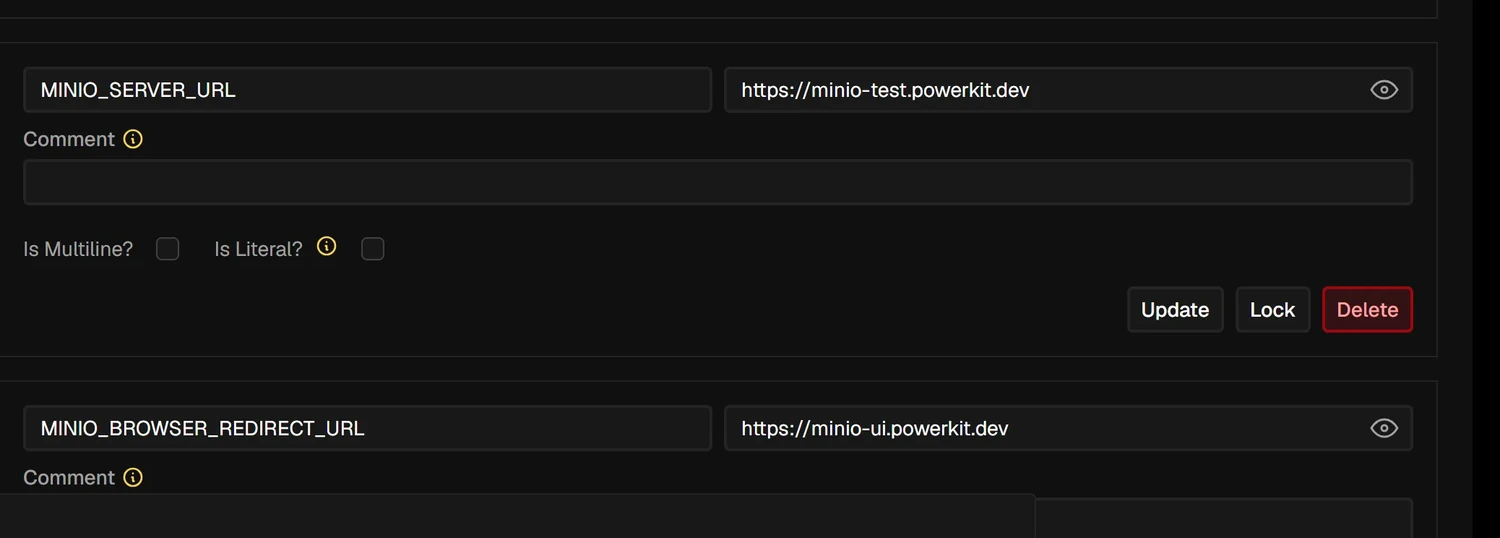
Fix: tell MinIO its public URL. In Coolify, open your resource, go to Environment Variables, and add these two as literal values:
MINIO_SERVER_URL=https://s3.example.com
MINIO_BROWSER_REDIRECT_URL=https://console.example.com
MINIO_SERVER_URL makes signatures validate. It fixes presigned URLs too, same cause. MINIO_BROWSER_REDIRECT_URL is its required companion. Add both in the env UI, not the compose. A Coolify Service Stack doesn't reliably inject literal URL values from the compose file.
Deploy and log in
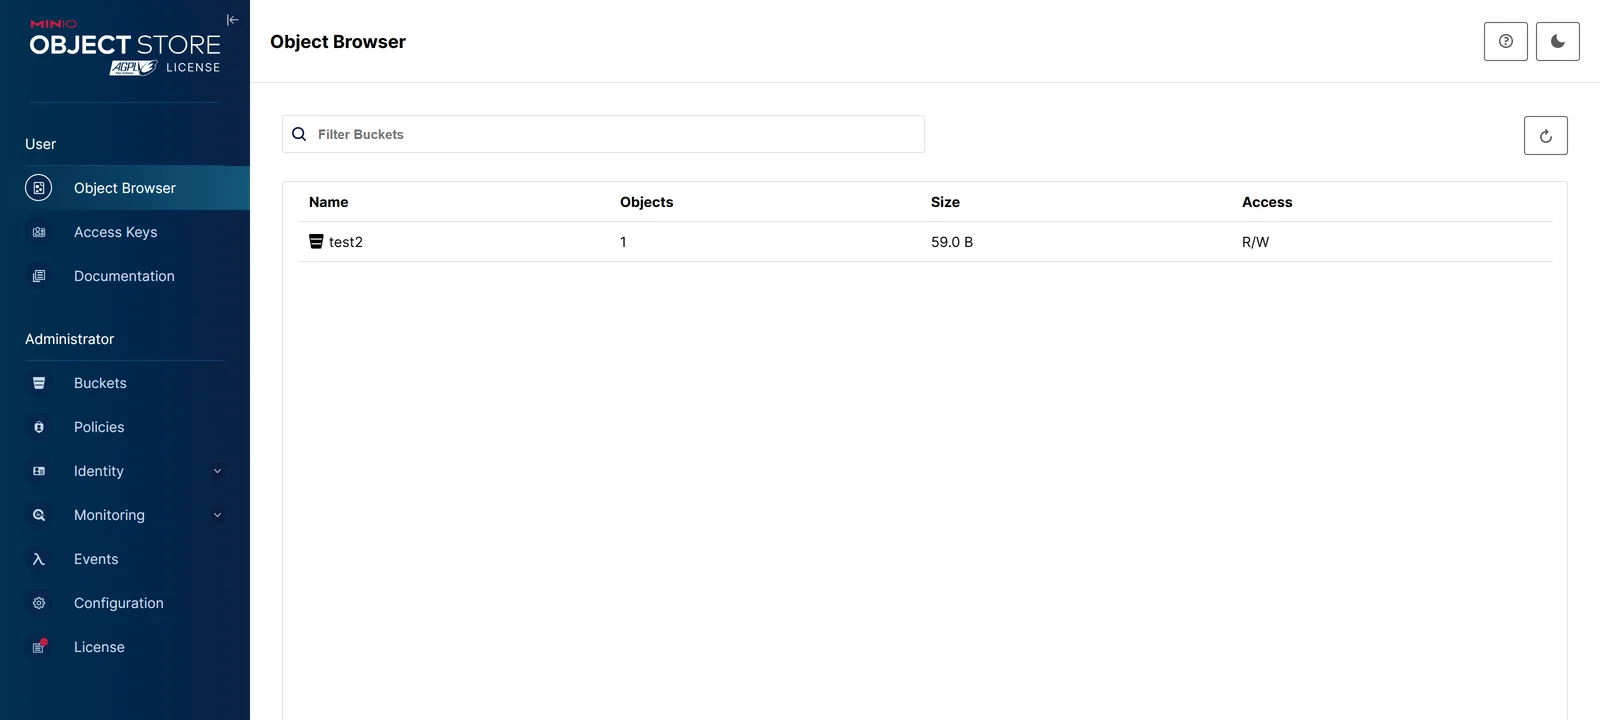
Hit Deploy. When it's up, open your console domain. Coolify generated your login and shows it right on the service page, an Admin User and an Admin Password. Copy those in.
You should now see the full console: buckets, Identity → Users, Policies, Access Keys, Configuration. Everything MinIO removed, back.
Step 2: Prove it works (don't skip this)
Clicking around the UI proves the console reaches MinIO. It does not prove your apps can. That traffic takes the external path through the proxy, which is different. So test it like a real client.
First, create an access key in the console: Access Keys → Create. That's separate from your admin login. Keep the key and secret handy. Then test it like a real client, from your own machine.
Test it with Python (boto3)
This runs the same create, upload, download, presigned, and delete cycle a real app does, against your public endpoint. So it proves your apps can reach the storage, not just the console. Run pip install boto3 requests, fill in the top of this script, and run it:
#!/usr/bin/env python3
"""MinIO integration test: full CRUD + multipart + presigned, against your PUBLIC endpoint."""
import io, sys, uuid, datetime as dt
import boto3
from boto3.s3.transfer import TransferConfig
from botocore.client import Config
import requests

# --- edit these ---
ENDPOINT   = "https://s3.example.com"   # your S3 API domain (no port)
ACCESS_KEY = "PASTE_ACCESS_KEY"          # console -> Access Keys -> Create
SECRET_KEY = "PASTE_SECRET_KEY"
BUCKET     = "minio-integ-test"          # created + deleted by the test

# PATH-STYLE is the critical line: without it, boto3 tries bucket.s3.example.com and fails behind a proxy.
s3 = boto3.client(
    "s3", endpoint_url=ENDPOINT,
    aws_access_key_id=ACCESS_KEY, aws_secret_access_key=SECRET_KEY,
    region_name="us-east-1",
    config=Config(signature_version="s3v4", s3={"addressing_style": "path"}),
)

KEY = f"healthcheck/{dt.datetime.now(dt.timezone.utc):%Y%m%dT%H%M%S}-{uuid.uuid4().hex[:8]}.txt"
PAYLOAD = f"minio test {uuid.uuid4()}".encode()
results, made_bucket = [], False

def check(name, fn):
    try:
        d = fn(); results.append(True); print(f"  [PASS]  {name}" + (f"  --  {d}" if d else ""))
    except Exception as e:
        results.append(False); print(f"  [FAIL]  {name}\n          {type(e).__name__}: {e}")

def connect():  return f"{len(s3.list_buckets().get('Buckets', []))} bucket(s) visible"
def make():
    global made_bucket
    if BUCKET in [b['Name'] for b in s3.list_buckets().get('Buckets', [])]: return "exists (reusing)"
    s3.create_bucket(Bucket=BUCKET); made_bucket = True; return "created"
def upload():   s3.put_object(Bucket=BUCKET, Key=KEY, Body=PAYLOAD); return f"{len(PAYLOAD)} bytes"
def stat():
    if s3.head_object(Bucket=BUCKET, Key=KEY)["ContentLength"] != len(PAYLOAD): raise AssertionError("size mismatch")
    return "ok"
def download():
    if s3.get_object(Bucket=BUCKET, Key=KEY)["Body"].read() != PAYLOAD: raise AssertionError("bytes differ")
    return "content matches"
def listing():
    if not any(o["Key"] == KEY for o in s3.list_objects_v2(Bucket=BUCKET, Prefix=KEY).get("Contents", [])):
        raise AssertionError("key not listed")
    return "found"
def multipart():
    cfg = TransferConfig(multipart_threshold=5*1024*1024, multipart_chunksize=5*1024*1024)
    data, k = b"x"*(6*1024*1024), KEY + ".mp"
    s3.upload_fileobj(io.BytesIO(data), BUCKET, k, Config=cfg)
    got = s3.get_object(Bucket=BUCKET, Key=k)["Body"].read(); s3.delete_object(Bucket=BUCKET, Key=k)
    if len(got) != len(data): raise AssertionError("multipart mismatch")
    return "6 MB via multipart"
def presign_get():
    url = s3.generate_presigned_url("get_object", Params={"Bucket": BUCKET, "Key": KEY}, ExpiresIn=120)
    r = requests.get(url, timeout=20); r.raise_for_status()
    if r.content != PAYLOAD: raise AssertionError("wrong content")
    return "signed URL works"
def presign_put():
    k = KEY + ".put"
    url = s3.generate_presigned_url("put_object", Params={"Bucket": BUCKET, "Key": k}, ExpiresIn=120)
    requests.put(url, data=b"ok", timeout=20).raise_for_status()
    got = s3.get_object(Bucket=BUCKET, Key=k)["Body"].read(); s3.delete_object(Bucket=BUCKET, Key=k)
    if got != b"ok": raise AssertionError("wrong content")
    return "signed URL works"
def del_obj():  s3.delete_object(Bucket=BUCKET, Key=KEY); return "deleted"
def del_bucket():
    if not made_bucket: return "left in place"
    for o in s3.list_objects_v2(Bucket=BUCKET).get("Contents", []): s3.delete_object(Bucket=BUCKET, Key=o["Key"])
    s3.delete_bucket(Bucket=BUCKET); return "removed"

print(f"\nTesting MinIO at {ENDPOINT}\n")
for n, f in [("Connect", connect), ("Create bucket", make), ("Upload", upload), ("Stat", stat),
             ("Download + verify", download), ("List", listing), ("Multipart", multipart),
             ("Presigned GET", presign_get), ("Presigned PUT", presign_put),
             ("Delete object", del_obj), ("Delete bucket", del_bucket)]:
    check(n, f)

ok = sum(results)
print(f"\n{'='*40}\n  {ok}/{len(results)} checks passed\n{'='*40}")
sys.exit(0 if ok == len(results) else 1)
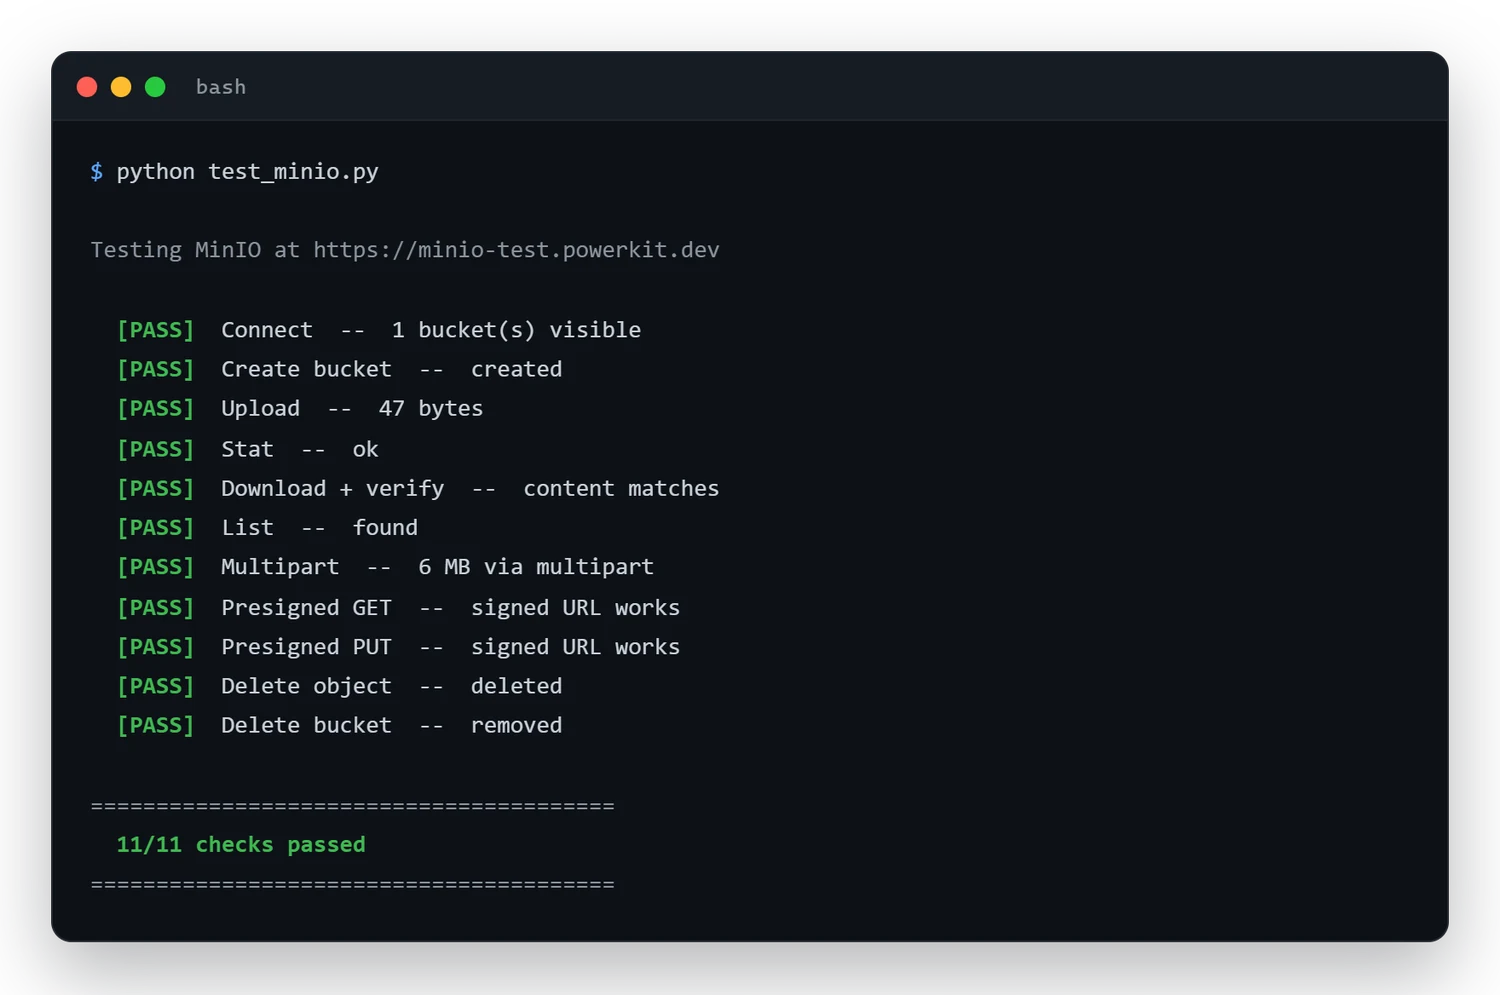
11/11 means you're done: reachable, S3-compatible, big files via multipart, presigned URLs working. That same client config is exactly what your app code needs too.
The traps, collected
The whole reason this guide is worth reading. Each of these cost me real time:
InvalidAccessKeyIdis a lie: MinIO doesn't know its public URL. SetMINIO_SERVER_URL+MINIO_BROWSER_REDIRECT_URLin Coolify's env UI.- The last official MinIO image has a known security hole: use
coollabsio/minio(or my mirror), notminio/minio:latest. MINIO_BROWSER=offhides the Object Browser: leave it unset.- Console shows "unhealthy": the distroless console image has no shell to run a healthcheck. Disable it, it's fine.
Hardening (optional, 10 minutes)
Stop using root day-to-day
Make a dedicated console user. First, generate a secret key, the original openssl rand trick fails on minimal MinIO images that don't ship openssl:
Console user secret
Generated here in your browser, then dropped straight into the mc admin user add command below, so you never depend on openssl being inside the container. Click for a fresh one anytime.
generating…
Generated in your browser with the Web Crypto API. Nothing leaves this page.
Then run this from the MinIO container's terminal in Coolify. Paste the whole block at once, the shell runs each line in turn:
mc alias set local http://localhost:9000 "$MINIO_ROOT_USER" "$MINIO_ROOT_PASSWORD"
mc admin user add local console "GENERATE_A_KEY_ABOVE"
printf '{"Version":"2012-10-17","Statement":[{"Effect":"Allow","Action":["admin:*"]},{"Effect":"Allow","Action":["s3:*"],"Resource":["arn:aws:s3:::*"]}]}' > /tmp/ca.json
mc admin policy create local consoleAdmin /tmp/ca.json
mc admin policy attach local consoleAdmin --user=console
console is the new user's login (its access key) and the generated value is its secret. The last two lines grant that user full admin rights. Now log in to the console with access key console and that secret, instead of root.
Now that you have storage running on the same Coolify server, you can wire it into the rest of your stack, the same way you'd add PyRunner for scheduled Python jobs next to it.
FAQ
Why did Coolify remove MinIO from its catalog?
MinIO went source-only and stopped publishing official Docker images around October 2025, and the minio/minio repo was archived in April 2026. With no maintained image to point at, Coolify dropped MinIO from its one-click catalog. The server still works fine, which is exactly what this guide gets you running.
Is MinIO still safe to self-host in 2026?
The MinIO server itself still works well. The catch is that the last official image (RELEASE.2025-09-07) ships an unpatched, high-severity security hole (a CVE), and the fix in RELEASE.2025-10-15 was never published as an official image. This guide uses a patched build rebuilt from source, so you run the fixed version.
Why doesn't the MinIO console show users, policies, and access keys anymore?
The community console was stripped down to a plain object browser. The last release with the full console was RELEASE.2025-04-22. To get identity, policies, and access-key management back, you run the OpenMaxIO console, the last full version of that same console, forked by the community.
What is OpenMaxIO?
OpenMaxIO is a community fork of the last full MinIO console. The MinIO console was always a separate program from the server; old MinIO just bundled them. OpenMaxIO keeps that full console alive as a standalone container you point at your MinIO server with CONSOLE_MINIO_SERVER.
Why do I get InvalidAccessKeyId when my access keys are correct?
Because MinIO doesn't know its own public URL. AWS Signature V4 signs each request using the host, and behind a proxy MinIO validates against the wrong host, so it reports a signature mismatch as "access key does not exist." Set MINIO_SERVER_URL and its companion MINIO_BROWSER_REDIRECT_URL to your public domains in Coolify's environment variables, then redeploy.
Do I need the console container to use MinIO?
No. The MinIO server is the only required piece; it stores data and speaks S3. The OpenMaxIO console is an optional admin UI. Run only the server and your apps already have working object storage; add the console when you want a browser to manage buckets, users, and keys.
Can I use a maintained MinIO alternative instead?
Yes. If you'd rather not run a frozen project, cgr.dev/chainguard/minio:latest gives you an ongoing-patched MinIO image you can drop straight into the compose.
How do I test it without writing any code?
Create a short-lived access key in the console, then use any S3 client you already trust. The MinIO mc client can list, copy, and remove objects from your terminal in a couple of commands. The boto3 script above is the most thorough check though, since it also exercises multipart uploads and presigned URLs the way a real app does. Delete the test access key when you're done either way.
What this is part of
This guide gets you a working, patched, fully manageable MinIO. The real work starts after, when object storage is one of several services sharing a single VPS, all of them needing backups, monitoring, and a safe update path.
That's what I cover in Self Hosting 2.0. The full course is 34 lessons that walk through:
- Multi-app resource planning on one VPS (RAM, CPU, disk per service)
- Backups that actually work, including off-site object storage to S3 or MinIO itself
- Security hardening: fail2ban, SSH keys only, 2FA, least-privilege access keys
- Owning your own images and registries so a frozen upstream can't break your stack
🔒 Before you put MinIO in front of real users, lock it down. The defaults above are the floor, not the ceiling. The short list:
- Stop using the root account day-to-day (the dedicated console user above)
- Give each app its own least-privilege access key, not the root credentials
- Run the patched image and subscribe to the Coolify releases feed so you find out about updates
- Back up the
minio-datavolume off-site, on a schedule
I walk through each one with the exact commands and rollback notes in Self Hosting 2.0.
Course
Want the full system?
Related

Get the free Vibe Engineering Blocks guide
The exact building blocks I use to ship real products with AI — yours as a free PDF.
Questions & Discussion
Ask a question about this guide →Have a question? Ask it in the community — it's tagged #guide and linked back here. Reading is open to everyone; posting needs a free account.
Loading questions…