How to Install PyRunner on Coolify (3-Minute Setup)
This is the fastest way to install PyRunner on your own Coolify server. You point Coolify at the PyRunner repo, paste three environment variables, set your domain, and deploy. The volume, port, healthcheck, and SSL are all handled automatically by the pre-tuned compose file.
By the end of this guide you'll have:
- PyRunner running on your own Coolify server
- Your own domain with automatic HTTPS
- A persistent volume that Coolify creates for you (no manual setup)
- One-click updates whenever a new PyRunner version ships
Before you start
You need three things:
- Coolify v4.x running on a server you control. If you don't have it yet, the official Coolify install is one command.
- A server with at least 1 GB RAM (2 GB is more comfortable).
- A domain pointed at your Coolify server (set an
Arecord at your DNS provider). No domain yet? Coolify will give you a freesslip.iosubdomain you can use to start.
That's it. Let's get into it.
Your PyRunner domain (optional)
Drop in the domain or subdomain you'll use for PyRunner. We'll plug it into every copyable block on this page so you can paste with no edits.
Values stay in your browser only. Nothing leaves this page.
Step 1: Generate two secret keys
PyRunner needs two keys before it can start:
SECRET_KEY: Django uses this for sessions and CSRF protection.ENCRYPTION_KEY: This encrypts every secret you store inside PyRunner (API tokens, env vars, anything sensitive).
Use the generators below to create both keys instantly. Everything happens in your browser. The keys never leave this page. Copy them somewhere safe (a password manager works best). You'll paste them into Coolify in a minute.
Click "Generate" to create a new key…
Generated client-side with the Web Crypto API. Nothing is sent to any server.
Click "Generate" to create a new key…
32 random bytes, URL-safe base64. Compatible with Python's cryptography.fernet.Fernet.
⚠ Do not lose the ENCRYPTION_KEY. Every secret you save inside PyRunner is encrypted with this key. If you lose it, those secrets are gone forever. Treat it like a database password.
Step 2: Create the resource in Coolify
Open Coolify and go to Projects → your project → + New → Public Repository.
Fill in:
Repository URL
https://github.com/hassancs91/PyRunner
Branch: main
Click Check Repository.
On the next screen, set:
Build Pack: Docker Compose
Docker Compose Location
/docker-compose.coolify.yml
Click Save.
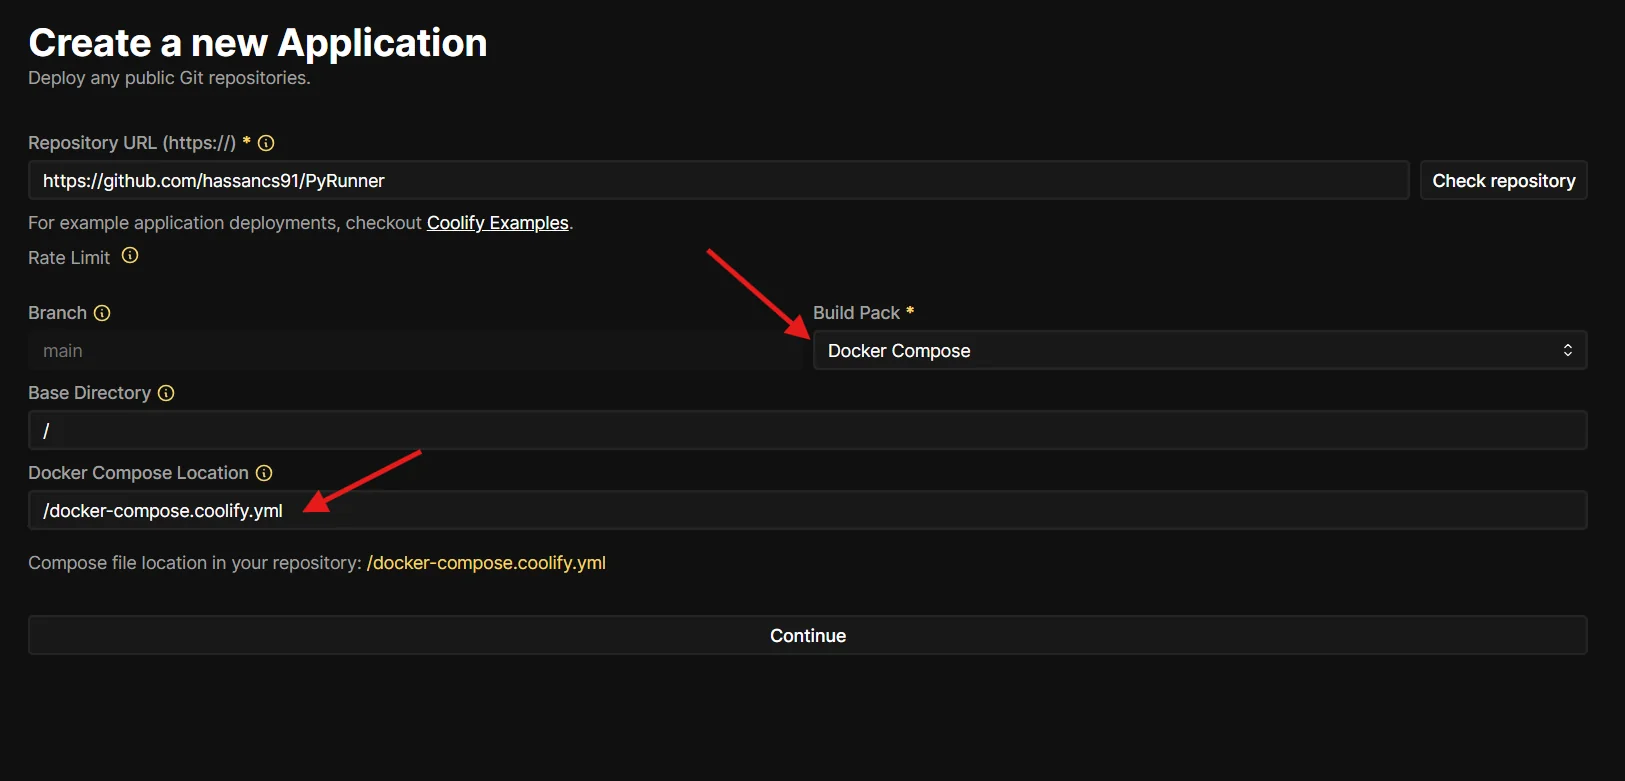
What just happened: Coolify is now reading the pre-tuned compose file from the PyRunner repo. The volume, port, healthcheck, and SSL handling are all already defined in that file. You don't have to configure any of them manually.
Step 3: Set three environment variables
After saving, Coolify takes you straight to the environment variables page.
You'll notice a variable called SERVICE_FQDN_PYRUNNER_8000 already there, auto-populated by Coolify. Leave it alone. That's the variable that wires up your domain to the right container port.
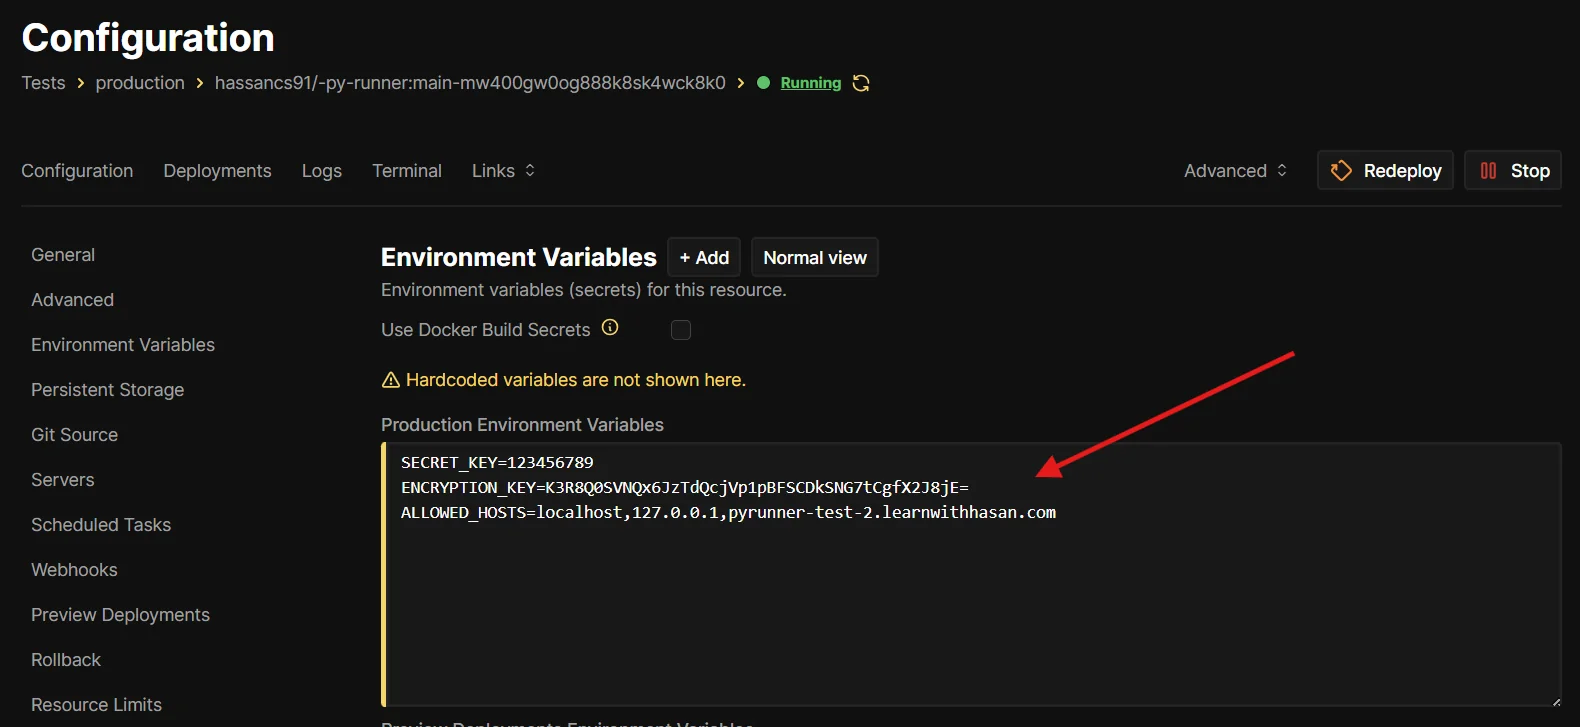
Add these three:
| Key | Value |
|---|---|
SECRET_KEY | (paste from Step 1) |
ENCRYPTION_KEY | (paste from Step 1) |
ALLOWED_HOSTS | localhost,127.0.0.1,pyrunner.example.com (add your real domain to the end) |
Toggle the Secret flag on SECRET_KEY and ENCRYPTION_KEY so they stay masked in the UI and logs.
If your Coolify is in Developer mode (env vars accept a raw .env paste), copy this block and drop it in. Values stay in sync with the keys you generated above and the domain you set at the top:
SECRET_KEY=your-secret-key-here
ENCRYPTION_KEY=your-encryption-key-here
ALLOWED_HOSTS=localhost,127.0.0.1,pyrunner.example.com
.env block as a single paste. That's exactly what the copyable block above gives you.Step 4: Set your domain
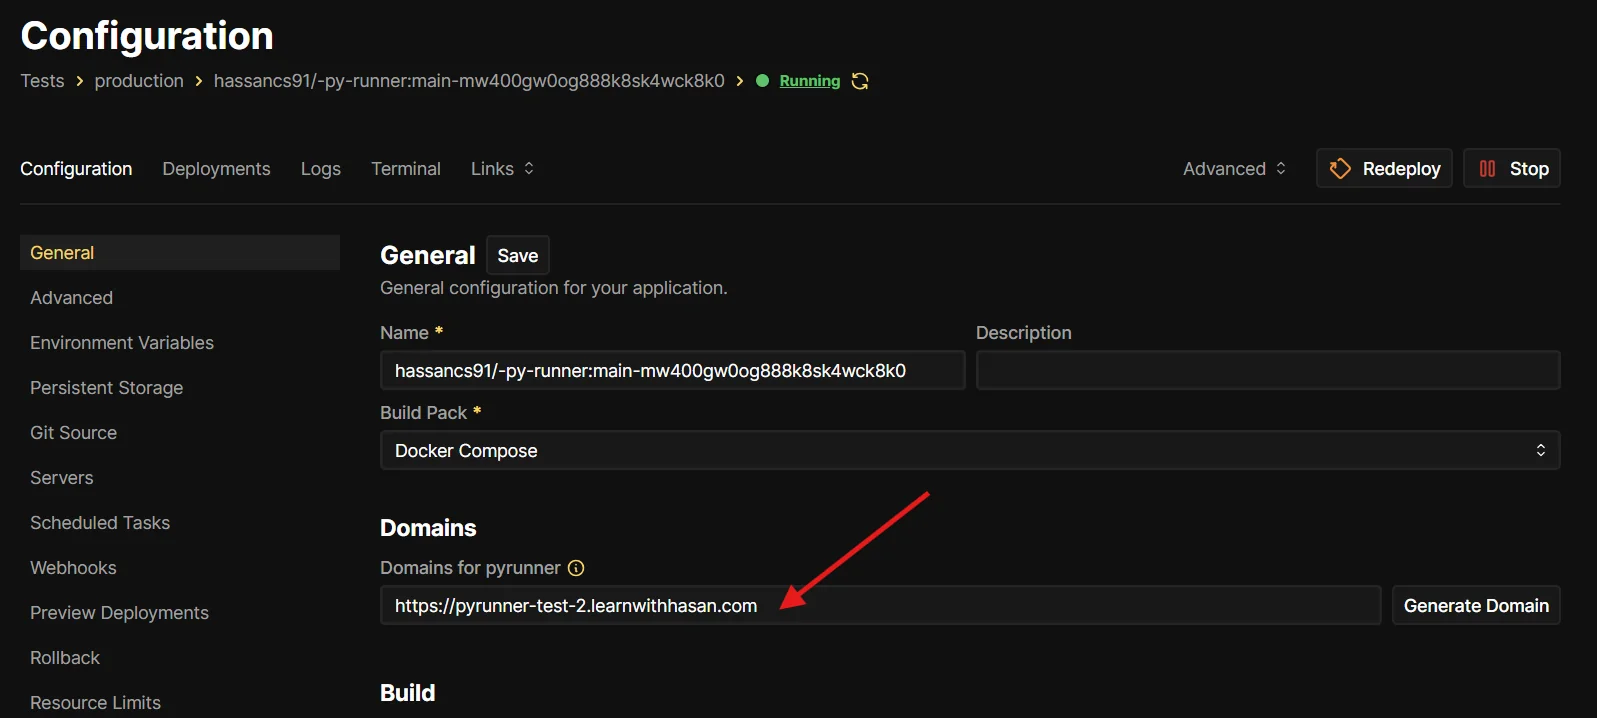
Go back to the main Configuration page for the resource. You'll see a Domains for pyrunner field.
Enter your domain (for example https://pyrunner.example.com) and click Save.
Coolify will automatically request an SSL certificate from Let's Encrypt once you deploy. You don't need to do anything else for HTTPS.
If you don't have a custom domain ready, click Generate Domain and Coolify gives you a free sslip.io URL.
Step 5: Deploy
Click Redeploy (top right).
The first deploy takes about a minute. Coolify pulls the image, creates the volume, and runs the database migrations. Watch the logs:
- You should see
PyRunner is ready!followed by Gunicorn startup messages on port 8000. - If you see
ERROR: SECRET_KEY is requiredorERROR: ENCRYPTION_KEY is required, go back to Step 3 and check your env vars.
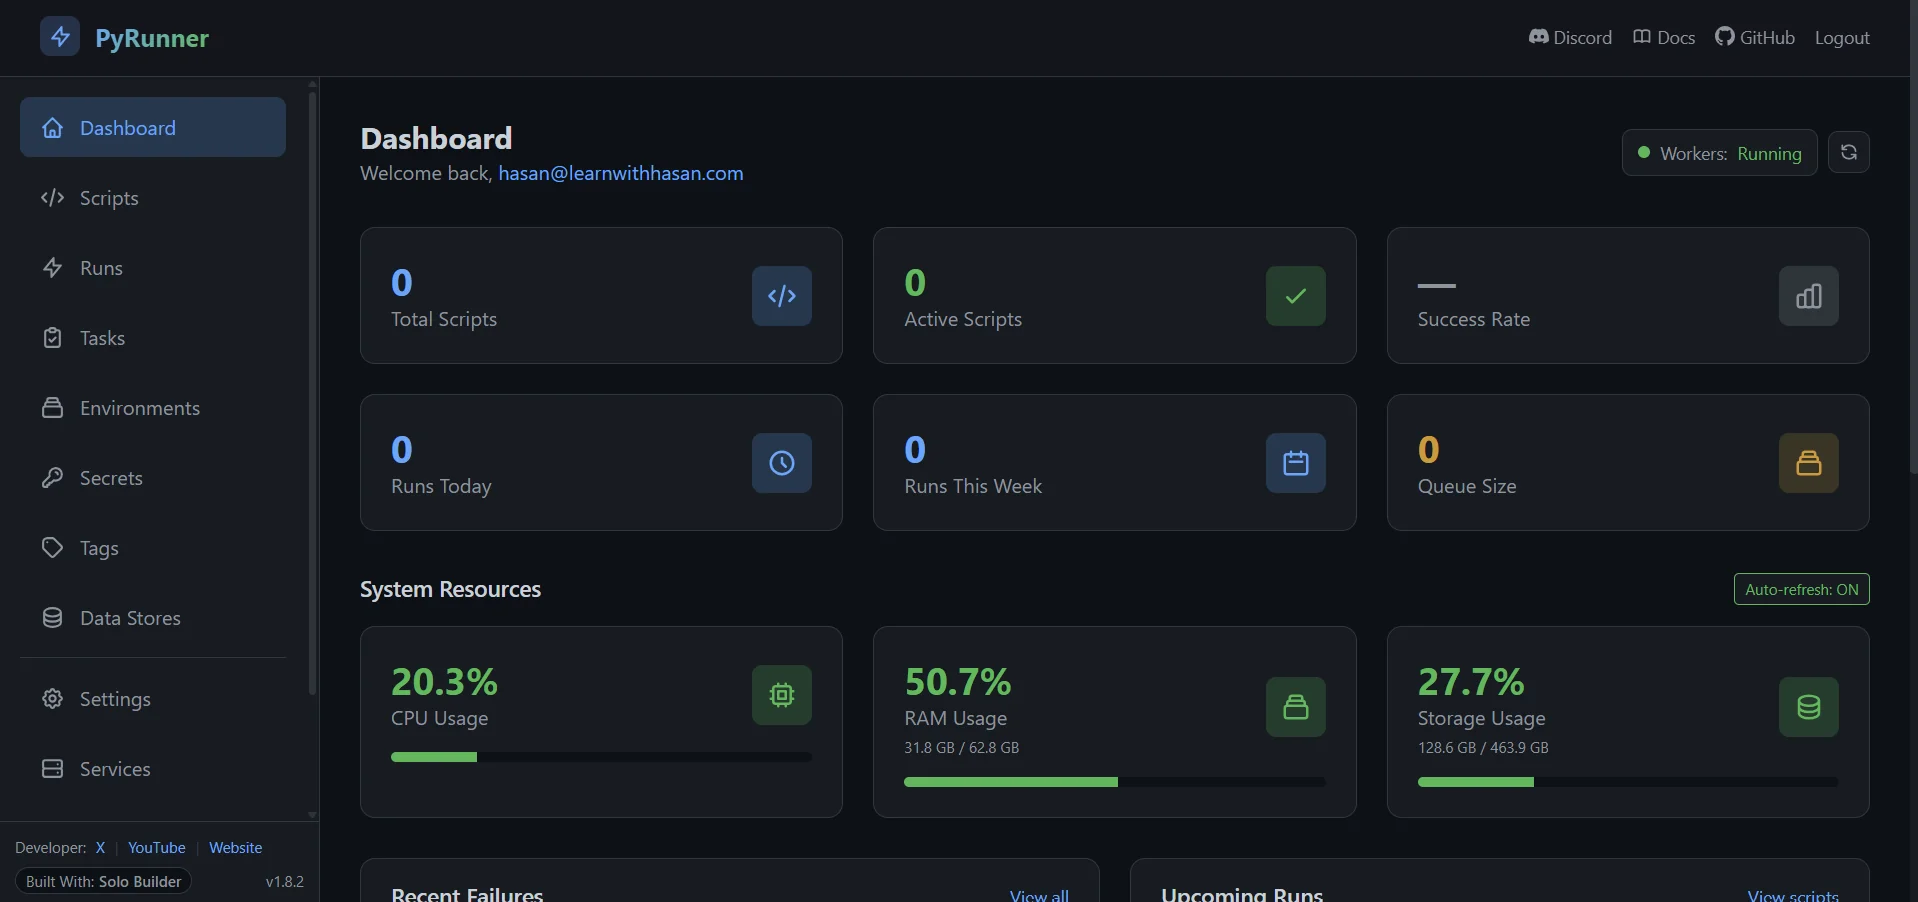
When the healthcheck turns green, open your domain in a browser. PyRunner walks you through a quick first-run setup (pick a username, email, and password for your admin account) and drops you straight onto the dashboard:
That's what I save every month self-hosting my stack instead of paying SaaS for email, hosting, databases, automation, and analytics.
The Self-Hosting Course walks through replacing your SaaS stack piece by piece, with the exact setup for each.
Email setup (do this next)
Your admin account works straight away, but everyone else logs in via passwordless magic links. Without email configured, no one but you can sign in.
Inside the app:
- Go to Settings → Email.
- Pick one:
- Resend (simplest): paste your Resend API key, set the From address, toggle Use Resend on.
- SMTP: fill in your SMTP host, port, username, password, and From address. Works with Mailgun, SendGrid, Postmark, or your own SMTP server.
- Send a test email from the same page to confirm it works.
You're done. PyRunner is running on your own server, on your own domain, with everything persistent.
💡 Want to self-host your whole stack the smart way?
Get the free guide on cutting your cloud bills and owning your infrastructure.
When things go wrong
Here are the issues I see most often:
| Symptom | Fix |
|---|---|
DisallowedHost error in the browser |
Add your domain to ALLOWED_HOSTS (comma-separated), redeploy |
| 502 Bad Gateway right after deploy | Wait 60 seconds. Migrations are still running. The healthcheck has a 60-second grace period |
| "No available server" from Coolify's proxy | The container is running but routing failed. Try restarting the proxy: Settings → Proxy → Restart Proxy |
Container restart loop, log says SECRET_KEY is required |
The env var is missing or empty. Set it and redeploy |
Container restart loop, log says ENCRYPTION_KEY is required |
Generate one (Step 1), set it, redeploy |
| Login emails never arrive | Email is still on the default console backend. Configure SMTP or Resend in Settings → Email |
Issue not on this list? Got a question or a feature idea?
Hop into the PyRunner Discord. That's the fastest way to get help, share what you've built, and shape what ships next.
Like PyRunner? Star the repo.
Drop a star on PyRunner on GitHub. It helps other builders find the project, and signals to me which tools to keep pushing on.
Updating PyRunner
When a new version ships to Docker Hub:
- Open your PyRunner resource in Coolify.
- Click Redeploy with Pull latest image toggled on.
The volume keeps your data safe across redeploys. Migrations run automatically when the new container starts.
What's next
You now have PyRunner running on your own server. Schedule a few Python scripts, store some secrets, see how it feels to run things on infrastructure you actually control.
If you want to go deeper on self-hosting (Coolify setup from scratch, picking the right VPS, backups, self-hosted email, security), that's the full Self Hosting 2.0 course. I built it around the same stack I run my own products on, including PyRunner itself.
Related:
- Self-Hosting Hub: the full self-hosting collection
- PyRunner project page: what PyRunner is and what it can do
- PyRunner on GitHub: source code, releases, issues
Ship it.
Get the free Vibe Engineering Blocks guide
The exact building blocks I use to ship real products with AI — yours as a free PDF.
Questions & Discussion
Ask a question about this guide →Have a question? Ask it in the community — it's tagged #guide and linked back here. Reading is open to everyone; posting needs a free account.
Loading questions…