How to Install Coolify in 2026: Your Starter Guide to Self-Hosting
Coolify is a free, open-source PaaS you install on your own VPS. This guide takes you from a blank Ubuntu server to a running Coolify dashboard with Postgres, Redis, and MongoDB, in about 30 minutes.
- Coolify v4 running on your own VPS at a custom HTTPS domain
- One-click Postgres, Redis, and MongoDB on the same server, wired to your apps
- Locked-down firewall (only ports 22, 80, 443 open)
- A safe update path you can repeat every time Coolify ships a new version
- A working playbook for the four things that go wrong most often
Your Coolify dashboard domain & server IP (optional)
Drop in the domain and IP you'll use for this install. We'll plug them into every copyable block on this page so you can paste with no edits. Values stay in your browser only. Nothing leaves this page.
Values stay in your browser only. Nothing leaves this page.
Why I self-host on Coolify
I've been paying managed cloud bills for years. Then I added it all up. A Vercel hobby project, a managed Postgres on one provider, a managed Redis on another, a MongoDB Atlas free tier slowly creeping into paid territory. Each one looked cheap on its own. Together they were costing me more than a dedicated server with 8GB of RAM.
Coolify fixes that. You install it once on a VPS you own, and you get a clean dashboard for deploying apps from Git, running databases, managing SSL, and watching logs. One server. One bill. All your stuff.
What you actually get with Coolify v4 (stable since 27 April 2026):
- Deploy any app that runs in Docker, no Dockerfile required for most stacks
- One-click Postgres, MySQL, MariaDB, MongoDB, Redis, KeyDB, Dragonfly, ClickHouse
- 280+ one-click services (Ghost, Plausible, Mautic, n8n, Listmonk, and on)
- Automatic SSL via Let's Encrypt (handled by Traefik under the hood)
- Git-based deployments with auto-deploy on push
- Built-in monitoring agent (Sentinel), still flagged experimental, but already useful
It's Apache 2.0 licensed. Free forever to self-host. You only pay for the VPS.
Step 1: Pick a VPS
Coolify's official minimum is 2 CPU cores, 2 GB RAM, and 30 GB of free disk. That's enough to learn on, but Coolify itself eats about 1 GB of RAM before you deploy anything, so for real work you want more headroom.
What I actually recommend for a starter setup:
- 4 vCPU, 8 GB RAM, 100 GB+ NVMe storage
- Ubuntu 24.04 LTS (the install script is happiest here)
- Fresh server, nothing installed
Best VPS for Coolify (4 vCPU / 8 GB starter tier)
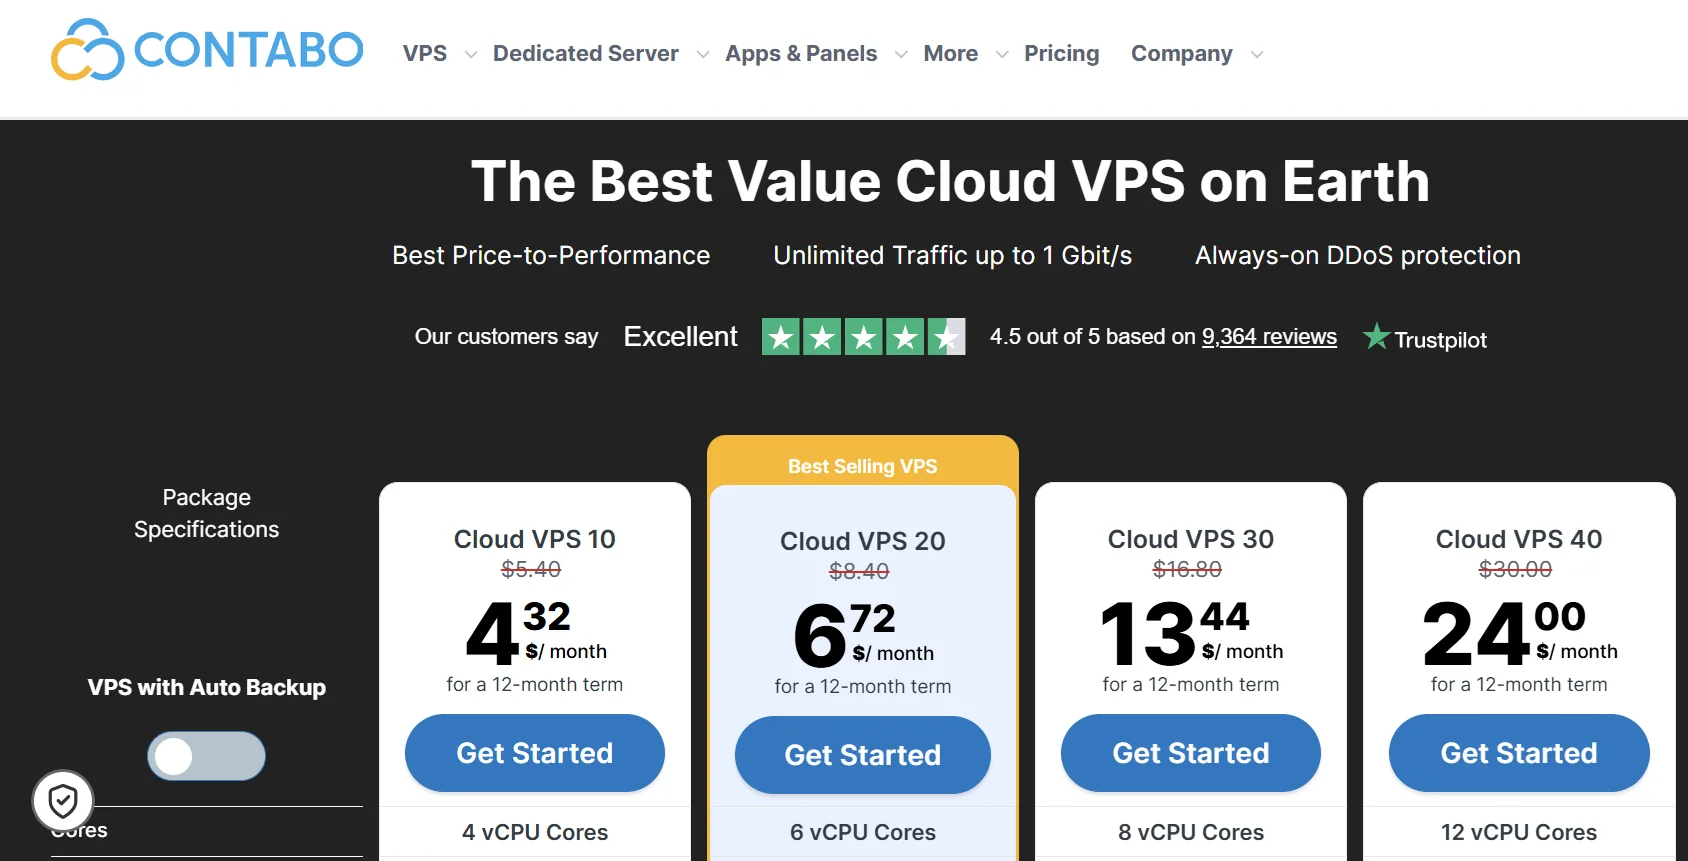
Four providers work well for a Coolify starter, each on its cheapest plan with at least 8 GB of RAM (the comfortable sweet spot for Coolify). All four are solid; the right pick depends on your budget and what you're optimizing for: raw specs per dollar (Contabo), latency in Europe (Hetzner), simple UX with extras (Hostinger), or managed-cloud polish (DigitalOcean).
Install Coolify on Contabo (the option I'm using here)
For this guide I'm using Contabo's Cloud VPS 10. 4 vCPU, 8 GB RAM, 75 GB NVMe, around €4.50/month. It's the cheapest tier with enough RAM to comfortably run Coolify plus a few apps and databases.
Provisioning the server
In the Contabo panel:
- Pick Cloud VPS 10 or larger
- Region: closest to your users
- Image: Ubuntu 24.04
- Skip the paid add-ons unless you need them
- Save the root password somewhere safe (you'll need it in 10 seconds)
Once the server is ready, you'll get an IP address by email.
Step 2: Install Coolify
SSH into your fresh server as root:
ssh root@YOUR_SERVER_IP
Then run one command:
curl -fsSL https://cdn.coollabs.io/coolify/install.sh | bash
That's it. The install script will:
- Install Docker if it's not already there
- Pull the Coolify containers (
coolify,coolify-db,coolify-redis,coolify-proxy) - Set up the
/data/coolifydirectory tree - Generate SSH keys
- Start everything
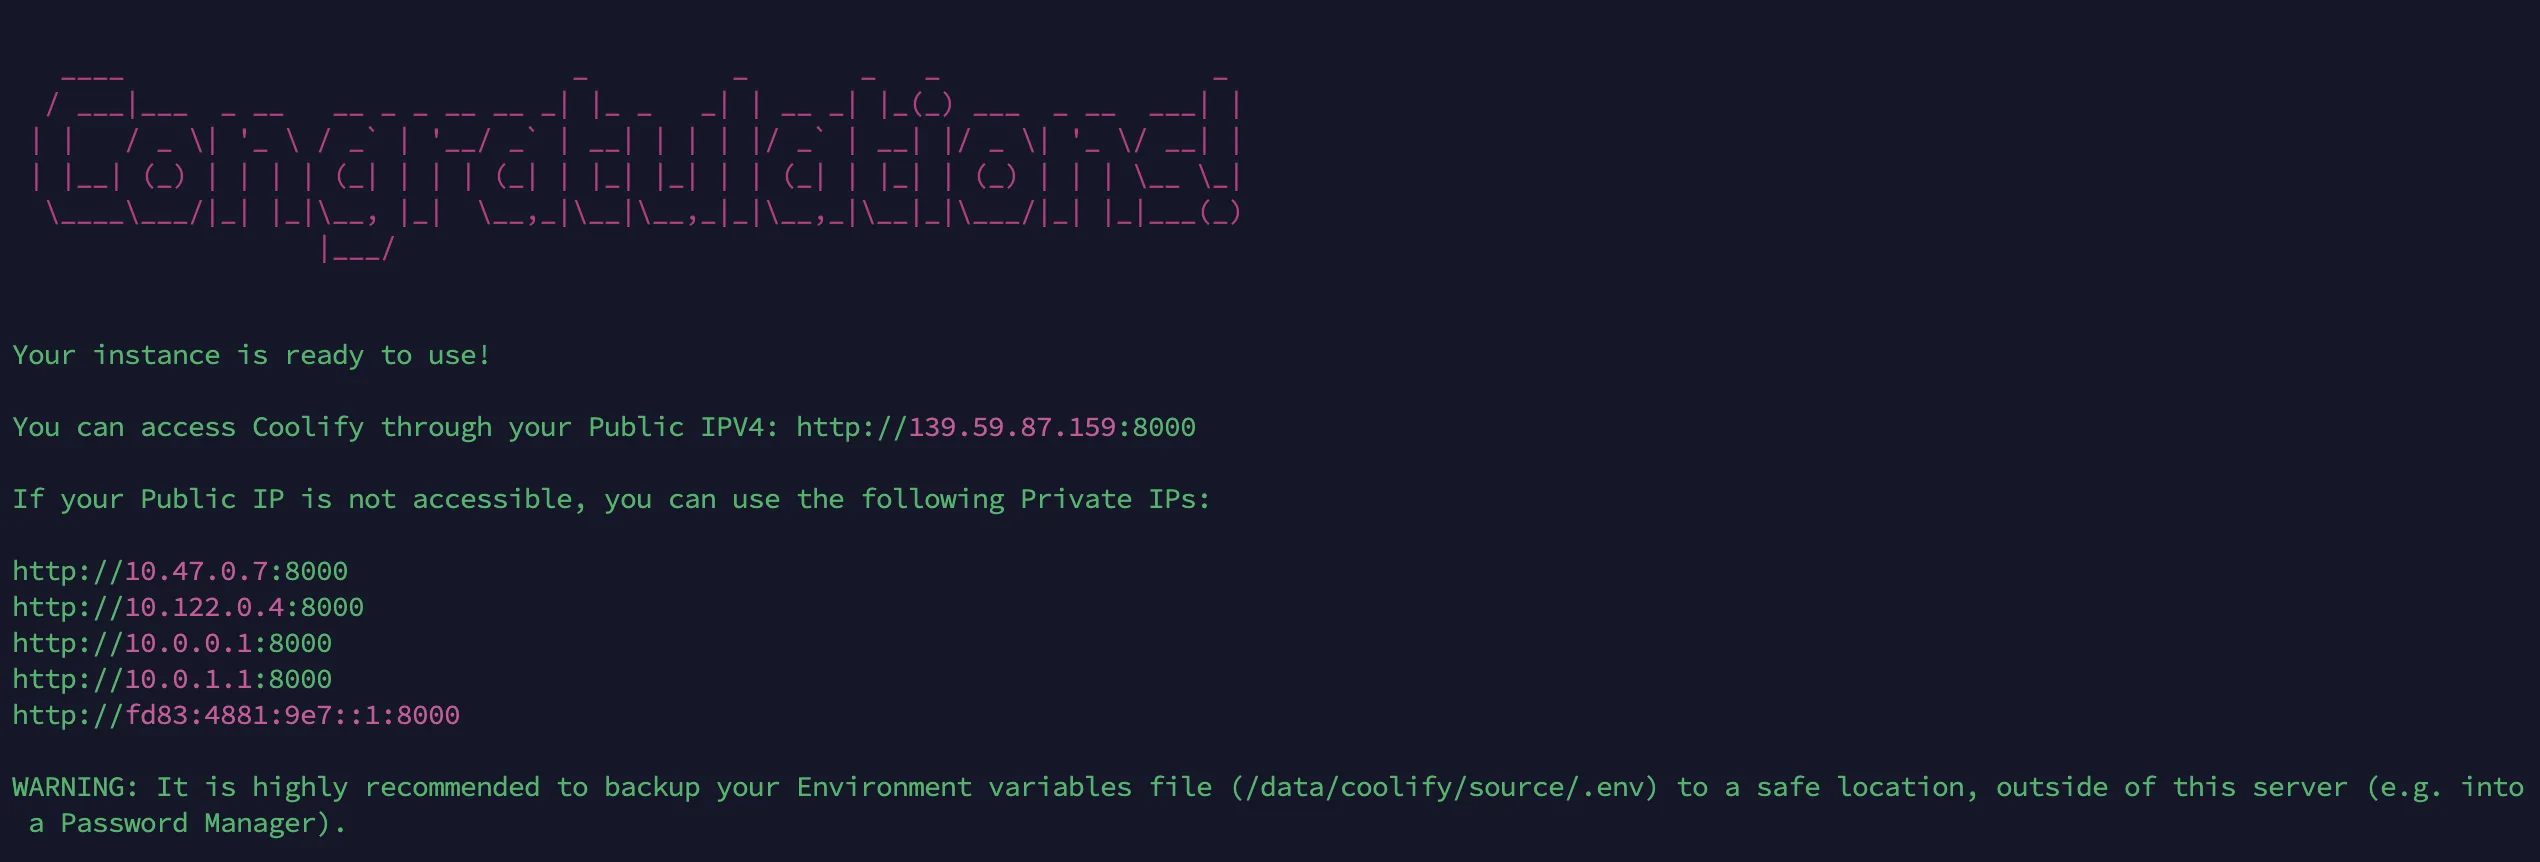
Takes 2 to 5 minutes depending on your server's network speed. You'll see a final message with your dashboard URL:
Coolify is ready!
Your instance: http://YOUR_SERVER_IP:8000
Critical: create your admin account immediately
⚠ Open that URL in your browser right now. Whoever creates the first account becomes the admin. If you wait and someone else hits that page first, they own your server.
Fill in name, email, password. Done.
Coolify will then ask you to:
- Choose localhost as your server (you're deploying to the same machine that runs Coolify)
- Create your first project (call it
starteror whatever)
You're in.
Step 3: Set up a domain with SSL
Accessing Coolify on http://YOUR_SERVER_IP:8000 works, but it's HTTP, no SSL, and you're typing an IP forever. Let's fix that.
In your domain registrar (Namecheap, Cloudflare, GoDaddy, doesn't matter), add an A record:
Type: A
Name: coolify   (or whatever subdomain you want)
Value: YOUR_SERVER_IP
TTL: Auto (or lowest available)
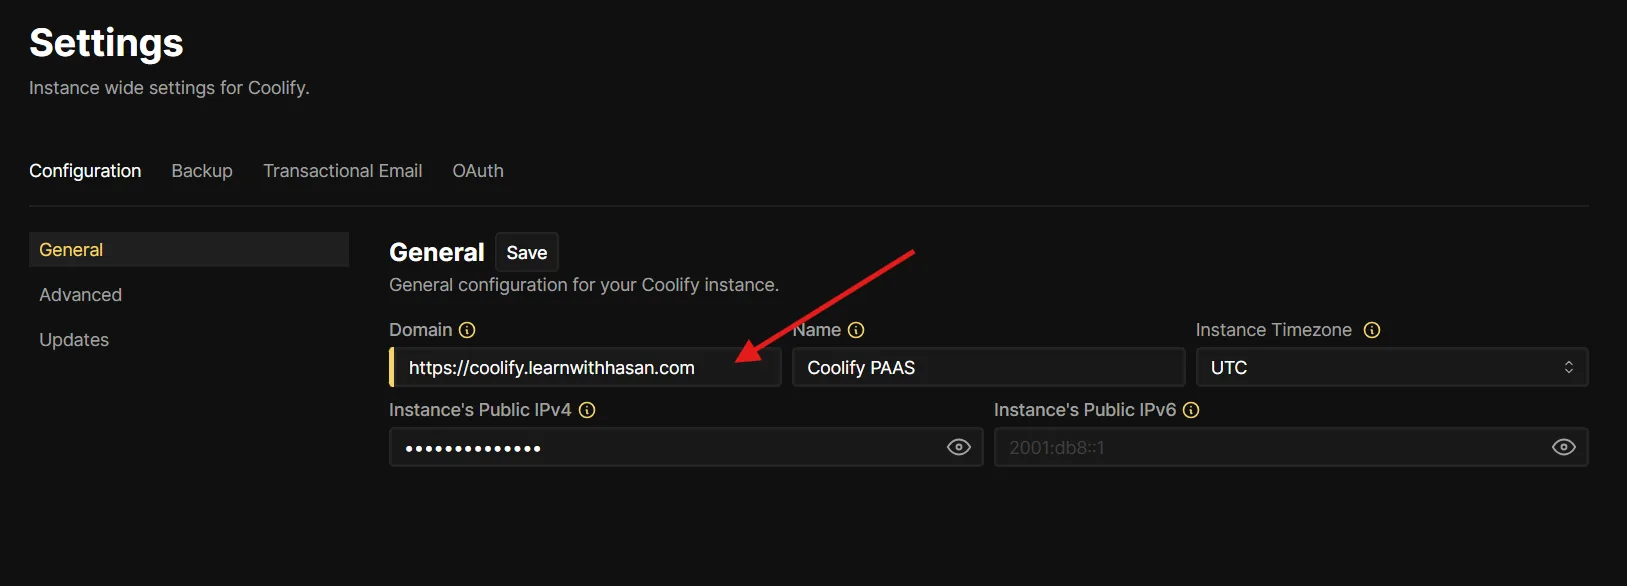
Wait a minute for DNS to propagate. Then in Coolify go to Settings and enter your domain in the Instance Domain field with https:// at the start:
https://coolify.yourdomain.com
Save. Coolify configures Traefik (its built-in reverse proxy), requests a Let's Encrypt cert, and within a minute you'll be able to load the dashboard at your domain with a green padlock.
While you're here, lock down the firewall on the server:
sudo ufw allow 22/tcp    # SSH
sudo ufw allow 80/tcp    # HTTP (Let's Encrypt + redirects)
sudo ufw allow 443/tcp   # HTTPS
sudo ufw enable
Notice I'm not opening port 8000 anymore. Once your custom domain works, you don't need direct IP access. Keep that surface closed.
Step 4: Deploy your first three services (Postgres, Redis, MongoDB)
This is where Coolify earns its keep. Let's spin up PostgreSQL, Redis, and MongoDB. Three clicks each.
PostgreSQL
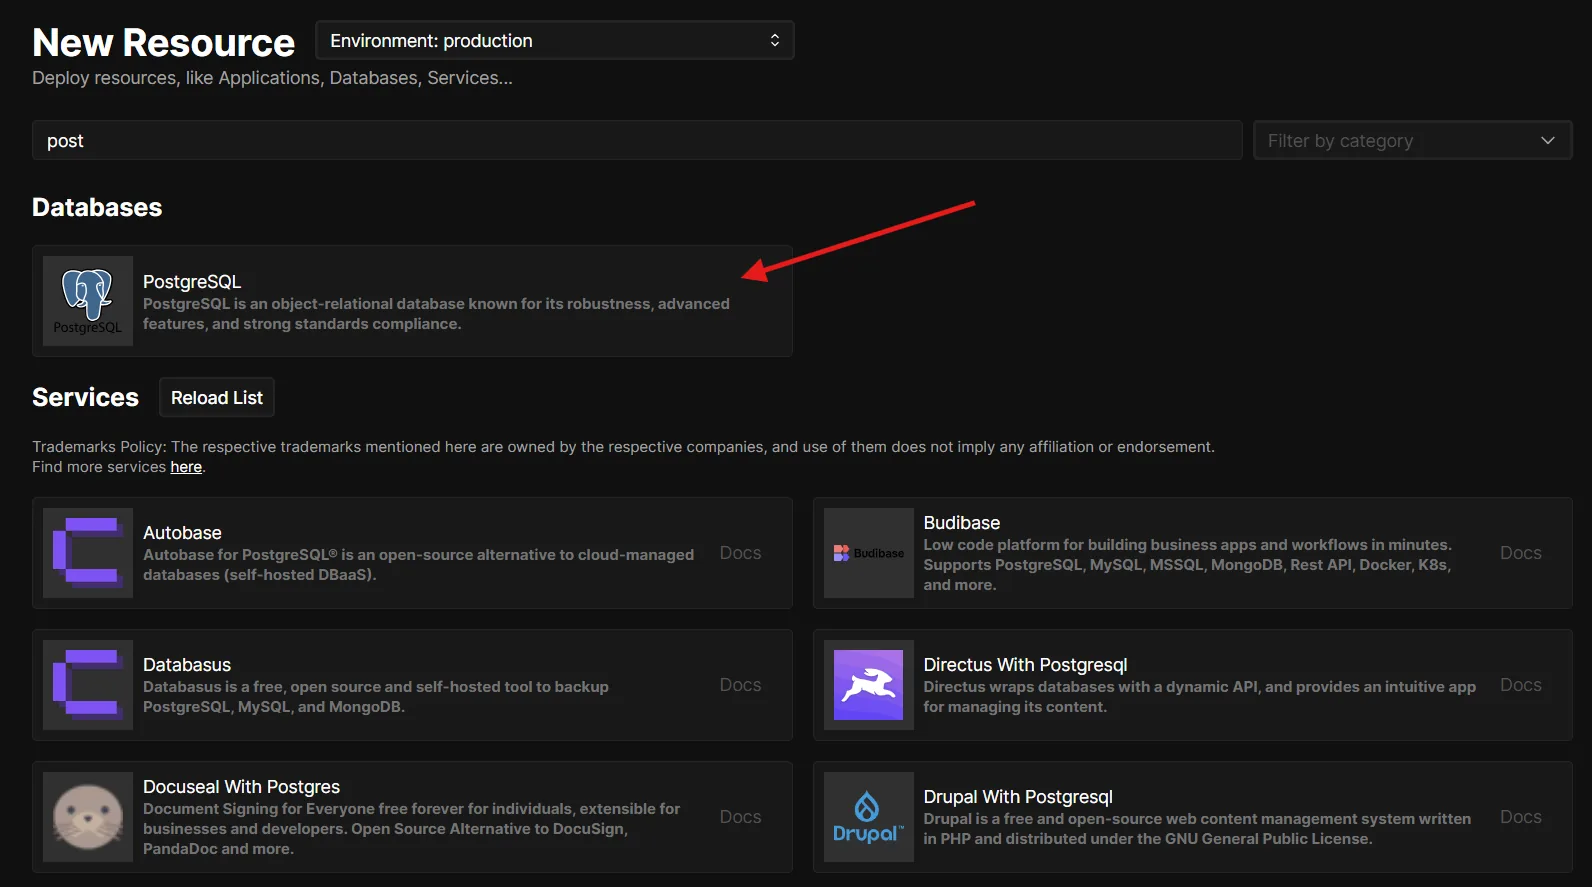
In your project, click + New Resource → Databases → PostgreSQL.
You'll see a config screen with defaults already filled in. The defaults are fine. Click Start at the top right.
About 30 seconds later, you have a running PostgreSQL instance with:
- A persistent volume so your data survives restarts and upgrades
- Auto-generated strong password
- An internal connection string ready to copy
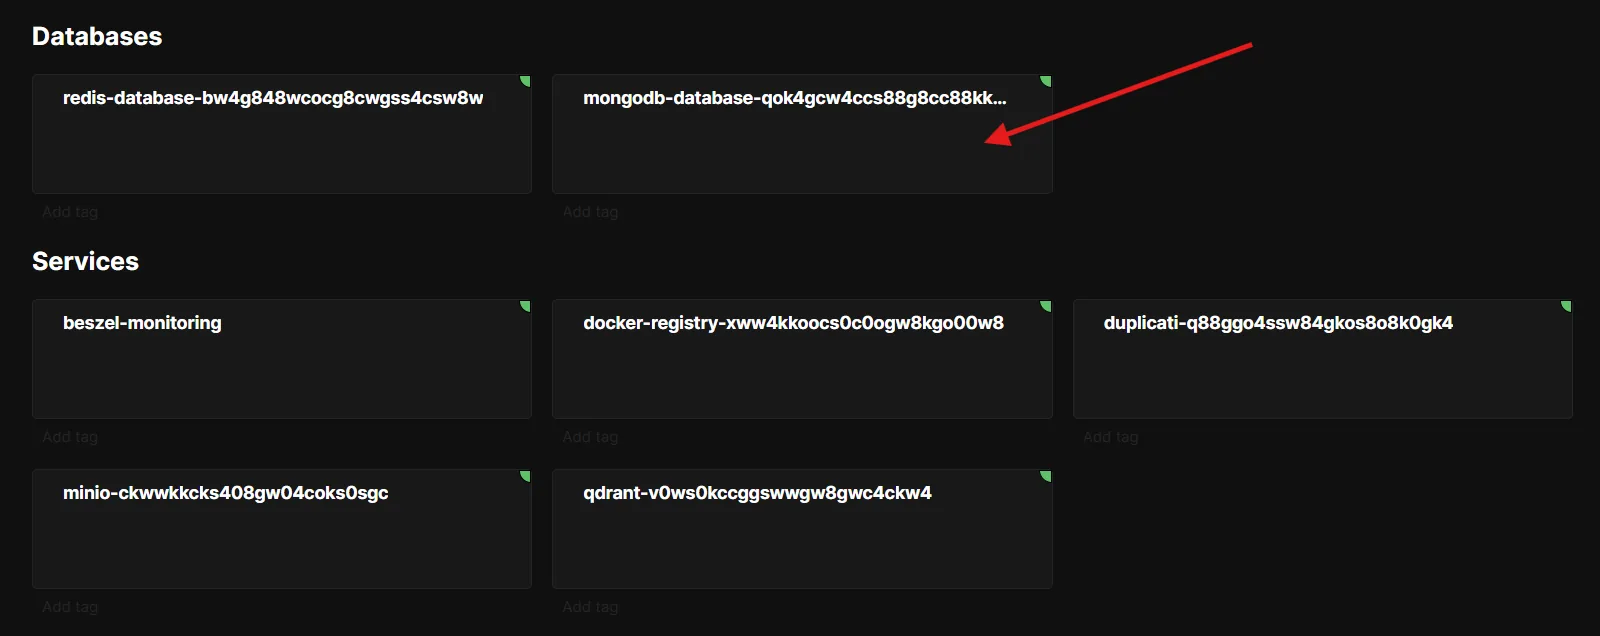
Scroll down. Coolify gives you both an internal and an external connection string. Coolify names each database container <engine>-<COOLIFY_UUID> (no -database suffix, just the engine and the resource UUID), so a real Postgres container ends up looking like postgresql-h0g0g8c00s4w:
# Internal (use this from apps inside Coolify)
postgresql://postgres:GENERATED_PASS@postgresql-h0g0g8c00s4w:5432/postgres

# External (only when you enable Publicly Accessible)
postgresql://postgres:GENERATED_PASS@YOUR_SERVER_IP:MAPPED_PORT/postgres
💡 Always copy the exact string from the Coolify resource page. The host part includes a fresh UUID that you can't guess, and Coolify auto-generates the password, so don't hand-type either one.
Use the internal one whenever your app is also deployed through Coolify on the same server. Traffic stays on the internal Docker network. Faster, more secure, no firewall round-trip.
Only enable Publicly Accessible when you genuinely need to connect from your laptop or an external service. Turn it off when you're done.
Redis
Same flow. + New Resource → Databases → Redis. Click Start.
The connection string Coolify gives you looks like this:
redis://default:GENERATED_PASS@redis-bw4g848wcocg8cwgss4csw8w:6379
⚠ Coolify v4 Redis ships with auth on. The container starts with --requirepass set to an auto-generated password, so the no-auth form redis://host:6379 will fail with NOAUTH Authentication required. Always copy the full string from the resource page.
Done. You now have caching, session storage, and a queue broker. About 15 seconds of work.
MongoDB
Same again. + New Resource → Databases → MongoDB. Click Start.
mongodb://root:GENERATED_PASS@mongodb-qok4gcw4ccs88g8cc88kk:27017
Three databases running on one server. Total time, maybe 90 seconds.
How to connect from your app
When you deploy an application to Coolify (Django, Node, Next.js, whatever), go to its Environment Variables section and paste those internal connection strings as variables:
DATABASE_URL=postgresql://postgres:PASS@postgresql-h0g0g8c00s4w:5432/postgres
REDIS_URL=redis://default:PASS@redis-bw4g848wcocg8cwgss4csw8w:6379
MONGODB_URL=mongodb://root:PASS@mongodb-qok4gcw4ccs88g8cc88kk:27017
Coolify puts all resources in the same project on the same Docker network. Your app finds these databases by container name automatically. No public IP, no exposed port, no firewall rule.
Now that you have Postgres + Redis on the same server, you have everything you need to self-host Mautic on the same Coolify instance, or add PyRunner for scheduled Python jobs.
Step 5: How to update Coolify safely
Coolify updates often. Sometimes weekly. Most of the time updates are smooth. Sometimes they aren't. Here's the safe way.
Always back up first
Before any update, run this on your server:
# Back up the entire Coolify data folder
tar czf /tmp/coolify-backup-$(date +%Y%m%d).tar.gz /data/coolify/

# Especially back up the .env file (contains all secrets)
cp /data/coolify/source/.env /tmp/coolify-env-$(date +%Y%m%d).backup
Then download both files to your local machine (or your password manager). If anything breaks, you can restore.
You should also enable Coolify's built-in scheduled backups. Go to Settings → Backup and turn on daily backups. For extra safety, configure an S3 destination. Cloudflare R2's free tier includes 10 GB-month of Standard storage, which is plenty for Coolify snapshots.
📊 While you're in Settings, enable Sentinel. Sentinel is Coolify's built-in monitoring agent. It collects per-container and host-level CPU, RAM, and disk metrics, exposes them at :8888, and feeds the dashboard plus automatic Docker cleanup triggers. The docs still flag it as experimental, so don't depend on it for production alerting, but it's a useful free signal for catching a container chewing through RAM.
Three ways to update
- Auto-update (in Settings → Auto Update). Coolify updates itself when a new stable hits the CDN. Easiest, riskiest if you're running production.
- Semi-auto. Auto-update off. When a new version is available you'll see an Upgrade button in the sidebar. Click it when you're ready, after backing up.
- Manual. Re-run the install script with a specific version:
curl -fsSL https://cdn.coollabs.io/coolify/install.sh | bash -s 4.0.0
I'd recommend semi-auto for most setups. You get notified but you choose when. Always back up. Always.
Moving from beta to v4.0.0 stable
This one matters right now. Coolify v4.0.0 shipped on 27 April 2026 after about two years in beta. If you've been on v4.0.0-beta.X for a long time (I was on beta for over a year), this is the path I'd take.
The good news: it's a normal version upgrade, not a fresh install. The architecture didn't change. All your existing apps, databases, environment variables, SSH keys, and project settings stay exactly where they are. You're moving from v4.0.0-beta.474 to v4.0.0, not from one major version to another.
Here's the order I'd follow:
1. Back up everything first. Same commands as above. Do not skip this. I'll repeat the commands so you have them in front of you:
tar czf /tmp/coolify-backup-$(date +%Y%m%d).tar.gz /data/coolify/
cp /data/coolify/source/.env /tmp/coolify-env-$(date +%Y%m%d).backup
Download both off the server. Password manager, S3, your laptop, wherever. Anywhere except only on the server you're about to update.
2. Use the dashboard Upgrade button if it shows v4.0.0. Go to your Coolify dashboard. If the CDN has caught up for your instance, you'll see an Upgrade button in the sidebar with v4.0.0 as the target. Click it. Wait. Most of the time this just works.
3. If the dashboard upgrade hangs or doesn't see v4.0.0, do it manually. A known annoyance is that the in-dashboard upgrade sometimes gets stuck on "Waiting for the update process" with no progress. If you hit that, SSH in and run the install script pinned to the stable version:
curl -fsSL https://cdn.coollabs.io/coolify/install.sh | bash -s 4.0.0
That forces the upgrade to v4.0.0 specifically. It takes 2 to 5 minutes. You'll see the same install output you saw on the first install, except now it's updating in place.
4. Verify after the upgrade. Once it finishes, refresh the dashboard. Check the version in the bottom-left corner. It should say 4.0.0. Then check that your existing services still work:
docker ps --format "table \t"
All your coolify, coolify-db, coolify-redis, coolify-proxy, and application containers should be running and healthy. Open one of your deployed sites in a browser to confirm it actually loads.
5. If something broke, restore from backup. This is exactly why we took the backup. Don't try to downgrade from the dashboard. Coolify doesn't officially support downgrades because database migrations are one-way. Instead:
# Stop Coolify
cd /data/coolify/source
docker compose --env-file .env -f docker-compose.yml -f docker-compose.prod.yml down

# Restore the data folder from backup
sudo rm -rf /data/coolify
sudo tar xzf /tmp/coolify-backup-YYYYMMDD.tar.gz -C /

# Reinstall the exact beta version you were on before
curl -fsSL https://cdn.coollabs.io/coolify/install.sh | bash -s 4.0.0-beta.474
Replace 4.0.0-beta.474 with whatever version you were running before. Your data is back, your services come up where you left them.
In practice, most people go from beta to v4.0.0 stable without issues. The backup is there for the small percentage where something weird happens (usually an edge case with a custom service config). Take the 30 seconds to back up. You'll never regret it.
Step 6: Common problems you will hit (and how to fix them)
I've installed Coolify on enough servers that I know which problems show up. Here are the four most common ones, reframed as the actual questions people search for.
Why does my Coolify app show "No Available Server"?
Traefik (Coolify's proxy) can't find a healthy container to route to.
Fixes in order:
- Open the application in Coolify, check the Logs tab. Look for crash messages, database connection errors, missing env vars. Most of the time it's one of these.
- Go to Health Checks in the app settings. If your app doesn't have a health endpoint, disable health checks here. Failing health checks make Traefik unmark the container as routable.
- Check the Port Exposes field matches the port your app actually listens on. Express defaults to 3000, Django to 8000, Next.js to 3000. Get this right.
- Make sure your app listens on
0.0.0.0, not127.0.0.1. The proxy can't reach a container that only accepts localhost connections.
Why is my Coolify dashboard suddenly unreachable?
You hit your domain, nothing loads.
First check what's actually broken:
ssh root@YOUR_SERVER_IP
docker ps --format "table \t"
You're looking for the coolify, coolify-db, coolify-redis, and coolify-proxy containers. Statuses should be Up X minutes (healthy).
If one shows (unhealthy), restart it:
docker restart coolify-redis
docker restart coolify
If the dashboard works at http://YOUR_SERVER_IP:8000 but not your custom domain, the proxy is the problem. Restart the proxy from the Coolify dashboard (Servers → your server → Proxy → Restart) or via terminal:
docker restart coolify-proxy
Why won't my Let's Encrypt SSL certificate generate?
Let's Encrypt fails. Your site shows a self-signed cert warning.
Check:
- Port 80 is open on your firewall and your cloud provider's networking rules. Let's Encrypt validates over port 80 by default.
- DNS actually points to your server. Run
dig coolify.yourdomain.comfrom your laptop. It should return your server's IP. - Cloudflare proxy is OFF (the orange cloud is grey). When the proxy is on, Cloudflare intercepts the validation. If you want to keep Cloudflare proxying, set Cloudflare's SSL/TLS mode to Full (strict) in their dashboard.
- If you see a 429 in the proxy logs, you've been rate-limited by Let's Encrypt. Wait a few hours and try again with the proxy restart button.
Why does one site work but another is down on Coolify?
Common cause: the website's container is healthy but its domain isn't routing. Two things to check:
- In the app's Domains field, did you include
https://at the start? Coolify uses this prefix to decide whether to issue SSL. - If you're using a
wwwand non-wwwversion, add both in the same field, comma-separated:https://example.com,https://www.example.com
That's it for the four big ones. For everything else, Coolify's troubleshooting docs are actually good. Read them.
FAQ
Is Coolify free?
Yes. Coolify is Apache 2.0 licensed and free forever to self-host. You only pay for the VPS you run it on. There's also an optional paid cloud offering if you don't want to manage the server yourself.
How much RAM does Coolify need?
Coolify's official minimum is 2 CPU cores, 2 GB RAM, and 30 GB of free disk. For real workloads with a few apps and databases, 4 vCPU / 8 GB RAM / 100 GB NVMe is the comfortable sweet spot. Coolify itself eats about 1 GB of RAM before you deploy anything, so the 2 GB minimum leaves almost no headroom.
Can I use Coolify without a domain?
Yes. Coolify can generate a free sslip.io subdomain that resolves to your server's IP, with automatic SSL. It's fine for development, internal tools, or a first install. You can switch to your own domain later without re-deploying anything.
Does Coolify support Docker Compose?
Yes. Docker Compose is a first-class build pack. You can point Coolify at a Git repo containing a docker-compose.yml and it will deploy every service in it, with the same domain, env vars, and SSL handling as a single-container app. This is how guides like self-hosting Mautic on Coolify work.
How do I back up Coolify?
Back up the /data/coolify/ directory and the /data/coolify/source/.env file (the .env holds all your encryption secrets, and without it, restoring is painful). Coolify also has built-in scheduled backups under Settings → Backup, with an optional S3 destination. Cloudflare R2's 10 GB-month free tier is more than enough for Coolify snapshots.
What's the difference between Coolify and Vercel or Heroku?
Coolify is a self-hosted alternative. You install it on a VPS you own, so there's no per-seat or per-deployment pricing, just the cost of the server. The deploy-from-Git experience is similar, but you control the infrastructure end-to-end. The trade-off is you do the ops (backups, monitoring, updates) yourself.
What this is part of
This guide gets you running. The real work starts after, when you're hosting four apps, three databases, and an email service on the same VPS without anything stepping on anything else.
That's what I cover in Self Hosting 2.0. The full course is 34 lessons that walk through:
- Multi-app resource planning (RAM, CPU, disk per service)
- Self-hosting your own email infrastructure (Postal, Listmonk, Mautic)
- Backups that actually work, including off-site to S3
- Security hardening: fail2ban, SSH keys only, 2FA on Coolify
- Going from a single VPS to multi-server when you need to scale
🔒 Before you put Coolify in front of real users, lock it down. The UFW rules in Step 3 are the floor, not the ceiling. The short list:
- Disable password SSH login (key auth only): edit
/etc/ssh/sshd_config - Install
fail2banto throttle brute-force attempts - Enable 2FA on your Coolify admin account (Profile → Two-Factor)
- Set up automated off-site backups (Settings → Backup → S3 destination)
- Subscribe to the Coolify releases feed so you find out about security patches
I walk through each one with the exact commands and rollback notes in Self Hosting 2.0.
🚀 Want the full system?
The course is here: Self Hosting 2.0 →
If you just want to keep learning the free way, here's what to do next.
Related
- 📚 Self Hosting Hub — every self-hosting tutorial on the site
- 📥 Self-Host Postal SMTP — ship a production-ready Postal install in ~30 minutes
- 🚀 Install PyRunner on Coolify — deploy PyRunner on your own Coolify server in 3 minutes
- 📧 Install Mautic 7 on Coolify — working docker-compose for Mautic since the one-click got pulled
Ship it.
Get the free Vibe Engineering Blocks guide
The exact building blocks I use to ship real products with AI — yours as a free PDF.
Questions & Discussion
Ask a question about this guide →Have a question? Ask it in the community — it's tagged #guide and linked back here. Reading is open to everyone; posting needs a free account.
Loading questions…