Claude Code Guide
A practical, copy-paste reference for everything in Claude Code — setup, commands, hooks, skills, subagents, agent teams, plugins, MCP, the Agent SDK, and the workflows that actually work. Verified against the official Anthropic docs. Built for developers who want to ship, not read tutorials.
Getting Started
Up and running in under 60 seconds.
Claude Code is an agentic coding tool that lives in your terminal. It can edit files, run commands, search your codebase, and interact with git — all through natural language.
Install on macOS, Linux, or WSL
curl -fsSL https://claude.ai/install.sh | bashInstall on Windows
irm https://claude.ai/install.ps1 | iexcurl -fsSL https://claude.ai/install.cmd -o install.cmd && install.cmd && del install.cmdwinget install Anthropic.ClaudeCodeInstall ↗ Git for Windows so Claude Code can use the Bash tool. Without it, Claude Code falls back to PowerShell.
Install via Homebrew (macOS / Linux)
# Stable channel (~1 week behind, skips bad releases)
brew install --cask claude-code

# Latest channel
brew install --cask claude-code@latest
First launch
Open any project directory and run claude. You'll be prompted to log in on first use. Switch accounts later with /login.
cd your-project
claude--dangerously-skip-permissions,
but a better option is Auto mode — an AI classifier decides what's safe.
Cycle to it with Shift + Tab. Or pass --permission-mode auto at launch.
Run Claude Code in VS Code
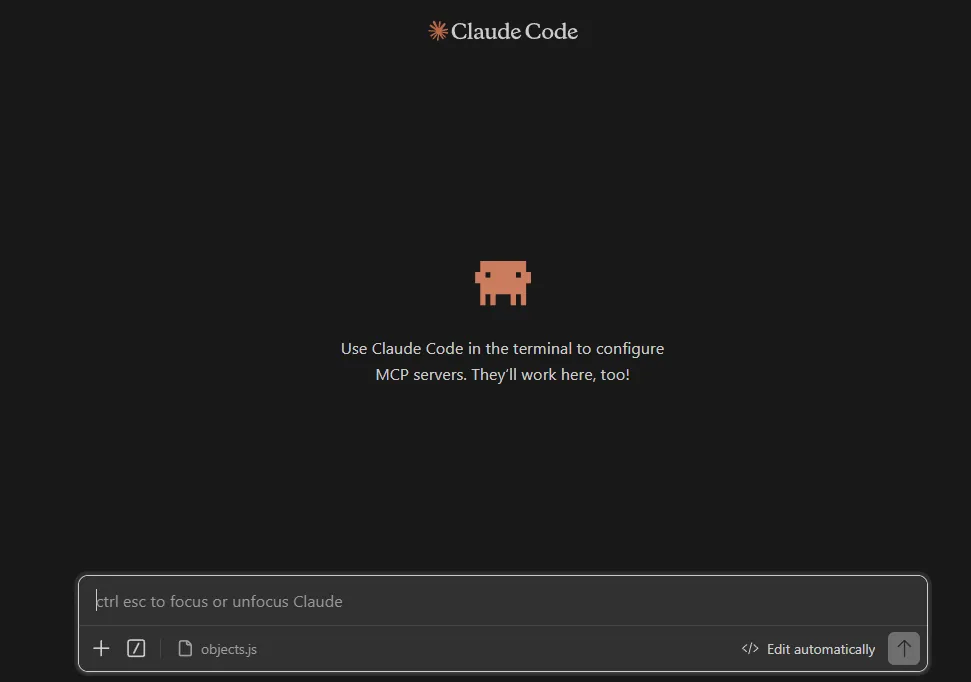
You can also run Claude Code directly inside VS Code, JetBrains IDEs, and Cursor. Install the Claude Code extension from the VS Code marketplace, and it will appear as an integrated panel in your editor. Same machinery, just rendered inside the IDE.
Other useful launch flags
| Command | What it does |
|---|---|
claude "task" | Run a one-time task and stay in the session |
claude -p "query" | One-off headless query, exit when done |
claude -c | Continue the most recent conversation in the current directory |
claude -r | Resume any previous conversation interactively |
claude agents | Open Agent View (background sessions panel, research preview) |
claude agents --json | List live sessions as JSON for scripts and status bars |
Keyboard Shortcuts
The shortcuts worth memorizing.
/ at the start of an empty prompt to see every command and skill available in your setup, including custom, plugin, and MCP-provided ones. Press ? any time for the shortcut cheat sheet on your platform.
Permissions
Control exactly what Claude Code can and can't do.
Claude Code uses a tiered permission system: read-only tools (file reads, grep) need no approval, bash commands require approval per project, and file modifications require approval per session. Rules are evaluated in order: deny → ask → allow. Deny always wins.
Where to configure
Permissions live in settings.json at two levels:
.claude/settings.json
Checked into git. Shared with your team.
~/.claude/settings.json
Applies to all your projects.
Permission Modes
Set defaultMode in your settings to change how Claude asks for approval:
| Mode | Behavior |
|---|---|
default | Standard behavior — prompts on first use of each tool |
acceptEdits | Auto-accepts file edits and common filesystem commands (mkdir, touch, mv, cp) inside the working directory |
plan | Read-only — Claude can analyze with reads + read-only shell commands but cannot edit source files |
auto | Auto-approves tool calls with background safety checks. Research preview |
dontAsk | New. Auto-denies tools unless pre-approved via /permissions or permissions.allow |
bypassPermissions | Skips all prompts. Root and home directory removals (rm -rf /, rm -rf ~) still prompt as a circuit breaker. Use only in containers/VMs |
Example 1: Minimal — auto-approve reads only
Good starting point. Claude can read your code freely but still asks before running commands or editing files.
{
  "permissions": {
    "allow": [
      "Read",
      "Grep",
      "Glob"
    ]
  }
}
Example 2: Solo developer — trust most tools
For personal projects where you want minimal interruption. Put this in your global settings.
{
  "permissions": {
    "allow": [
      "Bash(npm *)",
      "Bash(git *)",
      "Read",
      "Edit",
      "Grep",
      "Glob",
      "WebFetch",
      "WebSearch",
      "mcp__*"
    ]
  }
}
Example 3: Team project — allow builds, block danger
Allow common dev commands but explicitly block destructive ones. Great for shared repos.
{
  "permissions": {
    "allow": [
      "Bash(npm run *)",
      "Bash(git commit *)",
      "Read",
      "Grep",
      "Glob"
    ],
    "deny": [
      "Bash(git push *)",
      "Bash(rm -rf *)"
    ]
  }
}--permission-mode auto or
cycle to it with Shift + Tab.
Commands
Every built-in command and when to reach for it.
| Command | What it does | When to use it |
|---|---|---|
/init | Initialize project with a CLAUDE.md guide | First time in a project |
/compact | Compact conversation with optional focus instructions | Context usage exceeds 80% |
/clear | Wipe context, start fresh | Switching tasks |
/diff | Interactive diff viewer for uncommitted changes | Before committing |
/model | Switch between Opus / Sonnet / Haiku | Match model to task complexity |
/effort | Set effort level (low/medium/high/xhigh/max) | Balance speed vs. thoroughness |
/plan | Enter plan mode — read-only exploration before coding | Starting a complex task |
/resume | Pick up a previous session | Returning to unfinished work |
/branch | Branch the conversation at this point | "What if" experiments |
/rewind | Rewind conversation and/or code to a previous point | Undo Claude's changes |
/memory | Manage auto-saved context and CLAUDE.md | Persist info between sessions |
/context | Visualize current context usage as a grid | Check how much context is used |
/cost | Show token usage statistics | Check spending |
/usage | New. Per-category breakdown (skills, subagents, plugins, per-MCP-server) | Find what's driving your usage limits |
/goal | New (v2.1.139+). Set a completion condition; Claude works autonomously until met. /goal clear stops | Long-running autonomous work |
/plugin | Open the plugin manager (Discover / Browse / Manage) | Installing or managing plugins |
/agents | Panel with a Running tab (live subagents) and Library tab (definitions) | Managing subagents in the current session |
/tasks | List background items in the current session | Tracking work running in the background |
/background | Detach the whole session to keep running as a background agent | Free your terminal while a long task runs |
/mcp | View and manage MCP server connections | Adding or troubleshooting MCP servers |
/config | Open settings (theme, model, preferences) | Customizing Claude Code |
/permissions | View and manage permission rules | Reviewing what's allowed |
/doctor | Diagnose installation and settings | Something isn't working |
/btw | Quick side question without polluting context | Need a fast answer mid-task |
/export | Export conversation as plain text | Save or share a session |
/login | Switch accounts or re-authenticate | Multiple Anthropic accounts |
/ in your session to see which commands are available to you.
Bundled Skills
These ship with Claude Code — no installation needed. Bundled skills are prompt-based: they give Claude detailed instructions and let it orchestrate the work using its tools. Invoke them with / followed by the skill name.
/code-reviewStructured code review of changes/batchParallel work across worktrees/debugStructured debugging workflow/loopRepeat prompt on an interval (or self-paced)/claude-apiAPI-focused work — auto-loads on anthropic SDK import/runv2.1.145+. Launch and drive your app/verifyv2.1.145+. Build + run to confirm a change works/run-skill-generatorv2.1.145+. Record the launch recipe/init, /review, and /security-review are built-in commands that are also accessible through the Skill tool — so they look like skills but aren't bundled skills proper.
Custom Commands
Create your own slash commands with plain markdown files.
Custom commands are markdown files that become slash commands. Save them as skills (recommended) or in the legacy commands folder:
.claude/skills/name/SKILL.md
Shared with your team via git.
~/.claude/skills/name/SKILL.md
Available in all your projects.
.claude/commands/ still work,
but .claude/skills/ is now the recommended path. Skills add optional features like
YAML frontmatter, auto-triggering, and bundled scripts.
Use $ARGUMENTS in your skill to accept input when invoked.
Review the changes on the current branch compared to main.

Focus on:
1. Logic errors and edge cases
2. Security issues
3. Performance concerns
4. Missing error handling

Reference file names and line numbers.
Show the diff summary first.Write tests for $ARGUMENTS
Cover:
- Happy path
- Empty / null input
- Error cases
- Edge cases
Use the existing test framework. Run tests after writing them.Refactor $ARGUMENTS to be cleaner and more maintainable.
Rules:
- Keep the same behavior (no feature changes)
- Improve naming and readability
- Extract repeated logic into functions
- Add type hints if missing
- Run tests after to confirm nothing brokeHooks
Automated actions that run at specific points in Claude Code's lifecycle.
Hooks are shell commands, HTTP calls, or LLM prompts that execute automatically at specific lifecycle points.
Add them to .claude/settings.json (project) or ~/.claude/settings.json (global).
Hook commands receive JSON on stdin with tool details.
SessionStart, Setup, UserPromptSubmit, UserPromptExpansion, PreToolUse, PermissionRequest, PermissionDenied, PostToolUse, PostToolUseFailure, PostToolBatch, Notification, SubagentStart, SubagentStop, TaskCreated, TaskCompleted, Stop, StopFailure, TeammateIdle, InstructionsLoaded, ConfigChange, CwdChanged, FileChanged, WorktreeCreate, WorktreeRemove, PreCompact, PostCompact, Elicitation, ElicitationResult, SessionEnd. The examples below cover the most common ones. See the
↗ full hooks reference
for every event and its exit-code-2 behavior.
Auto-format Python files after every edit
{
  "hooks": {
    "PostToolUse": [{
      "matcher": "Write|Edit",
      "hooks": [{
        "type": "command",
        "command": "jq -r '.tool_input.file_path' | xargs black 2>/dev/null; exit 0"
      }]
    }]
  }
}
Auto-format JavaScript/TypeScript with Prettier
{
  "hooks": {
    "PostToolUse": [{
      "matcher": "Write|Edit",
      "hooks": [{
        "type": "command",
        "command": "jq -r '.tool_input.file_path' | xargs npx prettier --write 2>/dev/null; exit 0"
      }]
    }]
  }
}
Block dangerous commands
{
  "hooks": {
    "PreToolUse": [{
      "matcher": "Bash",
      "hooks": [{
        "type": "command",
        "command": "jq -r '.tool_input.command' | grep -qE 'rm -rf|git push.*--force|git reset --hard' && echo 'Blocked: dangerous command' >&2 && exit 2 || exit 0"
      }]
    }]
  }
}
Protect sensitive files from edits
{
  "hooks": {
    "PreToolUse": [{
      "matcher": "Write|Edit",
      "hooks": [{
        "type": "command",
        "command": "jq -r '.tool_input.file_path' | grep -qE '\\.env|secrets/|\\.git/' && echo 'Blocked: protected file' >&2 && exit 2 || exit 0"
      }]
    }]
  }
}
Desktop notification when Claude needs input
{
  "hooks": {
    "Notification": [{
      "matcher": "",
      "hooks": [{
        "type": "command",
        "command": "osascript -e 'display notification \"Claude Code needs input\" with title \"Claude Code\" sound name \"Ping\"'"
      }]
    }]
  }
}{
"hooks": {
"Notification": [{
"matcher": "",
"hooks": [{
"type": "command",
"command": "powershell -Command \"Add-Type -AssemblyName System.Windows.Forms; [System.Windows.Forms.MessageBox]::Show('Claude Code needs your attention','Claude Code')\""
}]
}]
}
}"command" (shell),
"http" (webhook), "mcp_tool" (invoke an MCP tool),
"prompt" (single-turn LLM eval), and "agent" (spawns a subagent).
For blocking hooks, exit code 2 blocks the action and shows stderr as feedback to Claude.
The exact effect depends on the event: PreToolUse blocks the tool call,
UserPromptSubmit rejects the prompt, PreCompact blocks compaction.
Subagents
Delegate side tasks to isolated workers so your main context stays clean.
A subagent is a specialized AI assistant that runs in its own context window, does the work, and returns only the summary to your main session. The verbose output — file searches, log dumps, multi-step reasoning — stays isolated. Use one when a side task would flood your main conversation with stuff you won't reference again.
Subagents help you:
- Preserve context by keeping exploration and implementation out of your main conversation
- Enforce constraints by limiting which tools a subagent can use
- Reuse configurations across projects with user-level subagents at
~/.claude/agents/ - Specialize behavior with focused system prompts for specific domains
- Control costs by routing tasks to faster, cheaper models like Haiku
Define a subagent
Subagents live in .claude/agents/<name>.md (project) or ~/.claude/agents/<name>.md (personal). The frontmatter description tells Claude when to delegate to it.
---
description: Research a topic across the codebase. Use when the user asks "where is X used", "what depends on Y", or for any read-only exploration that would flood the main context.
tools: Read Glob Grep
---

You are a focused codebase researcher. Your job is to investigate the user's question
across the project and return a concise summary with file paths and line numbers.

Process:
1. Find relevant files with Glob and Grep first
2. Read the files in depth
3. Return a structured summary: findings, file references, open questions

Don't edit anything. Don't run shell commands. Stay read-only.
Invoke and manage subagents
Open the subagent panel with /agents. The Running tab shows live subagents. The Library tab lets you create and edit definitions. Claude can also auto-delegate to a subagent when the description matches your request.
CLAUDE_CODE_SUBAGENT_MODEL env var. Keep Opus for your main reasoning, send the grunt work to Haiku.
export CLAUDE_CODE_SUBAGENT_MODEL="claude-haiku-4-5"
Skills + Subagents
A skill can run in a subagent by adding context: fork to its frontmatter. The skill content becomes the subagent's prompt, with the agent type controlling tools and model.
---
name: deep-research
description: Research a topic thoroughly across the codebase
context: fork
agent: Explore
---

Research $ARGUMENTS thoroughly:

1. Find relevant files using Glob and Grep
2. Read and analyze the code
3. Summarize findings with specific file references
Agent Teams
Multiple coordinated Claude Code sessions that talk to each other.
CLAUDE_CODE_EXPERIMENTAL_AGENT_TEAMS=1 in your settings or environment.
While subagents are isolated workers that report back to the main agent, Agent Teams are multiple full Claude Code sessions that coordinate as peers. One session is the lead. The others are teammates that share a task list and message each other directly — no central dispatcher.
Subagents vs Agent Teams
| Subagents | Agent Teams | |
|---|---|---|
| Context | Own context; results return to caller | Own context; fully independent |
| Communication | Up to the main agent only | Teammates message each other directly |
| Coordination | Main agent manages all work | Shared task list with self-coordination |
| Best for | Focused tasks where only the result matters | Complex work that needs discussion and collaboration |
| Token cost | Lower (results summarized back) | Higher (each teammate is a full session) |
Enable Agent Teams
{
  "env": {
    "CLAUDE_CODE_EXPERIMENTAL_AGENT_TEAMS": "1"
  }
}
Start a team
After enabling, just describe the team you want in natural language. Claude creates the team, spawns the teammates, and coordinates.
Create an agent team to review PR #142. Spawn three reviewers:
- One focused on security implications
- One checking performance impact
- One validating test coverage
Have them each review and report findings.
Behind the scenes Claude generates ~/.claude/teams/<team-name>/config.json and a shared task list at ~/.claude/tasks/<team-name>/. Don't edit these by hand — the runtime overwrites them.
Display modes
it2 CLI.Best practices
- 3–5 teammates is the sweet spot. Beyond that, coordination cost eats the parallel-work gain.
- Avoid file conflicts. Two teammates editing the same file overwrites each other. Partition the work so each teammate owns a different set of files.
- Require plan approval for risky tasks: "Spawn an architect teammate to refactor auth. Require plan approval before any changes." The teammate stays in read-only plan mode until the lead approves.
- Use hooks to enforce quality gates:
TeammateIdle,TaskCreated,TaskCompleted. Exit with code 2 to send feedback and keep the teammate working. - Clean up with the lead when finished: "Clean up the team". Teammates shouldn't run cleanup — only the lead.
/resume and /rewind don't restore in-process teammates. Task status can lag. One team per lead at a time. No nested teams. Split-pane mode doesn't work in VS Code's integrated terminal, Windows Terminal, or Ghostty.
CLAUDE.md
The context file that tells Claude how your project works.
Claude reads CLAUDE.md at the start of every session. It's where you put your project's architecture, coding standards, build commands, and any rules you want Claude to follow.
For existing projects, run /init — Claude analyzes your codebase
and generates a CLAUDE.md with the conventions it discovers. Then refine it with anything
Claude wouldn't know on its own. For new projects, use the template below as a starting point.
Where to place it
./CLAUDE.md or ./.claude/CLAUDE.md
Shared with your team via git.
~/.claude/CLAUDE.md
Your preferences across every project.
Template
Use this as a starting guide — customize it for your project:
# Project: [Name]

## Tech Stack
- [Framework], [Language + version]
- [Database], [Key libraries]

## Commands
- Dev: [command]
- Build: [command]
- Test: [command]
- Lint: [command]

## Architecture
- [Where services live]
- [Where routes/views live]
- [Where models/types live]
- [Where tests live]

## Code Style
- [Rule 1 — be specific]
- [Rule 2]
- [Rule 3]

## Rules
- ALWAYS run tests after changes
- ALWAYS use TypeScript strict mode
- NEVER commit directly to main
- Keep files under 300 lines — split if larger.claude/rules/ files — you can scope rules to specific
file types using paths frontmatter. You can also import
other files with @path/to/file syntax.
Skills
Advanced auto-triggering commands with bundled resources.
Skills are the next level beyond custom commands. They live at .claude/skills/your-skill-name/SKILL.md and
support auto-triggering, bundled scripts, and subagent control.
SKILL.md frontmatter table,
every bundled skill, where skills live, dynamic context injection, and running a skill in a subagent — read the
complete Claude Code Skills guide.
- Plain markdown file
- Manual /slash invocation
- No bundled files
- Simple — start here
- YAML frontmatter + markdown
- Auto-triggered by AI
- Bundled scripts, references, assets
- Advanced — upgrade when needed
Popular Skills
Find More Skills
The skill ecosystem is growing fast. Browse community directories:
Create Your Own Skill
Create a directory in .claude/skills/your-skill-name/ with a SKILL.md file.
Add YAML frontmatter for name and description — Claude uses the description to decide when to auto-load it.
---
name: explain-code
description: Explains code with diagrams and analogies. Use when the user asks "how does this work?"
---

When explaining code, always include:

1. **Start with an analogy** — compare the code to something from everyday life
2. **Draw a diagram** — use ASCII art to show the flow or structure
3. **Walk through the code** — explain step-by-step what happens
4. **Highlight a gotcha** — what's a common mistake or misconception?

Keep explanations conversational.disable-model-invocation: true in the frontmatter
to make a skill manual-only (e.g. for deploy workflows you don't want Claude auto-triggering).
Get the free Vibe Engineering Blocks guide
The exact building blocks I use to ship real products with AI — yours as a free PDF.
Workflows
The mental models that separate productive Claude Code users from everyone else.
The Three Pillars
Modular Structure
Every feature in its own file. Check at 300 lines — if a file is longer, it needs splitting.
One Task Per Session
Plan → Code → Test → Commit → /clear → Next. Fresh sessions are cheap. Polluted sessions cost quality.
Know Your Building Blocks
Before prompting: What APIs do I need? What data flows where? What does the output look like? This is the approach taught across Solo Builder Complete — understand the building blocks before you prompt.
The Development Cycle
Power Prompts
Battle-tested prompts for common situations. Copy them directly.
Before writing any code, analyze the existing codebase structure and create a detailed plan. List every file you'll create or modify, and explain why. Wait for my approval before implementing.
Knowing everything you know now, scrap this and implement the elegant solution.
This error is happening: [paste error]
Don't just fix the symptom. Find the root cause, explain it, then fix it properly. Run tests after.
Use parallel subagents for these independent tasks:
1. [Task A]
2. [Task B]
3. [Task C]
Work on all three at the same time. Combine results when done.
Create a modular project structure for [description].
Each feature gets its own file in a logical folder structure.
No file should be longer than 300 lines.
Include type hints and error handling from the start.
Scan the entire project for files larger than 600 lines of code. List them sorted by size, and suggest how each could be split into smaller, focused modules.
Before you start, ask me questions to make sure you understand exactly what I want.
Plugins, Marketplaces & MCP
Three layers of extensibility, in order of how often you'll touch them.
Plugins
A plugin bundles skills, hooks, subagents, MCP servers, and LSP servers into a single installable package. Instead of every teammate manually setting up the same skills + hooks, a plugin is a one-click install.
Run /plugin inside Claude Code to open the plugin manager. The Discover and Browse screens now show each plugin's commands, agents, skills, hooks, and MCP/LSP servers before installation — you see exactly what you're getting.
# Browse the manager UI
/plugin

# Install from the Anthropic-managed marketplace
/plugin install frontend-design@claude-plugins-official
/plugin install github@claude-plugins-official
/plugin install sentry@claude-plugins-official
/plugin install typescript-lsp@claude-plugins-official
Plugin Marketplaces
A marketplace is a marketplace.json file hosted on GitHub (or any git host) that lists multiple plugins from one source. Add the marketplace once; install any of its plugins thereafter.
# Add a community marketplace
/plugin marketplace add owner/repo

# Install a specific plugin from it
/plugin install name@marketplace

# CLI equivalent (without a session)
claude plugin install plugin-name
The default trusted source is ↗ anthropics/claude-plugins-official. For your own marketplace, publish a marketplace.json in a git repo — that's the whole setup.
MCP Servers
MCP (Model Context Protocol) servers give Claude Code access to systems it doesn't already understand: GitHub, your database, your browser, your production tooling. Add them with claude mcp add.
Recommended day-one MCP servers
| Server | What it does | When to add |
|---|---|---|
| GitHub | PRs, issues, code search, branches across repos | Single highest-impact install for most developers |
| Playwright | Browser automation — Claude can see your UI | Building or testing web apps |
| Postgres / MySQL / MongoDB | Read schemas, run queries against your DB | Anything beyond a toy app |
| Fetch / Brave Search | Live web grounding | Cross-stack work, doc lookups |
| Linear / Notion | Pull tickets, write docs from your session | If your team lives in Linear or Notion |
# Browser automation — Claude can see your UI
claude mcp add --transport stdio playwright -- npx @playwright/mcp@latest

# GitHub — PRs, issues, code search across repos
claude mcp add --transport stdio github -- npx @anthropic/mcp-github@latest

# Postgres — read schemas, run queries
claude mcp add --transport stdio postgres -- npx @modelcontextprotocol/server-postgres@latest postgresql://user:pass@host/db# Notion — connect to your workspace
claude mcp add --transport http notion https://mcp.notion.com/mcp
Use /mcp any time to view connection status.
Model Selection
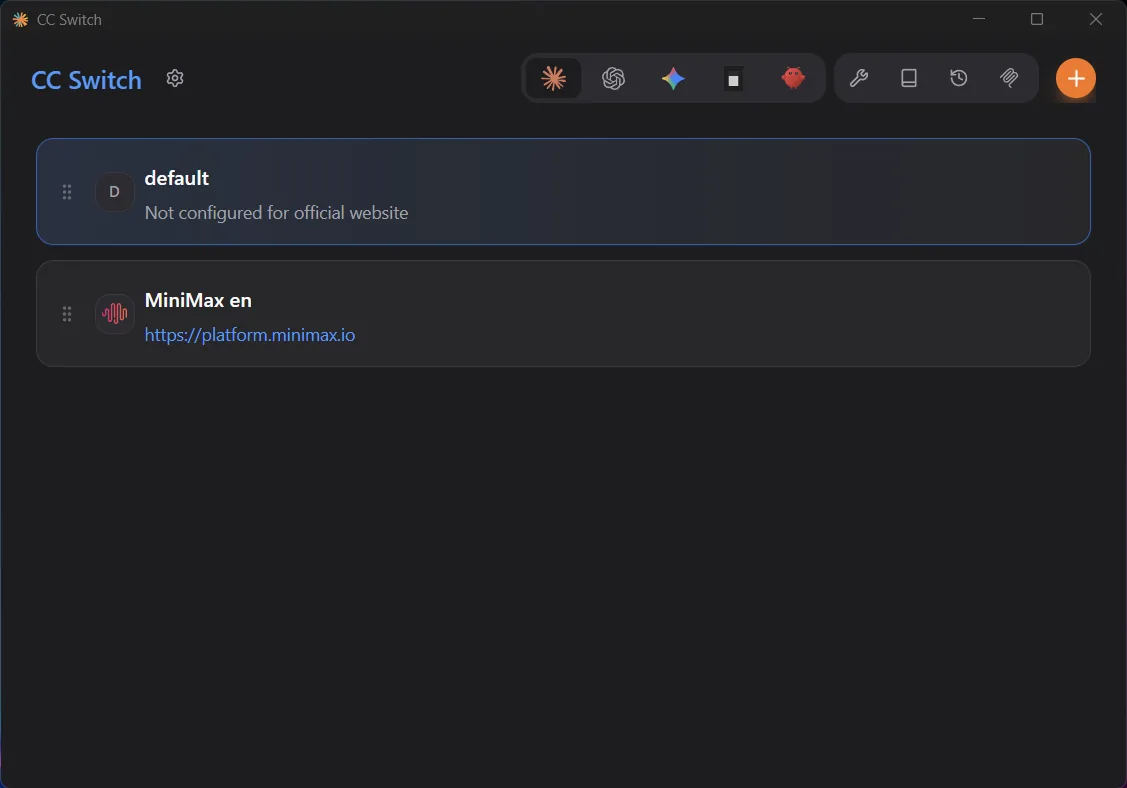
Match the model to the task. Use CC Switch for non-Anthropic models.
Claude Code defaults to Anthropic models (Opus and Sonnet). Use /model to switch between them.
For non-Anthropic models, ↗ CC Switch
lets you route to 50+ models from providers like DeepSeek, MiniMax, OpenRouter, and more.
| Model | Best for | Cost |
|---|---|---|
| Claude Opus 4.8 | Complex architecture, planning, long-running goals | $$$ |
| Claude Sonnet 5 | Everyday coding, the default for most sessions | $$ |
| Claude Haiku 4.5 | Fast grunt work, subagents, evaluator hooks | $ |
| MiniMax M2.7 | Strong coding, much cheaper via OpenRouter | $ |
| DeepSeek V3 | Budget tasks via OpenRouter / direct API | ¢ |
/fast to run Claude Opus up to 2.5× faster — same model quality, higher per-token cost. It works only on Opus (not Sonnet or Haiku), runs in the CLI only (not the VS Code extension), and draws from usage credits. Turn it on at the start of a session for the best cost efficiency.
export CLAUDE_CODE_SUBAGENT_MODEL="claude-haiku-4-5"
Claude Agent SDK
Build Claude into your own apps — same machinery as Claude Code, as a library.
The Claude Agent SDK gives you the same tool-using agent loop that powers Claude Code, but as a Python or TypeScript library you import into your own application. Hand Claude an objective, and it autonomously reads files, runs commands, edits code, and iterates — all from inside your app.
The TypeScript SDK bundles a native Claude Code binary as an optional dependency, so you don't need to install Claude Code separately.
Install
pip install claude-agent-sdk
export ANTHROPIC_API_KEY=sk-ant-...npm install @anthropic-ai/claude-agent-sdk
export ANTHROPIC_API_KEY=sk-ant-...Your first agent in 8 lines
import asyncio
from claude_agent_sdk import query, ClaudeAgentOptions

async def main():
    async for message in query(
        prompt="Find and fix the bug in auth.py",
        options=ClaudeAgentOptions(allowed_tools=["Read", "Edit", "Bash"]),
    ):
        print(message)

asyncio.run(main())import { query } from "@anthropic-ai/claude-agent-sdk";
for await (const message of query({
prompt: "Find and fix the bug in auth.ts",
options: { allowedTools: ["Read", "Edit", "Bash"] }
})) {
console.log(message);
}Built-in tools (no implementation needed)
| Tool | What it does |
|---|---|
| Read | Read any file in the working directory |
| Write | Create new files |
| Edit | Precise edits to existing files |
| Bash | Terminal commands, scripts, git operations |
| Monitor | Watch a background script and react to each output line as an event |
| Glob | Find files by pattern (**/*.ts, src/**/*.py) |
| Grep | Search file contents with regex |
| WebSearch | Search the web for current information |
| WebFetch | Fetch and parse web page content |
| AskUserQuestion | Multi-choice clarifying questions back to the user |
Build it into a desktop app
The Agent SDK is built for being embedded. You spin up an async for message in query(...) loop inside your app's event handler, stream tokens to your UI, and respond to AskUserQuestion events with a native picker.
Real example: VidTSX. VidTSX is my desktop app for AI motion graphics. Inside it, Claude drives the whole production pipeline — script generation, scene layout, prompt-to-video render orchestration — using the Agent SDK. The same agent that fixes bugs in Claude Code is the one that writes a Remotion composition and schedules a render job. One binary, two surfaces.
→ See how VidTSX uses Claude under the hood ↗
What else you get
PreToolUse, PostToolUse, Stop, SessionStart, UserPromptSubmit, …) exposed as Python/TS callbacks. Validate, log, block, transform.AgentDefinition in Python) and have your main agent delegate via the Agent tool. Each subagent has its own context window.mcp_servers={...}) instead of via claude mcp add.allowed_tools=[...], block dangerous ones via permission rules. Interactive approval flow via AskUserQuestion.session_id from the init message; resume with resume=session_id. Fork sessions to explore alternative paths from any point..claude/ from your CWD and ~/.claude/ (skills, slash commands, CLAUDE.md). Set setting_sources to restrict.Compare to other Claude tools
| Agent SDK | Claude Code CLI | Anthropic Client SDK | Managed Agents | |
|---|---|---|---|---|
| Runs in | Your process | Your terminal | Your process | Anthropic-managed |
| Tool loop | Built in | Built in | You implement | Managed |
| Best for | Custom apps, CI/CD, desktop integrations | Interactive dev, one-off tasks | Direct API control, custom logic | Hosted production agents, async work |
claude -p usage) on subscription plans draws from a separate monthly Agent SDK credit, distinct from your interactive Claude Code limits. If you're shipping production agents, plan for that line item.
↗ Anthropic support article.
- ✓ "Claude Agent" or "Claude" (preferred in dropdowns)
- ✓ "{YourAgent} Powered by Claude"
- ✗ "Claude Code" or "Claude Code Agent" (reserved for Anthropic's own product)
Full docs: ↗ Agent SDK overview · ↗ Quickstart · ↗ Example agents repo
Use Claude Code for Free
Route Claude Code to a free OpenRouter model — per project, no global config conflicts.
You can run Claude Code at $0 cost by pointing it at a free model on ↗ OpenRouter. We do this at the project level so it never touches your global Claude configuration — no conflicts, no broken main setup, just a sandboxed override for the one project you want free.
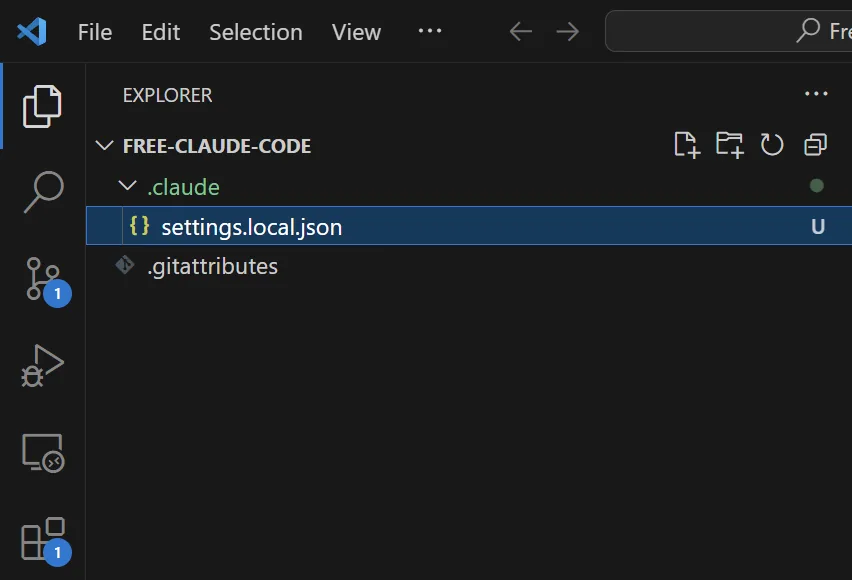
Step 1 — Create the project-level config. Inside the project where you want to use Claude Code for free, create a .claude folder, and inside it create a file named settings.local.json.
Step 2 — Get a free OpenRouter API key. Sign up at ↗ openrouter.ai, create an API key, then browse the models page and copy the slug of any model tagged free (for example minimax/minimax-m2.5:free).
Step 3 — Paste this into .claude/settings.local.json (replace the key and model slug with your own):
{
  "env": {
    "ANTHROPIC_AUTH_TOKEN": "XXX",
    "ANTHROPIC_BASE_URL": "https://openrouter.ai/api",
    "ANTHROPIC_DEFAULT_HAIKU_MODEL": "minimax/minimax-m2.5:free",
    "ANTHROPIC_DEFAULT_OPUS_MODEL": "minimax/minimax-m2.5:free",
    "ANTHROPIC_DEFAULT_SONNET_MODEL": "minimax/minimax-m2.5:free"
  }
}
Step 4 — Launch Claude Code in that project. Open a terminal in the project folder and run claude. Then run the /model command — you should see the free OpenRouter model listed as the active model. Say hi to confirm it answers.
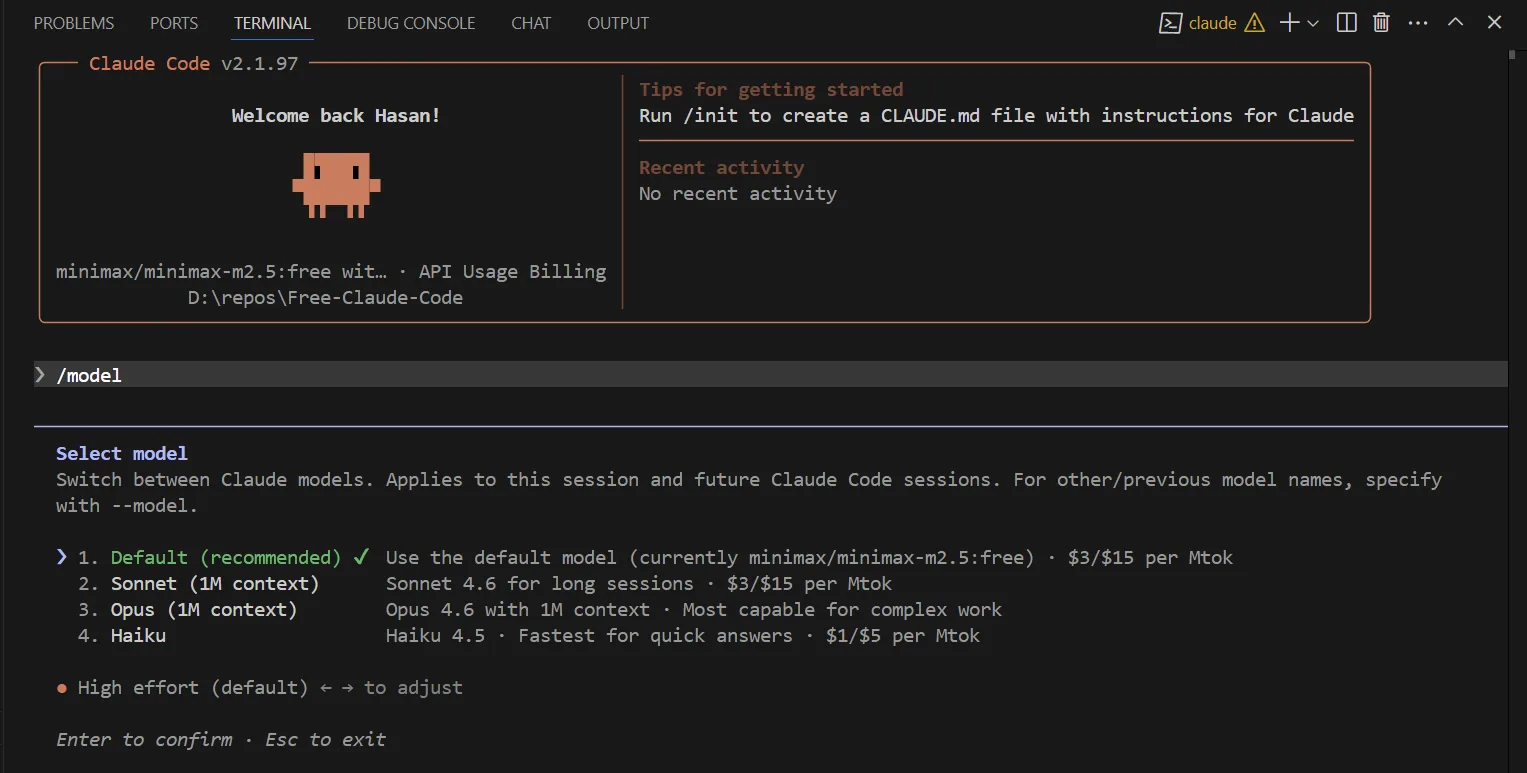
Step 5 — Verify $0 cost. Head to your OpenRouter usage logs — you'll see your requests landing at $0. Enjoy.
FAQ
Quick answers to common questions.
.claude/commands/deploy.md and a skill at .claude/skills/deploy/SKILL.md both create /deploy and work the same way. Skills add optional features: a directory for supporting files, YAML frontmatter to control invocation, and the ability for Claude to load them automatically when relevant./compact manually with focus instructions, or /clear to start fresh. Use /context to visualize current usage as a grid. Best practice: one task per session, commit in between.ANTHROPIC_BASE_URL and ANTHROPIC_AUTH_TOKEN environment variables to route Claude Code to OpenRouter, DeepSeek, MiniMax, or any provider that speaks the Anthropic Messages API shape..claude/skills/<name>/SKILL.md. A skill is a markdown file with YAML frontmatter; Claude loads it automatically when the description matches your request, or you invoke it directly with /skill-name. Skills can bundle supporting scripts and reference files that load only when needed. See the Skills section for templates.irm https://claude.ai/install.ps1 | iex. On CMD, run curl -fsSL https://claude.ai/install.cmd -o install.cmd && install.cmd && del install.cmd. Or via WinGet: winget install Anthropic.ClaudeCode. Install Git for Windows so Claude Code can use the Bash tool; without it, Claude Code falls back to PowerShell.CLAUDE_CODE_EXPERIMENTAL_AGENT_TEAMS=1.marketplace.json file (hosted on GitHub or any git host) that lists your plugins. Users then run /plugin marketplace add owner/repo, followed by /plugin install your-plugin@your-marketplace. Anthropic also maintains an official marketplace at anthropics/claude-plugins-official.pip install claude-agent-sdk or npm install @anthropic-ai/claude-agent-sdk. Same built-in tools (Read, Write, Edit, Bash, Monitor, Glob, Grep, WebSearch, WebFetch, AskUserQuestion), hooks, subagents, MCP, permissions, sessions. Starting June 15, 2026, Agent SDK usage on subscription plans draws from a separate monthly Agent SDK credit. See the Agent SDK section.