How to Secure a Coolify VPS Without Breaking Coolify
 Hasan Aboul Hasan
Published 2026-07-29
Updated 2026-08-11
Hasan Aboul Hasan
Published 2026-07-29
Updated 2026-08-11
I put a fresh Coolify box on a public IP, turned on ufw, allowed only SSH and web traffic, then probed it from my laptop. Three ports answered that I had never allowed. The firewall is where most Coolify security guides stop, and it is only the first of four layers. This guide walks all four, each one tested on a real server, and then applies every layer in order on a fresh box to prove they hold together without breaking Coolify.
Every number below came off that server. This is not theory for me: I run the same stack in production, and it is the stack I teach in my Self Hosting 2.0 course.
Docker opens container ports by writing a DNAT rule (a rule that rewrites
where a packet is going) into a table the kernel reads before ufw's rules. So
ufw deny 8000 changes nothing. Put the panel on a domain first, then write your
policy into the DOCKER-USER chain through
/etc/ufw/after.rules. Ports 8000, 6001 and 6002 close, and Coolify keeps working
because it now reaches all of that over 443.
- Knock on your server's doors from your laptop and see which ones answer.
- Put the panel on a real domain with HTTPS, so closing the extra doors costs you nothing.
- Turn on the normal firewall: allow SSH and web traffic, deny the rest.
- Paste one block into one file, so the doors Docker opens obey the firewall too.
- Knock again from your laptop and confirm only 22, 80 and 443 answer.
About 15 minutes, every command copy-paste. You do not need to understand Docker's firewall internals to finish: the theory sections below are marked optional, and skipping them is allowed.
New to firewalls? The jargon on this page, translated
- Port
- A numbered door on your server. Every service answers behind one: SSH behind 22, HTTPS behind 443.
- Published port
- A door Docker has opened on the server itself so the internet can reach a container. Publishing is what makes a container port public.
- ufw
- Ubuntu's firewall tool, the doorman at the entrance. It checks visitors against the guest list you wrote, but only for doors that belong to the building itself.
- Chain
- A list of firewall rules the kernel reads top to bottom, like a guard working through a checklist. The first rule that matches decides.
- DNAT
- A mail-forwarding order: anything addressed to door 8000, deliver to this container instead. Docker files one for every port it publishes, and it runs before the doorman sees the visitor.
- DOCKER-USER
- The one chain Docker reserves for your rules and never touches. It is checked before traffic reaches any container. On a stock install it is empty.
- Loopback
- The machine's private line to itself. Tests you run on the server travel it and never meet the firewall, which is why this guide tests from your laptop.
- Reverse proxy
- The single service answering doors 80 and 443 that passes each visitor to the right app based on the domain they asked for. Coolify's is called Traefik.
- Network interface
- The server's network plug.
eth0is usually the one facing the internet, andip -4 route show defaultprints yours.
- A server answering on 22, 80 and 443 only, verified from outside, with a policy that also covers the database you deploy next month
- SSH locked to keys with fail2ban, done the way that keeps Coolify's own connection alive
- Two-factor on the dashboard and API tokens scoped so a leaked token cannot read your database passwords
- Security updates that install themselves without taking your apps down
- All four layers applied in order on a fresh box, with the dashboard, live logs, the browser terminal and a real deploy still working at the end
Each layer closes a different door, and each one has its own way of quietly breaking Coolify if you get it wrong. Jump to any of them:
DOCKER-USER, verified from outside.
Layer 2 · SSH
Lock the door Coolify uses
Key-only root, no passwords, fail2ban, the Coolify-safe way that
keeps the panel's own connection alive.
Layer 3 · Account
The panel is the master key
Two-factor on the dashboard, API tokens scoped so a leaked one
cannot read your database passwords.
Layer 4 · Updates
Patches without a 3am reboot
Unattended security upgrades that run themselves, proven to
patch openssh without dropping your apps.
- What you need: a VPS running Coolify v4, root SSH access, and a domain you can point at the server. You also need a second machine to test from. Your own laptop is fine.
- Tested on: Coolify 4.1.2, Ubuntu 24.04. Layer 1 measured 29 July 2026; Layers 2 to 4 and the full end-to-end run re-verified on a fresh box on 11 August 2026.
- What can go wrong: you are editing a live firewall. The rules in this guide only filter traffic heading to containers, so they cannot cut your SSH session, but the ufw steps can. Before you touch anything, open a second terminal and log in. Leave it open. That is your undo.
Your server IP, panel domain & network interface (optional)
Drop in your server's IP address, the domain you'll put the panel on, and your public network interface. Every copyable block on this page updates, so you can paste with no edits.
Values stay in your browser only. Nothing leaves this page.
This is the layer nobody measures, and the one that leaves your dashboard and your databases on the public internet while ufw swears they are closed. It is also the deepest part of this guide, because it is where the real surprise lives.
First: check what the internet can reach
Do this before you change anything. It takes about a minute and it decides whether the rest of the guide applies to you.
The check has to run from your laptop, not from the server. A test you run on the box talks to itself over loopback, the machine's private line to itself, and that line never crosses the firewall. So the test passes even on a server that is wide open. You have to knock from outside.
Run it in a terminal on your own machine, using the version that matches your system. All three do the same thing: try a plain TCP connection to each port and print whether anything answered. Type your server's IP into the personalize card above and every version below is already filled in.
On Windows, you need nothing installed. Right-click the Start button, open Terminal (or Windows PowerShell), and paste this. Plain cmd cannot make this test on its own, so use PowerShell, which every Windows 10 and 11 machine has:
foreach ($p in 22, 80, 443, 6001, 6002, 8000) {
  if (Test-NetConnection YOUR.SERVER.IP -Port $p -InformationLevel Quiet -WarningAction SilentlyContinue) {
    "$p OPEN"
  } else {
    "$p closed"
  }
}
Expect the PowerShell version to be slow on ports a firewall silently drops: each one takes about 20 seconds to give up, measured on my machine, so scanning a hardened server takes about a minute. The slow ports are the firewall doing its job.
On Linux, and on Windows through WSL or Git Bash if bash is home for you:
for p in 22 80 443 6001 6002 8000; do
  timeout 5 bash -c "exec 3<>/dev/tcp/YOUR.SERVER.IP/$p" 2>/dev/null \
    && echo "$p OPEN" || echo "$p closed"
done
On a Mac, the Linux loop fails, because macOS ships without the
timeout command. Use this version instead. It asks the same question through
nc, which macOS has:
for p in 22 80 443 6001 6002 8000; do
  nc -z -w 5 YOUR.SERVER.IP $p 2>/dev/null \
    && echo "$p OPEN" || echo "$p closed"
done
Because curl speaks HTTP and most of these ports do not. On my first pass I
used curl and it reported port 22 as unreachable on a server I was actively logged into over
SSH. It was not unreachable, sshd just does not answer an HTTP request. A raw TCP connect
through /dev/tcp asks the only question that matters here: does anything pick up.
Here is what my freshly hardened server said, next to what ufw on that same server was reporting at that exact moment:
The same server, asked twice
Both outputs were taken within seconds of each other on Coolify 4.1.2.
On the server · what ufw reports
root@server:~# ufw status verbose
Status: active
Logging: on (low)
Default: deny (incoming), allow (outgoing)
New profiles: skip

To                Action      From
--                ------      ----
22/tcp            ALLOW IN    Anywhere
80/tcp            ALLOW IN    Anywhere
443/tcp           ALLOW IN    Anywhere
22/tcp (v6)       ALLOW IN    Anywhere (v6)
80/tcp (v6)       ALLOW IN    Anywhere (v6)
443/tcp (v6)      ALLOW IN    Anywhere (v6)
On my laptop · what the internet reaches
you@laptop:~$ bash probe.sh 159.89.17.196
PORT   TCP      WHAT IT IS
----   ---      ----------
22     OPEN     SSH
80     OPEN     HTTP (Traefik)
443    OPEN     HTTPS (Traefik)
6001   OPEN     realtime, live logs
6002   OPEN     realtime, web terminal
8000   OPEN     Coolify dashboard
8080   closed   coolify-proxy
5432   closed   Postgres
6379   closed   Redis

open to the internet: 6 of 12 probed
Ports 6001, 6002 and 8000 were never allowed in that firewall. All three answer anyway.
If ports 6001, 6002 or 8000 answered, keep reading. If only 22, 80 and 443 answered, someone already did this work on your box, and you can skip to the database section, which catches the case that bites later.
Why ufw does not stop Docker
Optional depth. The fix works even if you skip this: jump to putting the panel on a domain and start pasting. Stay if you want the one mechanism everything else on this page follows from.
Picture ufw as a doorman at your building's entrance, checking every visitor against the guest list you wrote. That works for traffic headed to the building itself. But when Docker publishes a container port, it does not argue with the doorman. It files a forwarding order at the post office instead: anything addressed to port 8000, deliver it straight to this container. The mail is rerouted before it ever reaches your door.
That forwarding order is a DNAT rule. It lives in the kernel's nat
table, and the kernel reads that table first, before any of the filtering rules ufw
manages. By the time your ufw rules would get a say, the packet has already been readdressed and
accepted by Docker's own chains.
A chain here is just a list of firewall rules the kernel walks in order, a
checklist a guard reads top to bottom. There is one chain that exists specifically so you can
filter this traffic, called DOCKER-USER, and Docker never touches its contents. On a
stock Coolify install it is empty: the page reserved for your rules is blank.
Where your ufw rules actually sit
Two journeys through the same machine. Only one of them meets your firewall.
Lane 1 · traffic to the host (SSH on port 22)
Lane 2 · traffic to a container (8000, 6001, 6002)
continues ↓
229 packets reached Docker's chains. Zero reached ufw's.
Packet counts from iptables -L FORWARD -n -v on the lab server.
You do not have to take the diagram's word for it, because iptables counts packets per rule. Here is the FORWARD chain on that server, with the counters:
iptables -L FORWARD -n -vnum   pkts bytes target
1      229 1321K DOCKER-USER
2      229 1321K DOCKER-FORWARD
3        0     0 ufw-before-logging-forward
4        0     0 ufw-before-forward
5        0     0 ufw-after-forward
229 packets reached Docker's chains. Zero reached ufw's. That is the whole story: on a Coolify box, ufw is not being overruled, it is never consulted. It still guards the host itself, which is why your SSH rules work exactly as you expect.
Coolify's own documentation is upfront about this. Its firewall page says that blocking ports
with ufw alone "will not be effective" and points at the DOCKER-USER approach. What
it does not do is show you what is currently open, or which ports you can close without losing the
panel. That is the gap this guide fills.
Knowing which layer a rule actually lands on is most of self-hosting. It is why Self Hosting 2.0 builds the stack in order instead of handing you a checklist. A rule you cannot place in the path is a rule you are trusting, not using.
What Coolify publishes, port by port
Six ports, and they are not equally dangerous. This is the state of a stock 4.1.2 install with ufw allowing only 22, 80 and 443:
| Port | What it is | Reachable from the internet? |
|---|---|---|
22 | SSH, on the host itself | Yes, and it should be |
80 | HTTP, the reverse proxy (one service that answers 80 and 443 and routes by domain) | Yes, needed for certificates |
443 | HTTPS, the reverse proxy | Yes, this is your traffic |
8000 | The Coolify dashboard | Yes, even with a ufw deny rule |
6001 | coolify-realtime, live deployment logs | Yes, never allowed in ufw |
6002 | coolify-realtime, the in-browser terminal | Yes, never allowed in ufw |
8080 | Published by the proxy container | No, and the reason matters |
Port 8000 is the one to sit with for a second. On my test box, ufw reported it restricted to
127.0.0.1. From my laptop, on a normal internet connection, it returned
HTTP 200 and served the Coolify login page, 47,500 bytes of it. On a brand new
install that page is the registration form, and whoever fills it in first owns the server.
The 8080 case, because it teaches the real rule
Optional depth. A small puzzle that teaches the rule worth remembering. In a hurry? Read the callout at the end of it, then keep moving.
Port 8080 looks identical to 6001 from the server's point of view. Both have a published port (a container port Docker opened on the server itself), both have a DNAT rule, neither has a ufw allow rule. One answers from the internet and one does not, and for a while I could not tell you why.
The answer is that 8080 is not protected. It is empty. The proxy container publishes 8080, and Coolify starts that proxy with its API dashboard switched off, so nothing inside the container is listening on 8080 to answer. The firewall path is wide open. There is just nobody home.
Your attack surface is the list of published ports, not the list of ports that answer today. A port that says "connection refused" is already open at the firewall. It is waiting for something to listen on it. Flip one setting, or deploy one container that binds that port, and it is public with no firewall change and no warning.
Put the panel on a domain first
This step is out of order in most people's heads, including mine when I started. It has to come before the firewall work, and here is why.
Right now your browser talks to port 6001 for live logs and 6002 for the terminal. Close those first and you will "successfully" firewall your server and then wonder why deployment logs stopped streaming. Give the instance a domain first and Coolify moves both of those onto 443 for you.
In your DNS provider, create an A record, the entry that maps a name to an IP address, and point it at your server's IP. Give it a few minutes to take effect. Then, in the Coolify dashboard, open Settings, put the full URL into the Instance Domain field, and save:
https://coolify.yourdomain.com
Coolify writes a proxy configuration file the moment you save. You do not have to edit it, but it is worth seeing, because it is the thing that makes the next section safe. Run this on the server as root to read it:
cat /data/coolify/proxy/dynamic/coolify.yaml
The interesting part is the two routers Coolify generated for you:
/data/coolify/proxy/dynamic/coolify.yamlcoolify-realtime-wss:
  entryPoints:
    - https
  service: coolify-realtime
  rule: 'Host(`coolify.yourdomain.com`) && PathPrefix(`/app`)'
coolify-terminal-ws:
  entryPoints:
    - https
  service: coolify-terminal
  rule: 'Host(`coolify.yourdomain.com`) && PathPrefix(`/terminal/ws`)'
Live logs now arrive on /app and the terminal on /terminal/ws, both
over HTTPS on 443. Ports 6001 and 6002 have nothing left to do from the outside world.
Load the dashboard on the new domain and check the padlock before you continue. If HTTPS is not working yet, fix that first: closing port 8000 while the domain is broken leaves you with no way into the panel at all.
If you do not have Coolify running yet, start with my Coolify install guide and come back here afterwards. The Self Hosting 2.0 course takes the same path from an empty VPS to a stack you actually run, in order, with nothing skipped.
The fix: five rules ufw will remember
Two parts. The ufw part you already know, and the part ufw cannot do on its own.
Part 1: the host firewall
Run these on the server as root, in this order. Port 22 is allowed before the firewall comes up, so your session cannot be cut. Each command prints a short confirmation:
ufw default deny incoming
ufw default allow outgoing
ufw allow 22/tcp
ufw allow 80/tcp
ufw allow 443/tcp
ufw enable
A lot of hardening advice suggests ufw limit 22/tcp. On a Coolify box that
quietly breaks the panel: Coolify opens SSH connections to your server constantly, trips the
rate limit, and starts reporting the server as unreachable at random. I measured it on a
previous run, 5 successful connections out of 20 with the limit rule and 20 out of 20 without.
The full breakdown is in
the
guide on Coolify saying "server is not reachable". Use allow, and put fail2ban
on failed logins instead.
Part 2: the part ufw cannot do
These rules go in the DOCKER-USER chain. You do not add them with the
ufw command, because ufw has no syntax for this chain. You append them to a file that
ufw reads every time it loads, which is what makes them survive a reboot.
Before editing, take a backup. Run this on the server as root:
cp /etc/ufw/after.rules /etc/ufw/after.rules.bak
Now add this block to the end of that file, after the existing
COMMIT line. The block assumes your public interface is eth0. If yours
has another name (ip -4 route show default prints it), put it in the personalize card
at the top and the block updates:
*filter
:DOCKER-USER - [0:0]
-A DOCKER-USER -m conntrack --ctstate RELATED,ESTABLISHED -j RETURN
-A DOCKER-USER ! -i eth0 -j RETURN
-A DOCKER-USER -i eth0 -p tcp -m multiport --dports 80,443 -j RETURN
-A DOCKER-USER -i eth0 -p udp -m multiport --dports 443 -j RETURN
-A DOCKER-USER -i eth0 -j DROP
COMMIT
Read top to bottom, that says: let through replies that belong to conversations already in progress, ignore anything that did not come in through the public interface so containers can still talk to each other, allow the public web on 80 and 443, and drop everything else. The last line is the one that matters most, because it is a default deny. Ports you have not thought of yet are already covered.
Apply it. Run this on the server as root, and it prints Firewall reloaded:
ufw reload
Confirm the rules are live. This prints the five rules with their packet counters:
iptables -L DOCKER-USER -n -v --line-numbers
It is the usual answer for making iptables rules survive a reboot, and on Ubuntu 24.04 it
removes ufw. The two packages conflict, and with apt -y there is
no prompt and no warning in the output. I hit this mid-test and only found it in
/var/log/apt/history.log afterwards:
/var/log/apt/history.logCommandline: apt-get install -y iptables-persistent
Install: iptables-persistent:amd64 (1.0.20), netfilter-persistent:amd64 (1.0.20, automatic)
Remove: ufw:amd64 (0.36.2-6)
The after.rules file above needs nothing installed, and ufw reapplies it at
every boot. That is the whole reason to put the rules there.
Verify from outside
Same check as the first section, same script, from your laptop. This is not optional: the server cannot tell you whether this worked.
The same probe, before and after
Same script, same server, same seven ports. One thing changed between them.
Before · ufw active, three ports allowed
PORT   TCP      WHAT IT IS
----   ---      ----------
22     OPEN     SSH
80     OPEN     HTTP (Traefik)
443    OPEN     HTTPS (Traefik)
6001   OPEN     realtime, live logs
6002   OPEN     realtime, web terminal
8000   OPEN     Coolify dashboard
8080   closed   coolify-proxy

open to the internet: 6 of 7
After · five rules in DOCKER-USER
PORT   TCP      WHAT IT IS
----   ---      ----------
22     OPEN     SSH
80     OPEN     HTTP (Traefik)
443    OPEN     HTTPS (Traefik)
6001   closed   realtime, live logs
6002   closed   realtime, web terminal
8000   closed   Coolify dashboard
8080   closed   coolify-proxy

open to the internet: 3 of 7
The dashboard, the live logs and the web terminal all kept working. The next section is the proof.
Six of seven down to three of seven. The dashboard on
YOUR.SERVER.IP:8000 now refuses to
connect at all, while the same dashboard on your domain keeps answering normally.
Proof that Coolify still works
This is the part I care about most, because a firewall that silently breaks your panel is worse than no firewall. You would not find out until the next time you shipped.
Four things to check, in the order they are likely to break.
The dashboard. Load it on your domain. It should be indistinguishable from before, because nothing about it changed except the door you came in through.
Live logs. Open any resource and watch the log panel stream. Behind the scenes
the browser now opens a websocket, a connection that stays open so the server can stream updates,
to wss://yourdomain/app/... instead of hitting port 6001. On my run it was the only
realtime connection the page made, and it connected on 443.
The web terminal. This is the one people assume they have lost. Open Terminal in the sidebar, pick your server, click Connect:
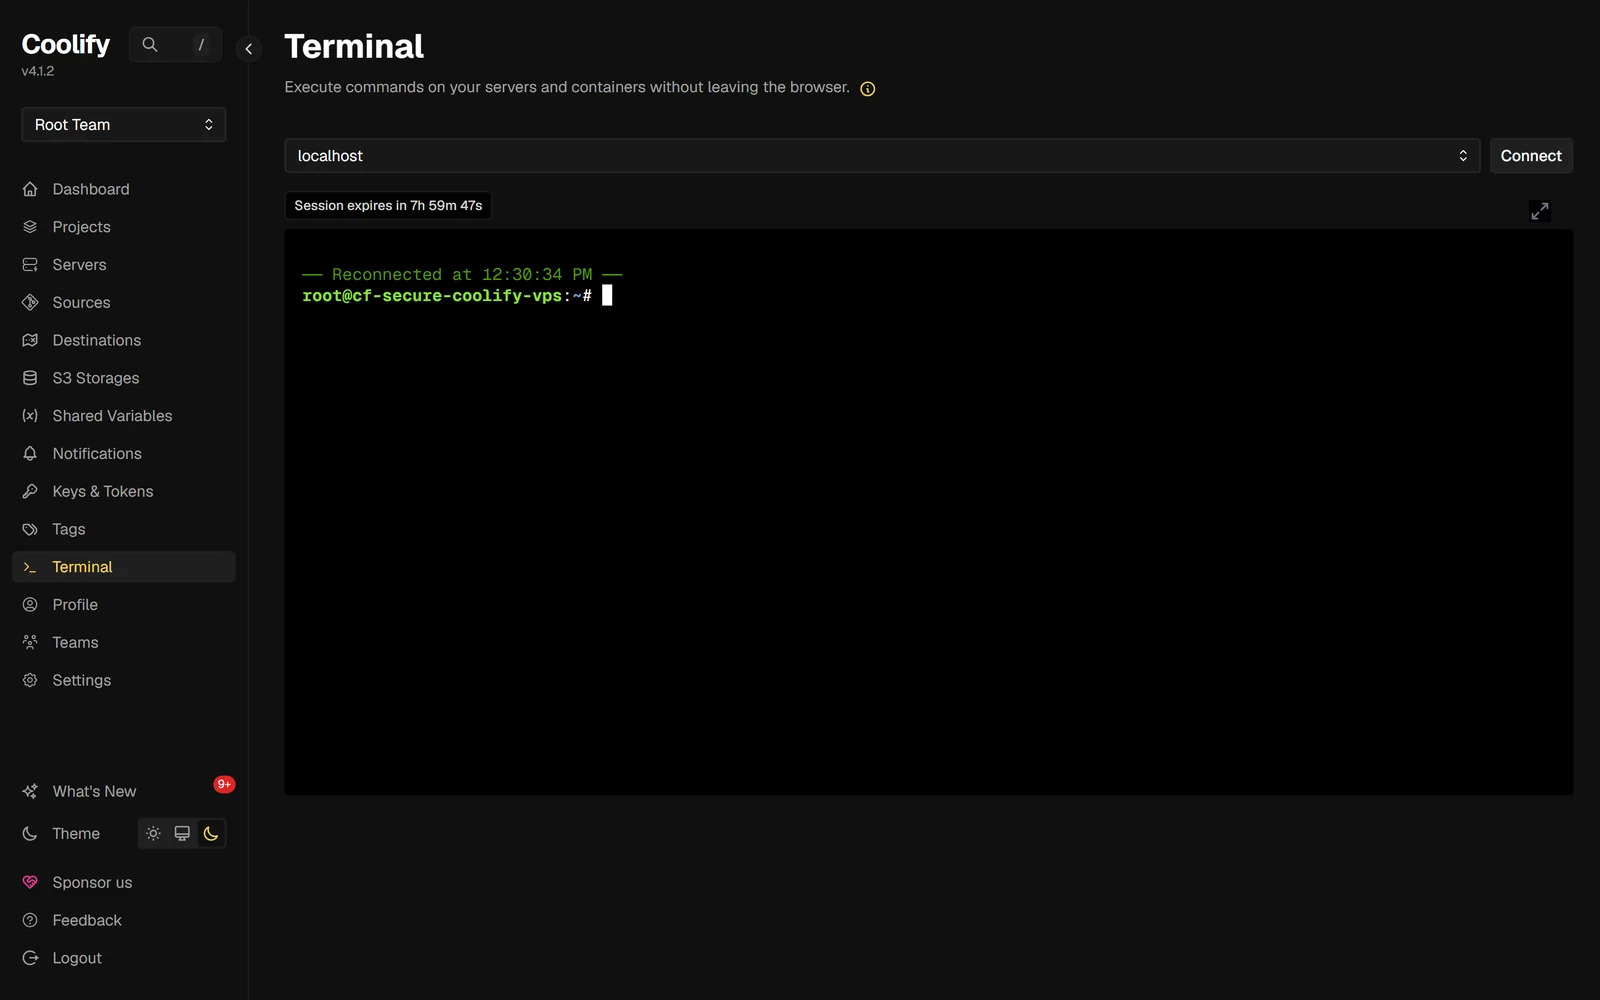
/terminal/ws on 443.A real deployment. Deploy something. On the locked-down box I deployed an nginx image to a fresh subdomain and it came up normally, serving HTTP 200 over HTTPS with a new certificate. My run reached running 24 seconds after I hit deploy, though that number is mostly how fast the image pulled, so treat it as "it did not hang", not as a benchmark.
One detail from that deployment is worth its own line. The container Coolify built publishes no host port at all. The proxy reaches it over the internal Docker network. A properly routed app never needed a published port, which is why a default-deny policy costs you nothing.
The database you deploy tomorrow
Everything so far was about Coolify's own ports. This section is about yours, and it is the one that actually leaks data.
The good news first: a database you create in Coolify is not exposed by default. I deployed a Postgres with default settings and its port stayed inside the Docker network. Nothing on the host was listening, and no DNAT rule appeared.
Then I ticked the option to make it publicly available, which people do for a reason: connecting
a local client, a migration, a reporting tool. Coolify starts a small proxy container that
publishes the port on 0.0.0.0, and a DNAT rule appears. Throughout all of this,
ufw had zero rules mentioning port 5432. The only thing standing in front of that
database is the chain you just configured.
So I tested exactly that, changing one variable and nothing else:
The firewall was written before that database existed and it covered it anyway. That is the argument for a default deny over a list of blocked ports: the rule you write today has to protect the thing you deploy in three months, when you have forgotten this page exists.
Does it survive a reboot?
A firewall rule that dies at the next reboot is worse than no rule, because you stop checking. So I tried to knock these off the box three ways:
- Restarting a container that publishes ports. Docker rewrites its NAT rules. The five DOCKER-USER rules survived.
- Restarting the Docker daemon with
systemctl restart docker, which rebuilds every chain Docker owns. Still five rules, and Docker's own DNAT rules came back alongside them. - A full reboot. Five rules, with live packet counters, and all six Coolify containers healthy.
After the reboot the probe from my laptop returned the same three open ports, and the dashboard
answered on the domain. That is what /etc/ufw/after.rules buys you: ufw reapplies the
file on every boot, so the policy is reinstalled before anything can use the gap.
Coolify manages your server over SSH, as root. So the standard hardening advice, applied literally, locks Coolify out of the machine it runs. Here is the recipe that hardens SSH and leaves the panel connected. Every command is copy-paste.
SSH, the Coolify-safe way
Four rules make this safe: keep root on key-only login instead of banning it, turn passwords
off entirely, put 2FA on humans but never on the machine account, and write it all to a drop-in
file so Ubuntu 24.04 does not override you. The config below encodes all four. Write it to
/etc/ssh/sshd_config.d/99-coolify-safe.conf:
PermitRootLogin prohibit-password
PasswordAuthentication no
PubkeyAuthentication yes
KbdInteractiveAuthentication yes
AuthenticationMethods publickey,keyboard-interactive

Match User root
    AuthenticationMethods publickey
The Match User root block is the whole trick. Humans must pass a key and a
second factor; root, which is the account Coolify logs in as, stays on key-only. Set
PermitRootLogin no instead and Coolify loses the box on the next deploy.
Plenty of write-ups — mine included, in an older course section — answer
PermitRootLogin no differently: leave root banned, and give Coolify a dedicated
service account instead. It sounds tidier. I tested it properly in August 2026 on Coolify
4.3.9, four fresh servers, and it does not hold up.
Set up exactly as Coolify's own documentation specifies, the panel reports the server
healthy, and then restarting the proxy fails with
cd: /data/coolify/proxy/: Permission denied while every deployment fails with
tee: /data/coolify/applications/<uuid>/.env: Permission denied. Both are
bugs inside Coolify; the second has been open upstream since February 2025. And the setup
requires NOPASSWD: ALL, so the "safer" account can become root without a
password — which is most of the reason the trade was never worth making.
The full test, with the commands and the reasoning, is in
the non-root
section of the not-reachable guide. If you already went down that road and finished with a
recursive chown on /data/coolify, that page also has the recovery.
Ubuntu's cloud image ships its own drop-ins that load before yours and can re-enable password auth, so strip the conflicting lines from the earlier files, then check the config parses and reload:
sed -i '/^PasswordAuthentication/d' /etc/ssh/sshd_config.d/*.conf
sshd -t && systemctl restart ssh
Now the second factor for human logins. Create your own sudo user, give it a key, and enroll it in a time-based one-time password:
apt install -y libpam-google-authenticator fail2ban
adduser --disabled-password --gecos "" deploy
usermod -aG sudo deploy
install -d -m 700 -o deploy -g deploy /home/deploy/.ssh
cp /root/.ssh/authorized_keys /home/deploy/.ssh/authorized_keys
chown deploy:deploy /home/deploy/.ssh/authorized_keys
sudo -u deploy google-authenticator -t -d -f -r 3 -R 30 -w 3
Add the PAM line that makes SSH ask for that code, but only for interactive human sessions:
echo 'auth required pam_google_authenticator.so nullok' >> /etc/pam.d/sshd
systemctl restart ssh
Then fail2ban, which is the right answer to brute-force noise. Do not reach for
ufw limit on port 22 for this: its rate limit also drops Coolify's own rapid
reconnects, and the panel starts reporting the server as unreachable. fail2ban bans on failed
authentication instead, which a key-based login never triggers. Write the jail:
[sshd]
enabled = true
backend = systemd
maxretry = 5
findtime = 10m
bantime = 1h
systemctl enable --now fail2ban
Verify the whole thing before you trust it. This confirms root is key-only, a human is asked for the second factor, and fail2ban is watching:
sshd -T -C user=root,host=localhost,addr=127.0.0.1 | grep -i authenticationmethods
sshd -T -C user=deploy,host=localhost,addr=127.0.0.1 | grep -i authenticationmethods
fail2ban-client status sshd
The first line should read authenticationmethods publickey, the second
publickey,keyboard-interactive. On the fresh box in the end-to-end run below, this
recipe passed all of its checks and Coolify never lost the server.
This section is the recipe on purpose: what to run, in order, without the failure stories. I worked it out by breaking a live server five separate ways, each with the exact error string it produces, plus how to recover a box you can no longer SSH into. That is a whole guide of its own: Coolify says "server is not reachable" after you hardened your VPS. If SSH is where your problem actually is right now, start there.
Coolify 4.1.2 does support running against a non-root user. But that user has to be in the
docker group, and docker group membership is root-equivalent: in a test, a normal
uid-1000 user in that group read /etc/shadow through a container in one command.
It is a supported setup. It just buys less security than it looks like.
You can firewall every port and lock down SSH perfectly, and one weak dashboard login still owns every app, database and credential on the box. Three things, all checked against 4.1.2: claim the account, turn on two-factor, and scope your API tokens.
Claim the account, and close registration
Claim the admin account the moment you install. A fresh Coolify serves a registration page to whoever reaches it first, and the first account created owns the server. My test box sat on a public IP with that page reachable for just under six minutes before I claimed it, and it was still unclaimed when I got there. On a different lab server I left exposed on purpose, the first uninvited SSH login attempt arrived 2 minutes and 35 seconds after boot. Nobody knew either machine existed. Bots scan the whole address space continuously.
Registration closes itself. Once the first account exists, the instance turns registration off, so a fresh install does not stay open to whoever finds the URL. Worth confirming rather than assuming, and the setting is under Settings.
Turn on two-factor authentication
Coolify has 2FA built in. Some older guides say it does not; on 4.1.2 it is right there on the Profile page. Click Configure and it shows a QR code and a setup key for your authenticator app:
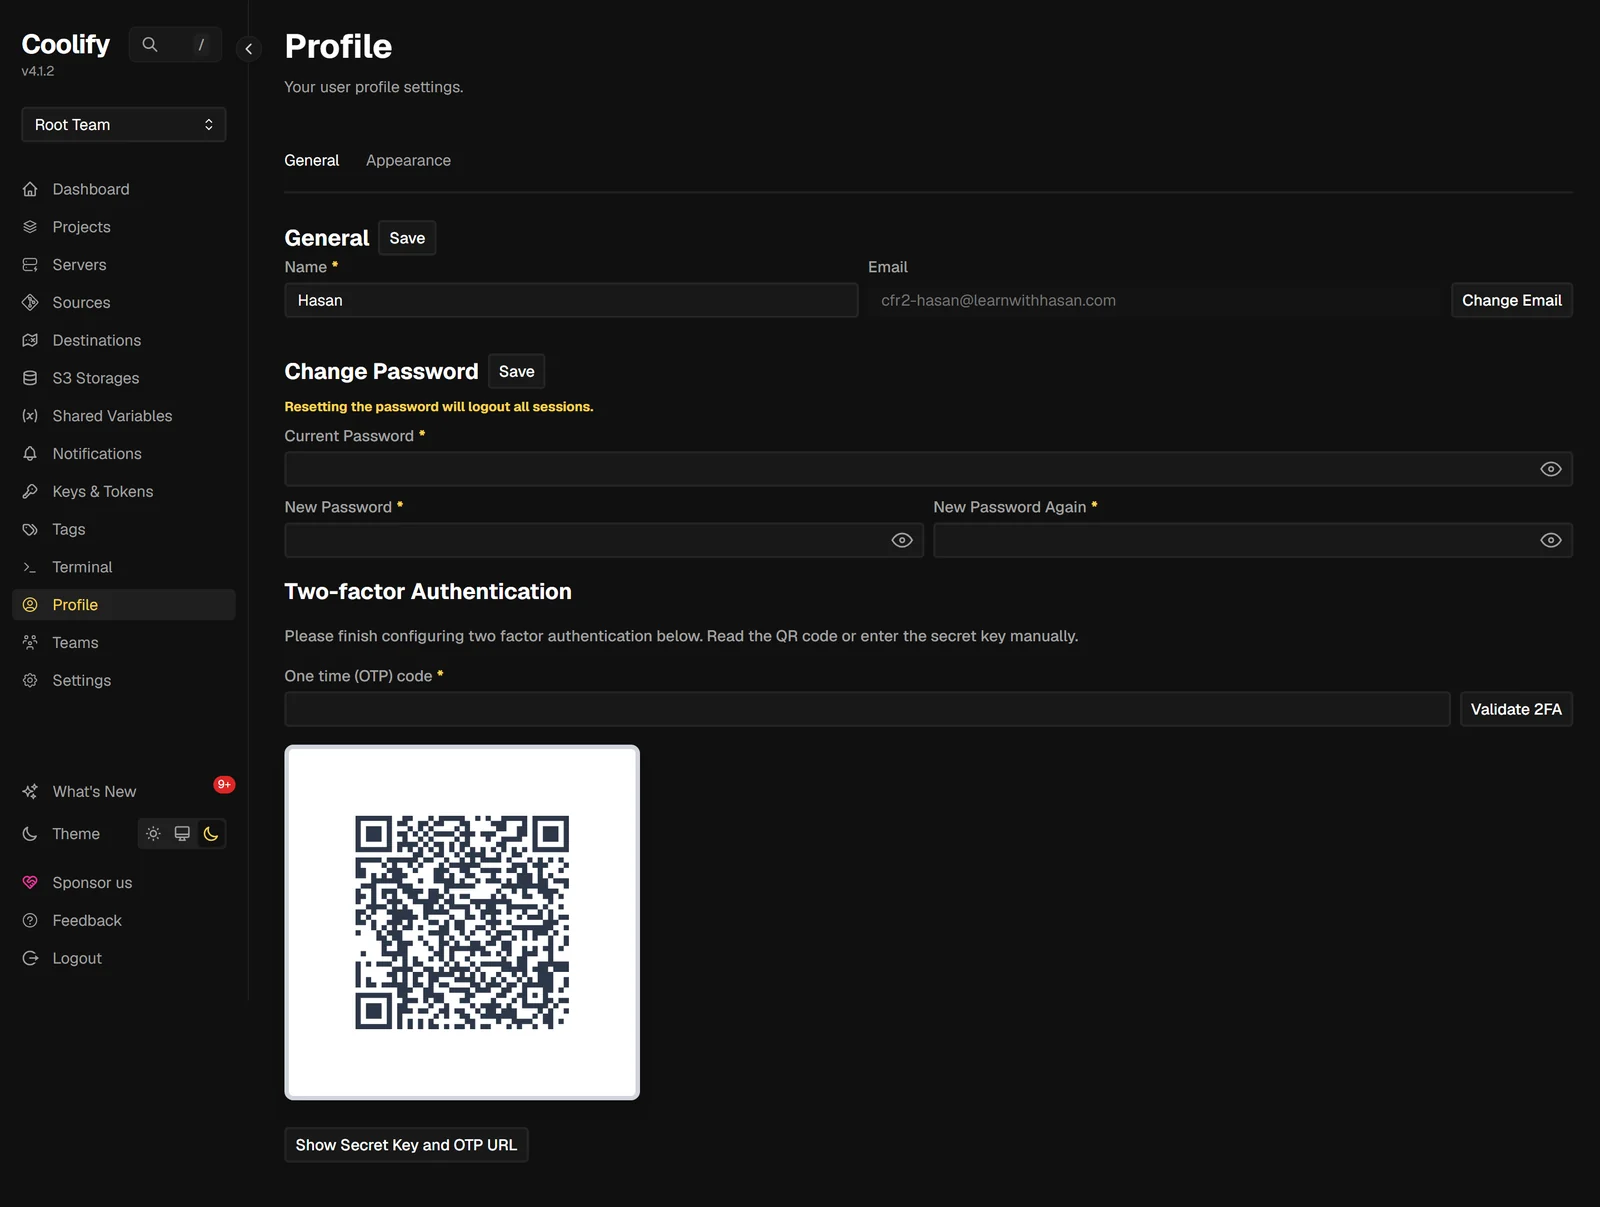
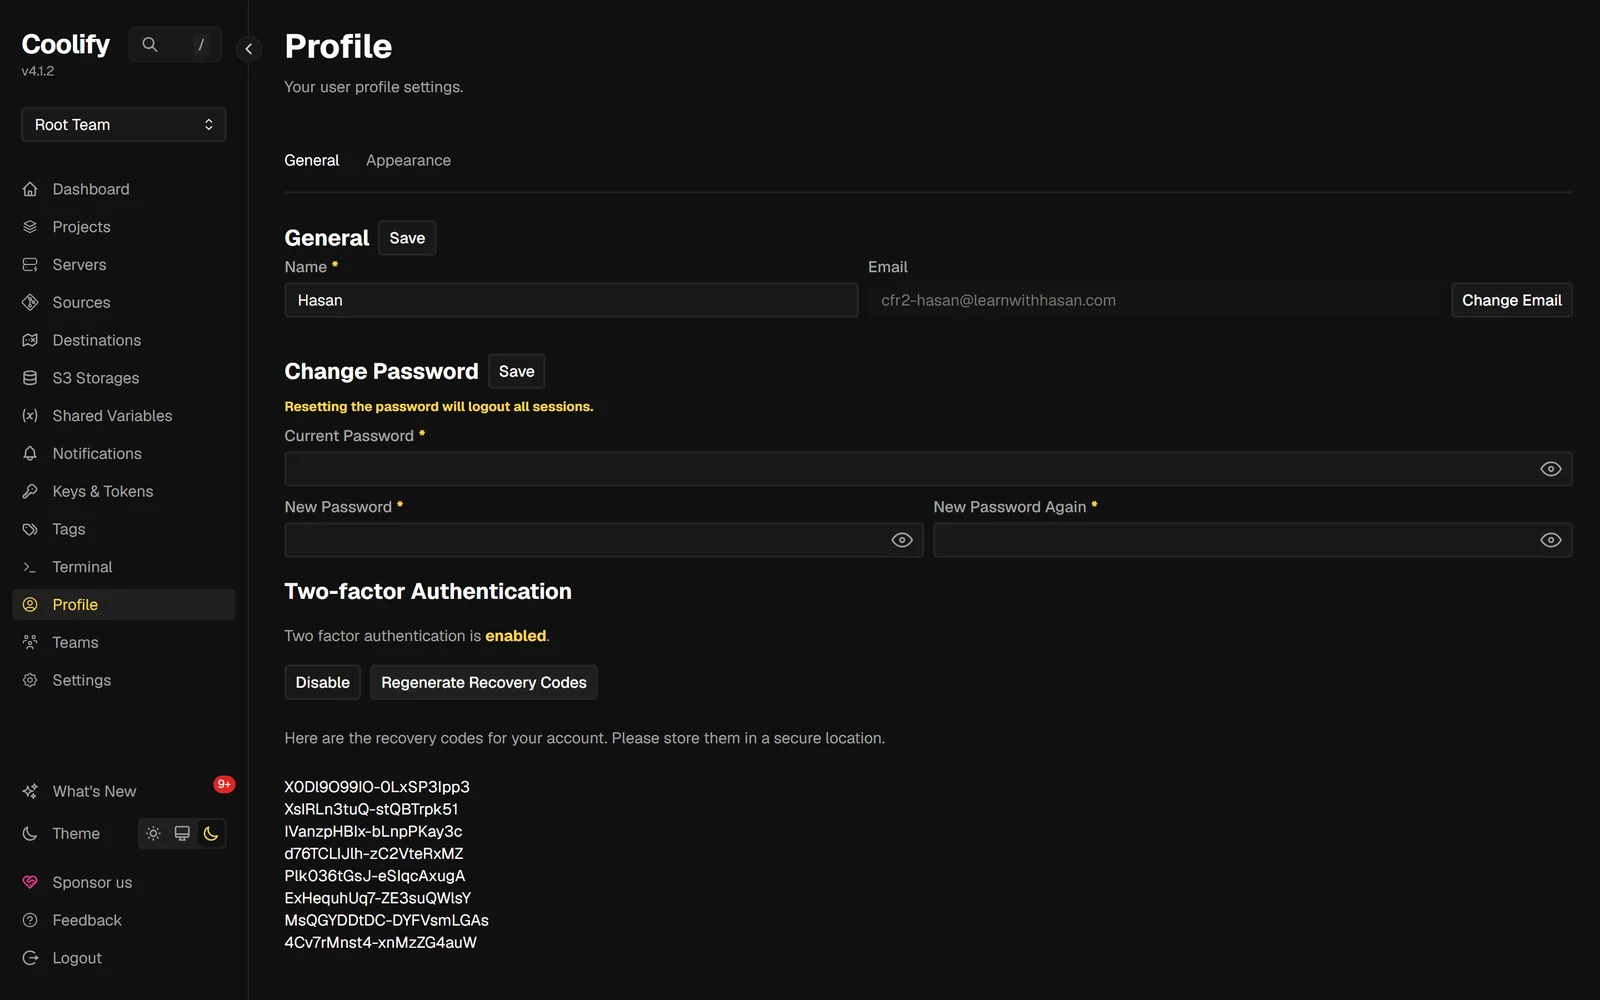
Once you validate a code, Coolify hands you a set of recovery codes. These are the way back in if you lose your phone, so store them somewhere that is not the server you are locking down:
From then on, logging in asks for the password and then the code from your app:
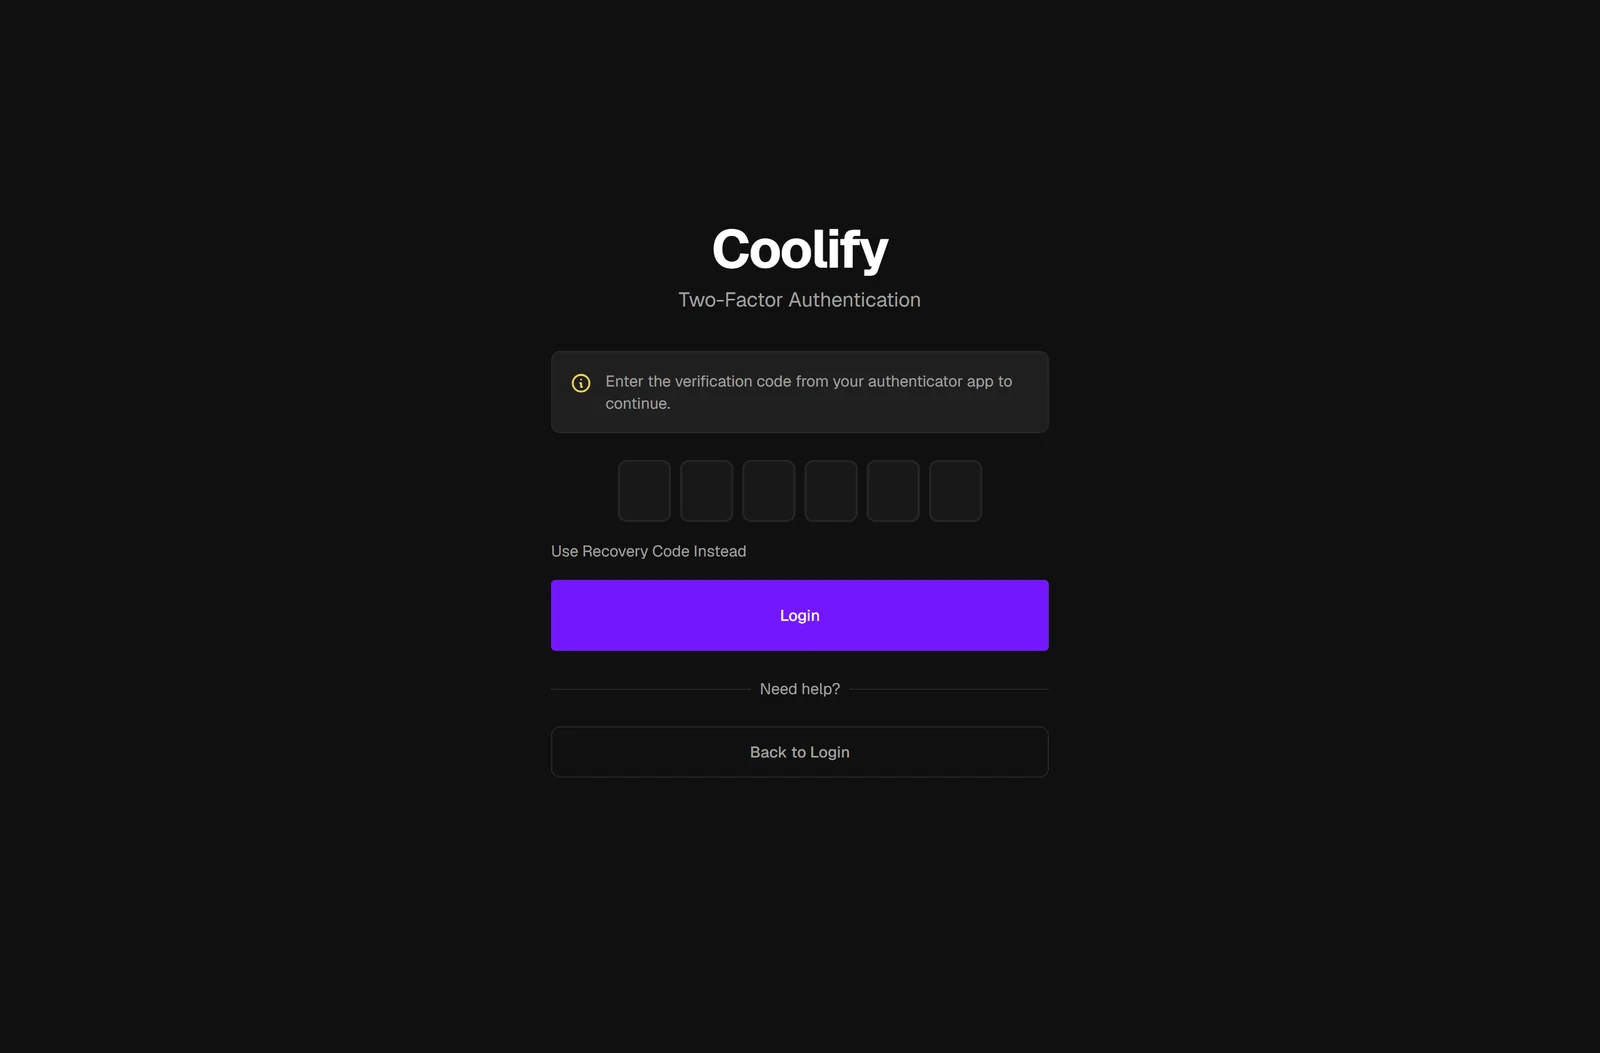
This is dashboard two-factor, and it costs you nothing: with it switched on I still watched the dashboard render, the live logs stream, the browser terminal open a root shell, and a real app deploy, all normally. That is the opposite of putting 2FA on SSH globally, which breaks Coolify because the machine account cannot type a code from your phone. Same words, "two factor", two completely different results. Layer 2 above scopes SSH 2FA to humans for exactly this reason.
Scope your API tokens
An API token is a second way into everything the dashboard controls, and Coolify keeps the API off until you enable it under Settings → Advanced. When you create a token, it offers a set of permission scopes:
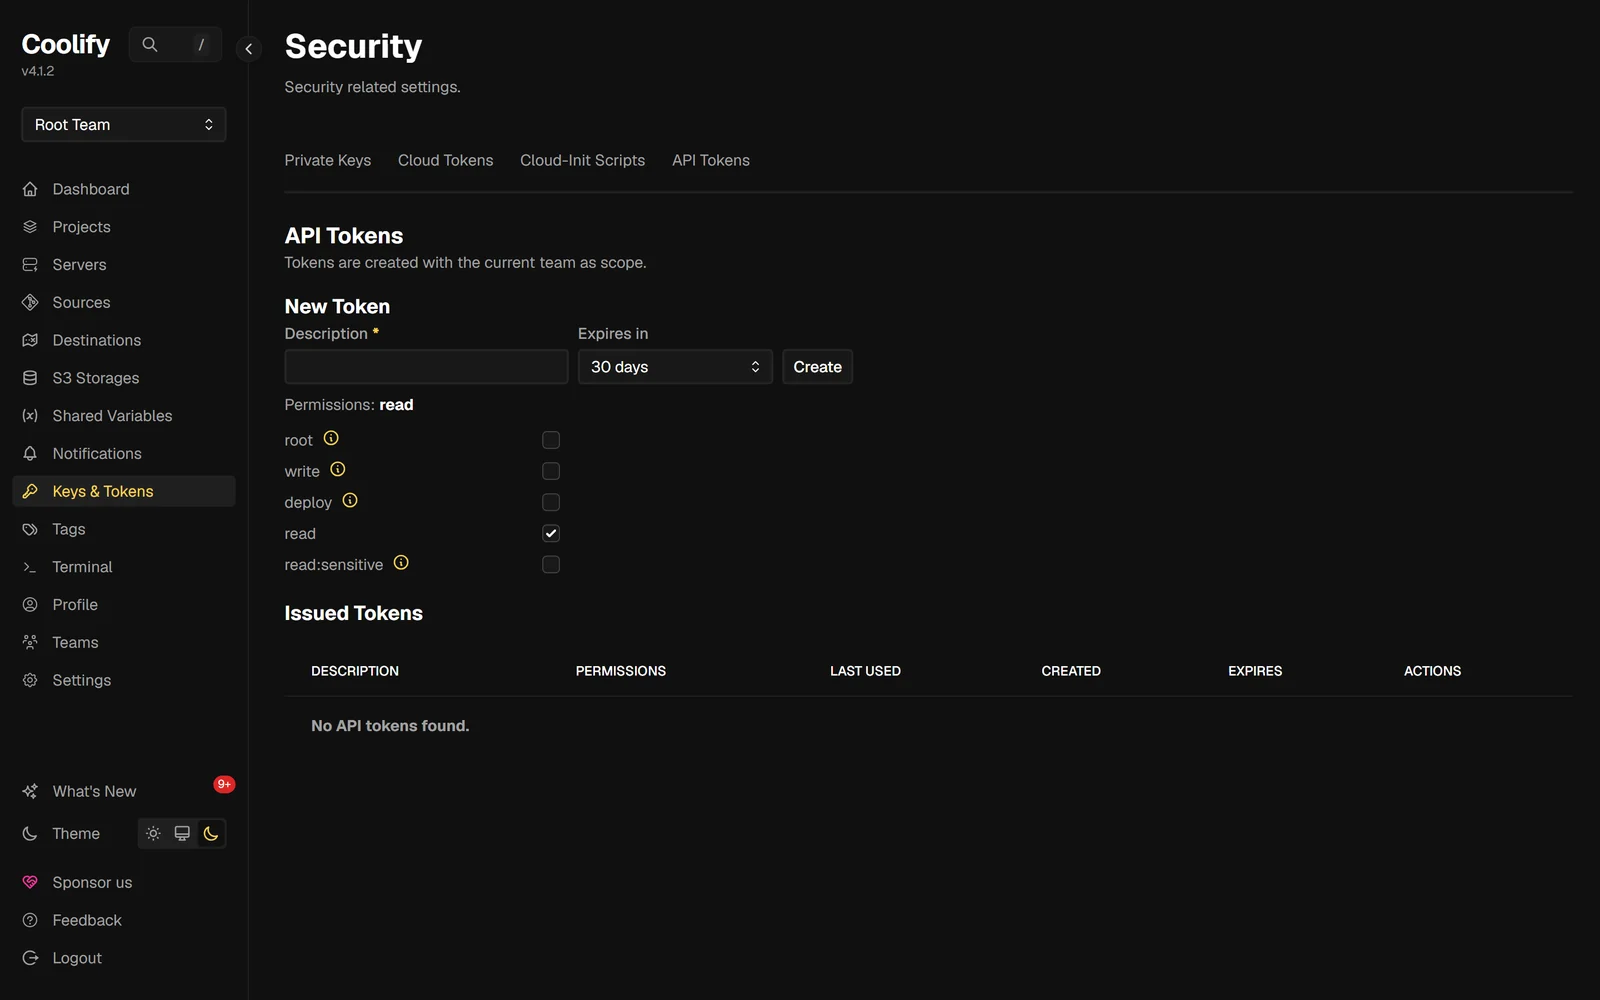
root, read,
write, deploy and read:sensitive.The difference between root and read is not cosmetic, and I measured
it. I deployed a Postgres through Coolify, then asked the API for the list of databases with each
token. A root token returned the postgres_password and a full connection
string with the password embedded, in plain text. A read token, hitting the exact
same endpoint, returned the same database record with every credential field stripped
out. And a write call that the root token accepted was refused outright for the read
token with a 403.
Because a root token hands back your deployed database passwords in plain text, a
token pasted into a script, a CI job or a chat window is a full breach if it leaks. Give each
token the narrowest scope that does the job, name it for where it lives, and delete it when that
job is done. A read token for a monitoring script cannot read a single password.
The three layers above are a point-in-time state. This one keeps the box patched as new CVEs land, on its own, without taking your apps down to do it.
Security updates you do not have to run
Unattended upgrades are in every checklist and almost never verified. Install and enable them. Run this on the server as root:
apt install -y unattended-upgrades
Then tell it to run daily. This creates the config file with both settings enabled:
APT::Periodic::Update-Package-Lists "1";
APT::Periodic::Unattended-Upgrade "1";
Now force one run so you can see it actually do something, rather than trusting that it will:
unattended-upgrade -v
On my box that first run patched 65 packages, including
openssh-server, libc6, perl and libpam-modules.
It took about five minutes and finished with All upgrades installed. My SSH session
stayed up through its own openssh-server upgrade.
Leave automatic reboots switched off, which is the Ubuntu default. On a Coolify box an unannounced reboot takes every app you host down with it. Reboot on your own schedule, when a kernel update needs it.
All four layers on a fresh box
Four layers that each work alone can still fight each other. Layer 2's ufw --force reset
would wipe Layer 1's rules if you ran the SSH recipe the wrong way; enabling dashboard 2FA could, in
principle, have broken the realtime connection. The only way to know is to apply all four in order on
a clean machine and check nothing broke. So I did.
Fresh droplet, stock Coolify 4.1.2, then, in this order: claim the admin account, put the panel on a domain with HTTPS, apply Layer 1's firewall, apply Layer 2's SSH recipe, enable Layer 3's 2FA and create a scoped token, and switch on Layer 4's unattended upgrades. After each layer I re-checked the one before it. Here is the end state, read from outside the box, with a database deployed and 2FA switched on:
Final probe from my laptop · all four layers applied, Postgres deployed, 2FA on
PORT     TCP        WHAT IT IS
22       OPEN       SSH
80       OPEN       HTTP (Traefik)
443      OPEN       HTTPS (Traefik)
6001     closed     coolify-realtime — live logs
6002     closed     coolify-realtime — web terminal
8000     closed     Coolify dashboard
5432     closed     Postgres (deployed + published)
open to the internet: 3 of 12 probed
Three ports answer, and they are the three that should. The Postgres was deployed after the firewall was written and set to "publicly available" on purpose, and Layer 1's default-deny still covered it with no new rule.
And Coolify itself, with everything above switched on? I checked the four things a firewall usually breaks. All four worked:
- The dashboard rendered over the domain, its realtime connection riding 443 through the reverse proxy, never touching 6001.
- The browser terminal opened a live
root@shell over 443, with 6002 unreachable from the internet. - A real deploy of nginx came up and served HTTP 200 over a fresh HTTPS certificate.
- All of it with 2FA enabled on the account I did it from.
That is the whole point of doing it in one run: not "each of these works" but "all of these work together, in this order, and the result is a box the internet can barely see and you can still fully operate."
What this guide does not cover
Being clear about the edges, so you know what you still have to think about:
- IPv6. The rules above are IPv4. If your server has a public IPv6 address,
it needs the same treatment in
after6.rules. That is a real gap, and I have not measured it. - General Linux hardening. No CIS benchmarks, no SELinux or AppArmor, no kernel tuning. Useful, different topic.
- Coolify Cloud. Self-hosted only. Cloud needs 22, 80 and 443 and has none of this problem.
- Putting the panel behind a VPN. A good option, especially for a team. Tailscale or WireGuard in front of the dashboard is a different guide.
- Your provider's firewall. Most hosts offer one that filters before traffic reaches your server, which sidesteps the Docker problem entirely. It also means your firewall lives in a web console instead of in a file you can read, back up and version. I would rather have both.
Questions people actually ask
Why is my dashboard still reachable on port 8000 after ufw deny 8000?
Because Docker published that port, and publishing writes a DNAT rule the kernel reads before
ufw's filtering. On my test server ufw reported port 8000 restricted to localhost while my laptop
still got HTTP 200 and the login page. The fix is a rule in DOCKER-USER, not another
ufw rule.
Does ufw protect a Coolify server at all?
Yes, it protects the host. SSH terminates on the machine itself and travels the INPUT chain, where your ufw rules apply normally. What it does not filter is traffic bound for a container, which is every port Docker published.
Which Coolify ports can I safely close?
8000, 6001 and 6002, once the panel is on a domain with HTTPS. Setting the instance domain makes Coolify route live logs and the browser terminal over 443. Close them first and you lose both.
Do I need ufw-docker, or is DOCKER-USER enough?
DOCKER-USER is enough here, and it needs nothing installed. Five rules in
after.rules survived a container restart, a daemon restart and a reboot on my test
box. ufw-docker is a good tool if you want per-container rules in ufw syntax, but for
a policy this small it is a dependency you do not need.
Will this break my deployments?
No. A fresh application deployed on the locked-down box reached running in 24 seconds and served HTTPS on a new domain. Apps routed through Coolify's proxy do not publish a host port at all.
My server has no domain yet. Can I still do this?
Do the domain first. Without it the dashboard only exists on IP:8000, and this
policy closes that. If you cannot use a domain yet, add a temporary rule allowing 8000 from your
own IP address in the DOCKER-USER block, and remove it once the domain is live.
I locked myself out of the dashboard. Now what?
SSH is untouched by these rules, so log in and run ufw disable, which drops the
DOCKER-USER policy with it. You are back to the exposed state, which is at least a working state.
Then fix the domain and re-enable. If SSH itself is the problem, that is the "server is not
reachable" guide instead.
Does turning on Coolify's dashboard two-factor authentication break anything?
No. With dashboard 2FA enabled on a locked-down test box, the dashboard still rendered, live logs still streamed, the browser terminal still opened a root shell, and a real app still deployed, all normally. Dashboard 2FA gates the login page only. It is a different thing from putting 2FA on SSH globally, which does break Coolify because the machine account cannot type a code from a phone. Scope SSH 2FA to human users and leave the root account on key-only.
Can someone with a leaked Coolify API token read my database passwords?
If it is a root token, yes. On a test box, a root token asked for the database list
returned the Postgres password and a full connection string in plain text. A read token
hitting the same endpoint returned the record with every credential field stripped, and a write call
it tried was refused with a 403. Scope tokens to the narrowest permission that does the job, and
treat any root token as equal to your dashboard password.
Related
Tested on: Coolify 4.1.2, and the SSH recipe re-run on Coolify 4.3.9
· Ubuntu 24.04 · Docker 29.6.2 · DigitalOcean droplets, 2 vCPU / 4 GB,
Frankfurt.
Lab runs: Layer 1 on 2026-07-29; Layers 2 to 4, the two-factor and API-token
captures, and the full four-layer end-to-end run on a fresh box on 2026-08-11; the SSH recipe
re-applied on 4.3.9 on 2026-08-19 and put through a resource install, a proxy restart, a
Coolify restart and a reboot, which it survived unchanged.
Last verified: 2026-08-19. Every port result, packet count, credential leak and
timing on this page came off a real server, probed from a laptop on a normal internet
connection.
This guide is one piece of it. In Self Hosting 2.0 I take an empty VPS all the way to a stack you run yourself: Coolify, real apps, backups, email, and the security work above in the order it should actually happen. 34 lessons, and nothing skipped between them.

Get the free Vibe Engineering Blocks guide
The exact building blocks I use to ship real products with AI — yours as a free PDF.
Questions & Discussion
Ask a question about this guide →Have a question? Ask it in the community — it's tagged #guide and linked back here. Reading is open to everyone; posting needs a free account.
Loading questions…