
Create an Advanced AI-Powered SEO Tool for Automated Blog Interlinking

In this post, I will show you how to build an AI-powered SEO tool that can identify potential interlink opportunities between your blog posts to automate one of the main SEO tasks.
I’ve tried multiple methods before, but semantic interlinking (the method introduced in this post) is the most efficient and gives very good results, as you will see next.
What is Interlinking?
Internal linking or Interlinking involves linking related content within your website. If you link to another website, this is called an external link, which is NOT our topic today.
The link can be a button or simply a keyword that relates to another piece of content on your website.
These links not only guide users throughout your website but also help search engines understand its hierarchy and context.
This can lead to improved SEO, which increases your rankings in search results and increases organic traffic to your website.
Benefits of Interlinking for SEO
- Improved Navigation: Interlinking helps users easily find related content, increasing engagement and time spent on your site.
- Boosts Page Authority: Linking to important pages distributes “link juice,” enhancing their authority and improving their search engine rankings.
- Better Indexing: Interlinking ensures all your pages are discovered and indexed, maximizing visibility.
- Reduced Bounce Rate: Providing links to relevant content encourages visitors to explore more pages, reducing bounce rates.
Interlinking Methods
You can always use the manual way of interlinking, where you go over every blog post you have and add a link when you find a keyword that relates to another piece of content. However, when you do it repetitively on all your blog posts, it may lead to this 😂

Not only that, but it can also be very time-consuming and inaccurate because you may forget about a piece of content on your website, and when you go over a webpage that can be used to interlink to it, you won’t remember to add it.
Therefore, being me with my Techy brain 😅, I always try to find the best and least time-consuming ways to do specific repetitive tasks. And since we are in the AI Era! I developed a new AI SEO Tool that takes care of interlinking!
My Implementation
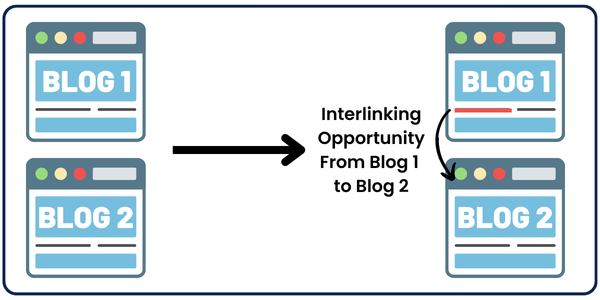
The code’s idea is very simple: it takes two blog post URLs, an input blog post and a target blog post.
We need to find keywords in the input blog post to link to the target blog post.
We’ll do that by chunking the input blog post into sentences, converting all these chunks and the title of the target blog post into vector embeddings, and then getting the cosine similarity between each chunk and the target blog post title.
💡 I used the word 'chunking' in the above paragraph to link to another blog post in which explains chunking for people who dont know much about chunking. This is a very good example of an interlink 💡Anyways, If the cosine similarity between them was above the threshold (which we assigned to 0.5), then these two vector embeddings are similar in meaning; therefore, this sentence from the input blog post can be used to link to the target blog post.
After that, all the sentences that contain interlinking opportunities are passed on to OpenAI’s GPT 4 model, which gives us the specific keyword we can use to link to the target web page.
So we get something like this:
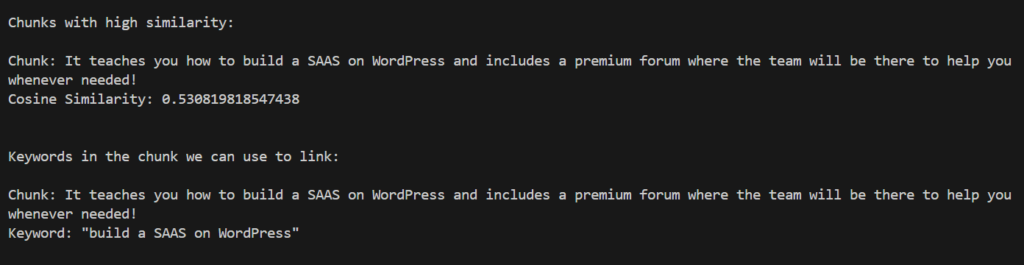
As you can see, the keyword we can use from the source blog is “build a SAAS on WordPress,” which will link to the target blog post, whose title is “SaaS on WordPress: Setup Credit System!”
That’s a very successful interlinking opportunity, don’t you think so?
Technical Explanation of the Code
Let’s go over the technical side of the code, which provided us with the result above.
We first split the blog post into individual sentences and converted each sentence into a numerical format that the computer could understand through a process called vector embeddings.
For example, the word “example” might be represented by a vector such as [0.12, 0.85, -0.34, …].
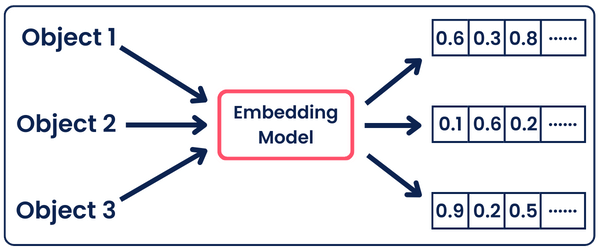
We then convert the target blog title into a vector in the same way. By looping through each sentence, we compare its vector with the vector of the target title using cosine similarity, a mathematical method that measures the similarity between two vectors based on the cosine of the angle between them.
The higher the cosine similarity score (closer to 1) with the target title, the closer meaning these sentences are.
We then pass the identified sentence and the target title to GPT-4 with a prompt asking it to detect the exact keyword(s) to link from.
This method effectively identifies and interlinks relevant sentences within the blog to the target title, enhancing SEO and improving user navigation.
Now, you should have grasped the idea behind how the code works. It’s time to try it yourself!
Get Our Environment Ready
First, our code depends on the SimplerLLM Library, which makes building AI tools much easier, as you will see now.
In addition, we’ll be using the Scikit-Learn library to calculate the cosine similarity easily!
Let’s start by creating a virtual environment and installing the libraries.
So, open a new terminal and run the following step-by-step:
1- Create the Virtual Environment:
python - m venv venv
2- Create and Activate the Virtual Environment:
venv/scripts/activate
3- Install Libraries:
pip install simplerllm scikit-learn
Now, we have a virtual environment with the libraries installed, which will help isolate the project and avoid conflicts between package versions.
The code
First things first, we’ll need to create a .env file and add our OpenAI API Key so that the SimplerLLM functions can use it to generate the responses.
If you don’t have an API key, go to OpenAI’s website and generate a new one. Then, add it to the .env file in this form:
OPENAI_API_KEY = "YOUR_API_KEY"
Now, we’re ready to get into the code’s details.
Our code is based on three main functions:
get_embeddings Function:
def get_embeddings(texts):
    try:
        # Create an instance of EmbeddingLLM
        embeddings_instance = EmbeddingsLLM.create(provider=EmbeddingsProvider.OPENAI, model_name="text-embedding-3-small")

        # Generate embeddings for the chunks of sentences
        response = embeddings_instance.generate_embeddings(texts)

        # Extract embeddings from the response, convert them to an array, and return them
        embeddings = np.array([item.embedding for item in response])
        return embeddings

    # Handle exceptions that might occur during the process
    except Exception as e:
        print("An error occurred:", e)
        return np.array([])
This is the function we’ll use to get the text embeddings for all the chunks and the title. As you can see, SimplerLLM is very straightforward to use; it takes a list of sentences and returns their respective embeddings using OpenAI’s Text Embedding Model.
This is where the text chunks are converted into vectors of numbers, which makes it easier to determine whether textual data are similar in meaning.
compare_with_threshold Function:
def compare_with_threshold(input_chunks, target_title, threshold=0.5):
    results = {}
    # Get embeddings for the target title and input chunks
    title_embedding = get_embeddings([target_title])
    chunk_embeddings = get_embeddings(input_chunks)

    # Compute cosine similarity and filter results
    similarities = cosine_similarity(chunk_embeddings, title_embedding)
    for idx, similarity in enumerate(similarities):
        if similarity[0] >= threshold:
            results[input_chunks[idx]] = similarity[0]

    return results
This is the main engine of the code where we get all the possible interlink opportunities. It takes as input the input blog post chunks (sentences), the title of the target blog post, and the threshold, which is set to 0.5 (you can change it if you want to get different results)
It then gets the text embeddings for all the input chunks and the target blog post title.
After that, it begins checking if the cosine similarity between the target blog post title embedding and every input chunk embedding is greater than the threshold to add it to the results.
Lastly, it returns a dictionary that contains all the sentences that we can use to interlink with their respective cosine similarity.
We have all the interlink opportunities until now. However, to make it even better, I’m going to pass every sentence we get into the choose_the_keyword function to get the specific word or words in each sentence, which we can use to link to the target blog post.
choose_the_keyword Function:
def choose_the_keyword(target_blog_title, similar_chunks):
    # Create an instance of LLM
    llm_instance = LLM.create(provider=LLMProvider.OPENAI, model_name="gpt-4")

    # Initialize a dictionary to store the results
    results = {}

    for chunk, _ in similar_chunks:
        prompt =  f"""
        You are an expert in SEO and blog interlinking. I have a chunk of text from a blog post which is semantically
        similar to the title of a target blog post, so I can use a keyword from the chunk to link to the blog post.

        I'm gonna give you both the chunk and the title of the target blog delimited between triple backticks, and
        your task is to tell me which keyword in the chunk can be used to link to the target blog post. Make sure
        to analyze both of them thoroughly to choose the right keyword from the chunk.

        #Inputs:
        chunk: ```{chunk}```
        title of target blog post: ```{target_blog_title}```

        #Output:
        The keyword can be 2-3 words if necessary and it should be in the chunk.
        And, the response should be only the keyword and nothing else.
        """
        response = llm_instance.generate_response(prompt=prompt)
        results[chunk] = response

    return results
As in the get_embeddings We created an OpenAI LLM instance, but this time, we chose the GPT-4 model instead of the text embeddings model.
After that, we’ll loop over the sentences we got from the function above, and using the power prompt shown, we’ll get the keyword that most fits the target title.
So, yeah, that’s it. You now have your own interlinking automated with a single click!
Run The Code
Here is the full structured code:
Don’t forget when you want to run the code, navigate to the Inputs section and add the link for the blogs on which you want to run this automation. Here’s what it looks like:
# Inputs
input_blog = load_content("INPUT_BLOG_LINK")
target_blog = load_content("TAREGT_BLOG_LINK")

If you have any questions about any part of the code, don’t hesitate to post them in the forum. We’ll be there to help you!
Advanced Implementation
The method above is good. However, it only provides links from one blog post to another.
So, why don’t we improve the code so that we give it a dynamic number of blog posts and it checks for potential interlinks between all blog posts?
All the input blog posts will become source and target posts alternatively.
The code will stay the same, but we’ll add a new function that handles pairs of blog posts and alternates them between input and target posts. Here’s the function:
def process_blogs(blog_urls):
    blogs = [load_content(url) for url in blog_urls]
    links_data = []

    for i in range(len(blogs)):
        input_blog = blogs[i]
        input_blog_chunks = [chunk.text for chunk in chunker.chunk_by_sentences(input_blog.content).chunk_list]
        print("Iteration")

        for j in range(len(blogs)):
            if i == j:
                continue
            target_blog = blogs[j]
            similar_chunks = compare_with_threshold(input_blog_chunks, target_blog.title)

            if similar_chunks:
                keywords = choose_the_keyword(target_blog.title, similar_chunks.items())
                for chunk, keyword in keywords.items():
                    link_info = {
                        "input_blog": blog_urls[i],
                        "target_blog": blog_urls[j],
                        "chunk": chunk,
                        "keyword": keyword,
                        "cosine_similarity": similar_chunks[chunk]
                    }
                    links_data.append(link_info)

    return json.dumps(links_data, indent=4)
As you can see, there are two nested loops to handle alternating between the posts.
At the end, it’ll return a JSON-formatted output that provides each interlinking opportunity with its respective details. Like this:

Additionally, we’ll edit the inputs section so that it takes a dynamic list of links instead of just a source post link and target post link. Here’s what it will look like:
blog_urls = [
    "https://learnwithhasan.com/ai-paraphraser-tool/",
    "https://learnwithhasan.com/saas-on-wordpress/",
    "https://learnwithhasan.com/no-code-ai-system-topic-research/",
    "https://learnwithhasan.com/create-ai-agents-with-python/",
    "https://learnwithhasan.com/free-ai-chatbot-on-wordpress/",
    "https://learnwithhasan.com/what-is-semantic-chunking/",
    "https://learnwithhasan.com/how-to-build-a-semantic-plagiarism-detector/",
    "https://learnwithhasan.com/find-similar-research-paper-abstracts/"
]

result = process_blogs(blog_urls)
print(result)
As you can see, it’s way smaller than the input section from the main code since all the printing and output formatting were added to the process_blogs function we added.
However, this code has one main limitation: It takes too much time to run if the number of blogs is large. For example, I tried to run the code on the blog posts listed above, and it took around 3-4 minutes to produce an output.
So, to solve this problem, we’ll use parallel and batch processing, two different implementations that I combined in my code to make it run significantly faster.
Keep in mind that these two implementations work in totally different ways and are independent of each other.
Here’s how each one works:
Batch Processing:
In the get_embeddings Function: the script now processes text embeddings in batches rather than one at a time. Here’s how it looks now:
def get_embeddings(texts):
    try:
        embeddings_instance = EmbeddingsLLM.create(provider=EmbeddingsProvider.OPENAI, model_name="text-embedding-3-small")
        batch_size = 10
        embeddings = []
        for i in range(0, len(texts), batch_size):
            batch_texts = texts[i:i + batch_size]
            response = embeddings_instance.generate_embeddings(batch_texts)
            embeddings.extend([item.embedding for item in response])
        return np.array(embeddings)
    except Exception as e:
        print("An error occurred:", e)
        return np.array([])
As you can see, we added a batch size of 10, which provides control over how many sentences are processed simultaneously. It also enhances error management by reducing the impact of errors in any single batch, making issues easier to identify and fix.
This approach reduces the overhead of repeatedly calling the embedding LLM and allows the model to optimize the processing of 10 sentences simultaneously, thus speeding up the embedding generation process.
Parallel Processing:
Parallel processing executes the same piece of code by multiple threads concurrently. It distributes computational tasks across the system’s resources to enhance processing speed.
I applied this to the process_blogs function, where I integrated the ThreadPoolExecutor which distributes the tasks among multiple threads.
This approach uses a new function called process_blog_pair to handle each pair of blogs concurrently, enabling simultaneous execution of intensive tasks such as content loading and similarity calculations.
Here are the two new functions:
def process_blog_pair(input_blog_url, target_blog_url):
    try:
        input_blog = load_content(input_blog_url.strip())
        target_blog = load_content(target_blog_url.strip())
    except Exception as e:
        print(f"Failed to load content for URLs {input_blog_url} or {target_blog_url}: {e}")
        return []

    input_blog_chunks = [chunk.text for chunk in chunker.chunk_by_sentences(input_blog.content).chunk_list]
    target_blog_title = target_blog.title
    similar_chunks = compare_with_threshold(input_blog_chunks, target_blog_title)
    links_data = []

    if similar_chunks:
        keywords = choose_the_keyword(target_blog_title, similar_chunks.items())
        for chunk, keyword in keywords.items():
            link_info = {
                "input_blog": input_blog_url,
                "target_blog": target_blog_url,
                "chunk": chunk,
                "keyword": keyword,
                "cosine_similarity": similar_chunks[chunk]
            }
            links_data.append(link_info)
    return links_data

def process_blogs(blog_urls):
    links_data = []
    with ThreadPoolExecutor() as executor:
        future_to_url = {executor.submit(process_blog_pair, blog_url, target_url): (blog_url, target_url)
                         for blog_url in blog_urls for target_url in blog_urls if blog_url != target_url}
        for future in as_completed(future_to_url):
            links_data.extend(future.result())
    return json.dumps(links_data, indent=4)
In this way, the code will run around 10x faster. When I tried to run it on the same number of blogs used above, it took around 20 seconds to give me the results rather than 3-4 minutes. Interesting, huh? 😉
Anyway, here’s the whole new code:
Build A UI For The Tool
The script works perfectly in the terminal, but why don’t we build a simple, user-friendly interface that makes it easier to run the code?
Plus, people who don’t know anything about coding will be able to use it without interacting with the code at all.
This is super simple if we combine streamlit with our power prompt below:
Act as an expert Python programmer specialized in building user-friendly UIs using Streamlit.

Create a Streamlit UI for the provided script. Make sure to comment all the code to enhance understanding, particularly for beginners. Choose the most suitable controls for the given script and aim for a professional, user-friendly interface.

The target audience is beginners who are looking to understand how to create user interfaces with Streamlit. The style of the response should be educational and thorough. Given the instructional nature, comments should be used extensively in the code to provide context and explanations.

Output:
Provide the optimized Streamlit UI code, segmented by comments explaining each part of the code for better understanding.

Input:
Provided script: {your input script}
This prompt is part of the premium prompt library, which is updated every month with new special prompts. All power members get access to the library.
Anyway, I used the prompt, and in seconds, I created a UI for my tool with Streamlit. Here’s the code it generated:
At first, you might think it’s not very easy because I added too many new things. However, if you check the code in detail, you’ll see that creating the interface using Streamlit is very easy. Everything is built-in.
Now, to run the code, you’ll need to save the code as ui.py, open a new terminal and run the following:
streamlit run ui.py
Of course, you can change the file’s name, but you’ll also need to change it to the new file’s name when you run it.
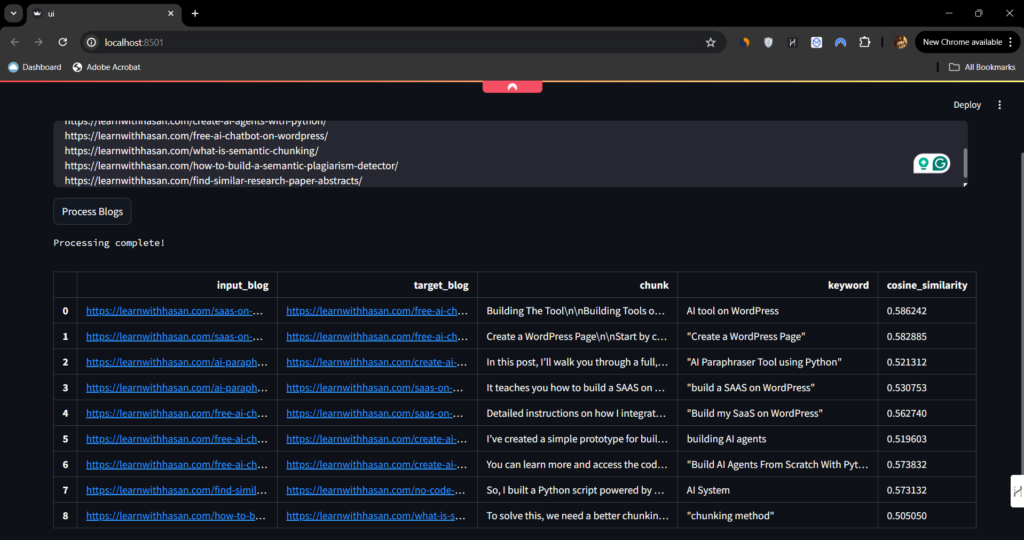
Once you run it, the following web page will open:

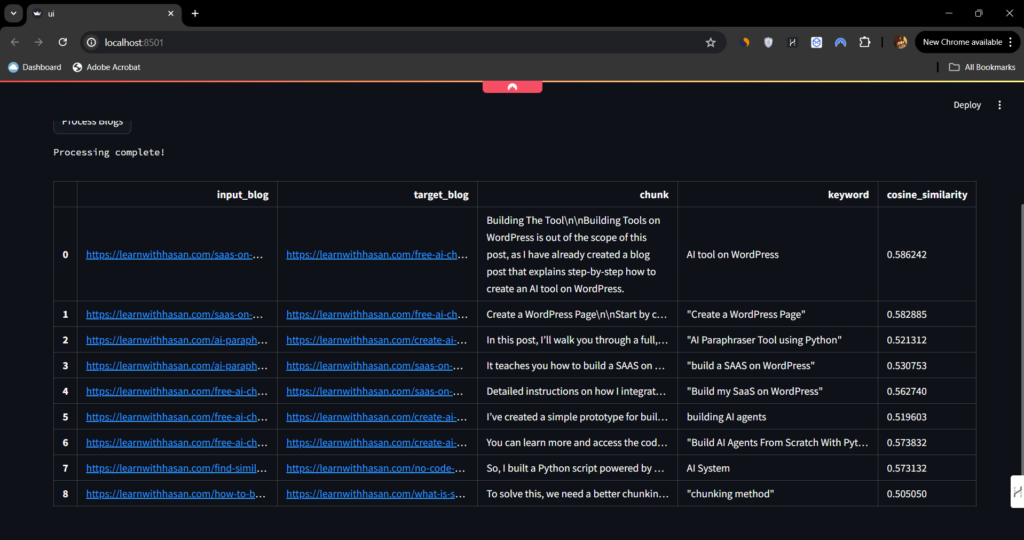
As you can see, it’s very simple and straightforward to use. You enter each blog URL on a new line, click the button, and let the magic happen!
It’ll provide you with a table containing all the interlinking opportunities, including the source blog, target blog, chunk, keyword, and cosine similarity!
Very nice, right? In addition to that, if you hover over one of these rows, it expands, showing you the whole chunks and the whole links like this:
Bonus: Make Money With This Tool!

Rather than keeping the tool only for your use, let people use it and charge them for every use.
Let me explain:
If you build a neat user interface for your tool on your WordPress website (one of the easiest things to do), you can build a points system, and people would buy points to use these tools.
It’s not necessary to build this tool; you can start with it and add many other tools. For example, you could build a backlinks checker instead of interlinks or an SEO analyzer tool.
It may also be your next SAAS Idea!
Then, you can either use these tools and provide them as a freelancing service, or you can build a tools page on your website and charge people a certain number of power points on every use, depending on the tool they’re using.
If you want to learn how to clone the same strategy and business model he’s using, check out this course. It teaches you how to build a SAAS on WordPress and includes a premium forum where the team will be there to help you whenever needed!
If you’re looking for a FREE source, I also have you covered! Here’s a Free Guide that teaches you the basics of how to start. Good Luck!


Responses