Chunking or Text-Splitting is a method for breaking down large pieces of text into smaller chunks. For example, you can chunk an essay into multiple paragraphs, a paragraph into multiple sentences, or even words into multiple characters.
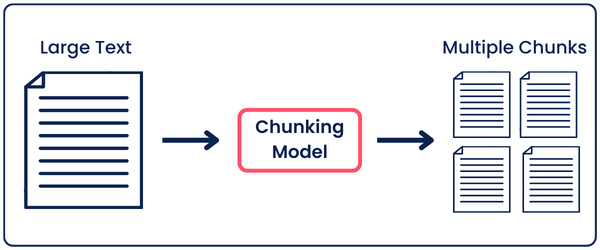
On a human level, this technique makes it easier to process and remember information, whether you’re learning something new, organizing data, or trying to understand complex concepts.
For example, in education, instructors use chunking to help students absorb and retain complex information by breaking lessons into segments.
However, on a programming level, chunking helps programmers working on text analysis, AI, software development, RAG, etc…
For example, in AI, specifically in Retrieval-Augmented Generation (RAG), chunking is essential for handling large datasets. It allows the AI to quickly retrieve specific information, enabling faster and more accurate results.
A Technique that Requires Chunking
A main limitation of generative AI models like ChatGPT and Gemini is hallucination. It is when you ask it something, and it responds with something wrong or not relevant. For example:
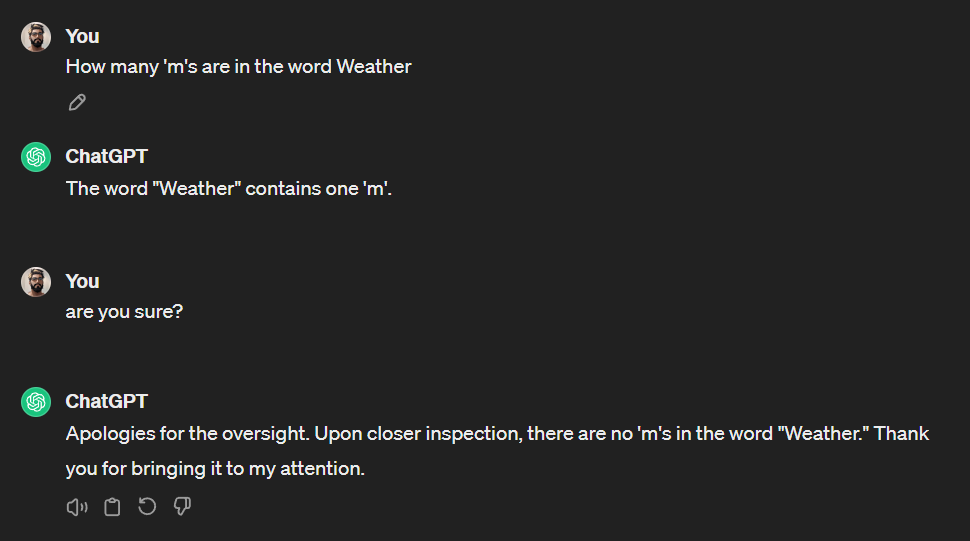
As you can see, it responded incorrectly to the question, although it is obvious that it doesn’t contain any ‘m’s. Then, when I asked if it was sure, it realized that it had responded incorrectly, and it fixed it.
If you use GPT-4 rather than GPT-3.5, it would respond correctly to this question. However, this doesn’t mean that it wouldn’t hallucinate answers for other complex questions.

Here comes Retrieval-augmented generation (RAG), a technique for enhancing the accuracy and reliability of generative AI models by fetching facts from external sources.
You do that by giving the AI model an external resource like an essay and then asking it questions related to it. This AI model will then analyze this piece of text, and if it doesn’t find an answer to your question from the text, it will tell you it doesn’t have an answer rather than hallucinating and giving you a wrong response.
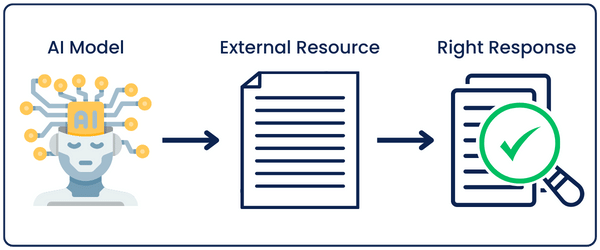
To do that efficiently, RAG chunks the external piece of text into a database of smaller chunks, which improves the search for relevant information and includes it in its responses. This not only improves the accuracy of the generated content but also makes the AI more efficient and quicker in fetching the necessary data.
This is an example of a very important use for chunking. Where the better the chunking method, the better the response and workflow of the RAG program.
Chunking Methods
Chunking can be applied in different ways depending on the program tasks. Here’s an overview of different chunking methods:
- By Character: Breaks down text into individual characters, which is useful for tasks that require deep and granular text analysis.
- By Character + SimplerLLM: Chunks text by characters in addition to preserving sentence structure, getting better and more meaningful segments. (Available in the SimplerLLM library)
- By Token: Text is segmented into tokens, such as words or subwords, commonly used in natural language processing to analyze text.
- By Paragraph: As the name states, it chunks text by paragraphs, which is useful in maintaining text structure.
- Recursive Chunking: It involves repeatedly breaking down data into smaller chunks, often used in hierarchical data structures.
- Semantic Chunking: It groups text based on meaning rather than structural elements, which is crucial for tasks that require understanding the context of the data.
- Agentic Chunking: This type focuses on identifying and grouping text based on the agents involved, such as people or organizations, which is useful in information extraction.
And, now to our main idea 👇
How Does Semantic Chunking Work?
The main idea behind semantic chunking is to split a given text based on how similar the chunks are in meaning.
This similarity is calculated by chunking the given text into sentences, then turning all these text-based chunks into vector embeddings and calculating the cosine similarity between these chunks.
After that, we initialize a threshold, for example, 0.8, and whenever the cosine similarity between 2 consecutive segments is more than that, a split is done there. So, everything before this splitting will be a chunk, and what’s after is another chunk, and so on, until we get all our chunks.
Theoretical Example:
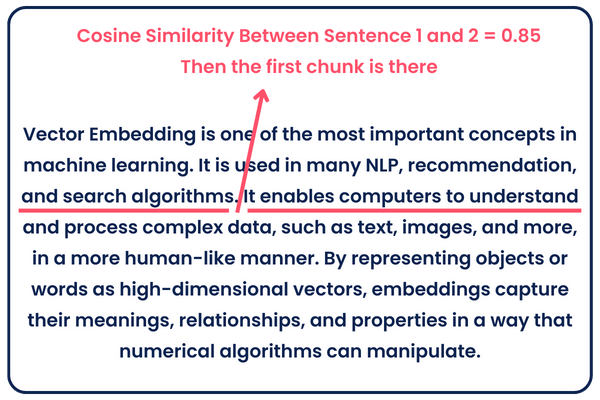
As you can see above, let’s say we turned sentences 1 and 2 into vectors, checked the cosine similarity between them and found it to be 0.85. Since our threshold is 0.8, which is less than the result we got, so we chunk there. If we choose the threshold to be 0.9, no chunk will be done.
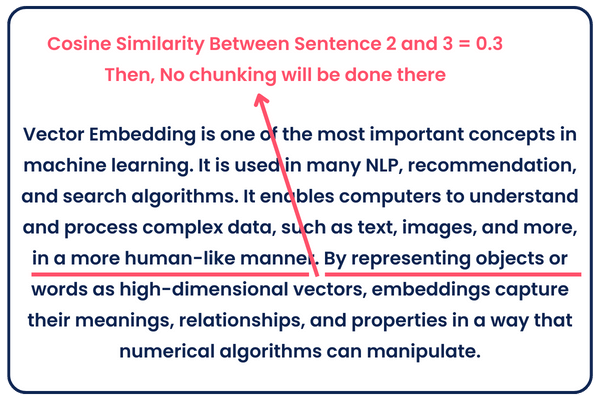
Now, let’s say we turned sentences 2 and 3 into vectors, checked their cosine similarity, and found it to be 0.3. So, no chunking will be done there since our threshold is 0.8, which is greater than the result we got.
Keep in mind that the above example is only theoretical to make the idea simpler.
Prototype
I developed a semantic chunker based on the algorithm I explained above, with a little tweak.
Instead of getting the cosine similarity between adjacent sentences, I combined every sentence with the sentence before it and the sentence after it. Then, I calculated the cosine similarity for the combined sentences.
So, instead of calculating the similarity between sentences 2 and 3, I’m now calculating it between the combined sentences 1,2,3 and 2,3,4.
Why do this? When chunking only by sentences, you may get 2 sentences like “It’s not as easy as it looks.” and “You know?”. When you turn these sentences into vectors, the cosine similarity between them wouldn’t be close; however, in sentence structure and meaning, they are very close.
So, when grouping them together and comparing them with other groups, it would give better results by turning all of them into one vector, therefore getting a low cosine similarity if the groups being compared are really close in meaning.
Anyways, back to our prototype:
import re
import openai
import numpy as np
from sklearn.metrics.pairwise import cosine_similarity

def chunk_text(text):
    # Split the input text into individual sentences.
    single_sentences_list = _split_sentences(text)

    # Combine adjacent sentences to form a context window around each sentence.
    combined_sentences = _combine_sentences(single_sentences_list)

    # Convert the combined sentences into vector representations using a neural network model.
    embeddings = convert_to_vector(combined_sentences)

    # Calculate the cosine distances between consecutive combined sentence embeddings to measure similarity.
    distances = _calculate_cosine_distances(embeddings)

    # Determine the threshold distance for identifying breakpoints based on the 80th percentile of all distances.
    breakpoint_percentile_threshold = 80
    breakpoint_distance_threshold = np.percentile(distances, breakpoint_percentile_threshold)

    # Find all indices where the distance exceeds the calculated threshold, indicating a potential chunk breakpoint.
    indices_above_thresh = [i for i, distance in enumerate(distances) if distance > breakpoint_distance_threshold]

    # Initialize the list of chunks and a variable to track the start of the next chunk.
    chunks = []
    start_index = 0

    # Loop through the identified breakpoints and create chunks accordingly.
    for index in indices_above_thresh:
        chunk = ' '.join(single_sentences_list[start_index:index+1])
        chunks.append(chunk)
        start_index = index + 1

    # If there are any sentences left after the last breakpoint, add them as the final chunk.
    if start_index < len(single_sentences_list):
        chunk = ' '.join(single_sentences_list[start_index:])
        chunks.append(chunk)

    # Return the list of text chunks.
    return chunks

def _split_sentences(text):
    # Use regular expressions to split the text into sentences based on punctuation followed by whitespace.
    sentences = re.split(r'(?<=[.?!])\s+', text)
    return sentences

def _combine_sentences(sentences):
    # Create a buffer by combining each sentence with its previous and next sentence to provide a wider context.
    combined_sentences = []
    for i in range(len(sentences)):
        combined_sentence = sentences[i]
        if i > 0:
            combined_sentence = sentences[i-1] + ' ' + combined_sentence
        if i < len(sentences) - 1:
            combined_sentence += ' ' + sentences[i+1]
        combined_sentences.append(combined_sentence)
    return combined_sentences

def convert_to_vector(texts):
    # Try to generate embeddings for a list of texts using a pre-trained model and handle any exceptions.
    try:
        response = openai.embeddings.create(
            input=texts,
            model="text-embedding-3-small"
        )
        embeddings = np.array([item.embedding for item in response.data])
        return embeddings
    except Exception as e:
        print("An error occurred:", e)
        return np.array([])  # Return an empty array in case of an error

def _calculate_cosine_distances(embeddings):
    # Calculate the cosine distance (1 - cosine similarity) between consecutive embeddings.
    distances = []
    for i in range(len(embeddings) - 1):
        similarity = cosine_similarity([embeddings[i]], [embeddings[i + 1]])[0][0]
        distance = 1 - similarity
        distances.append(distance)
    return distances

# Main Section
text = """Your_Input_Text"""
chunks = chunk_text(text)
print("Chunks:", chunks)
The code is very straightforward; it goes through all the steps I mentioned above.
In the main section, you call for the chunk_text function, which takes your input text and then, from it, calls all the other corresponding functions.
Scroll to the top, and you’ll see that, at first, it calls the _split_senteces function to split the input text into sentences, then the _combine_sentences generates the groups of 3 sentences, which is every sentence with its adjacent sentences; after that, all these grouped sentences are turned into vector embeddings using OpenAI’s embedding model, then the cosine similarity is calculated between all the adjacent groups of sentences, and finally whenever there is a cosine similarity greater than the percentile threshold I initialized to 95 a chunk is done.
Try experimenting with code by changing the percentile threshold and seeing how the chunks differ. You’ll realize that the lower the threshold, the more chunks you’ll get. But why?
When the threshold is low, the two pieces of text have to be very similar to each other to achieve a low cosine distance (or high cosine similarity) to pass the comparison with the threshold and not get chunked.
Otherwise, the text will not be chunked because, of course, not all pieces of text are very similar.
To run the code, you’re gonna have to create a .env file that contains your OpenAI API key like this:

Libraries That Have Semantic Chunkers Built-in
If you’re the type that doesn’t like to do such details yourself and you prefer ready-made tools and functions, you can always use well-known libraries that have semantic chunkers integrated into them; here are a few:
LangChain: LangChain is an open-source library designed to facilitate the building of language model applications. It offers semantic chunking functions, which enhance natural language understanding.
Llama Index: Llama Index is a specialized library that provides efficient indexing and retrieval capabilities for large-scale language models. It integrates semantic chunking to improve search precision and relevancy.
SimplerLLM: Coming soon… I will add more chunking functions to SimplerLLM soon. Stay Tuned!
These libraries vary in their approach and the level of customization they allow, so the choice of which to use may depend on your project’s specific requirements. In my opinion, the best approach is to take the prototype above and edit it to your own liking!
Let’s Visualize the Results
Let’s try the semantic chunker we built and visualize the results we got. Here’s the additional code to read a blog post using simplerLLM and plotting the cosine similarities using matplotlib.pyplot:
from SimplerLLM.tools.generic_loader import load_content

def plot_cosine_similarities(text):
    sentences = _split_sentences(text)
    combined_sentences = _combine_sentences(sentences)
    embeddings = convert_to_vector(combined_sentences)
    similarities = calculate_cosine_similarities(embeddings)

    plt.figure(figsize=(10, 5))
    # Plot the line connecting all points in blue
    plt.plot(similarities, marker='o', linestyle='-', color='blue', label='Cosine Similarity')

    # Overlay red dots where the similarity is 0.95 or higher
    for i, similarity in enumerate(similarities):
        if similarity >= 0.95:
            plt.plot(i, similarity, marker='o', color='red')

    plt.title('Cosine Similarities Between Consecutive Sentences')
    plt.xlabel('Sentence Pair Index')
    plt.ylabel('Cosine Similarity')
    plt.grid(True)
    plt.legend()
    plt.show()

# Example usage:
load = load_content("https://learnwithhasan.com/how-to-build-a-semantic-plagiarism-detector/")
text = load.content
plot_cosine_similarities(text)
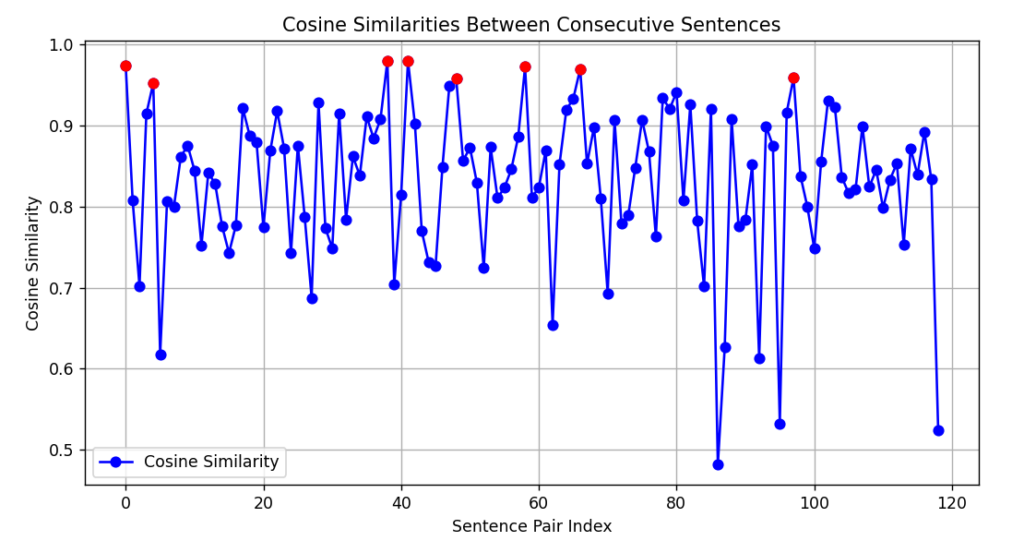
As you can see, I’m loading a blog post from the website, calculating the cosine similarities, and plotting the results:
Very cool, huh?
As shown, every cosine similarity greater than 0.95(the threshold) is colored in red, and that’s where all the chunking will take place. So, everything between the 2 colored dots is a chunk.
Try it with different outputs to see how the graph looks, and share your results with us!


Great post