Claude Code Video Editing: From Raw Recording to Published YouTube Video
 Hasan Aboul Hasan
Published 2026-07-17
Updated 2026-07-25
Hasan Aboul Hasan
Published 2026-07-17
Updated 2026-07-25
I record myself talking. Claude Code does everything after that: the cut, the animations, the screen recordings, the voice cleanup, the sound effects, the thumbnail, and the upload. No video editor. No screen recorder. It is one open repo of eight skills, it is MIT, and it is the thing that edited my videos. The repo is free. The models it calls are not, and I will show you exactly which ones cost money.
- A pipeline that takes a raw talking-head file and gives back a published YouTube video
- The eight Claude Code skills behind every step, ready to drop into
.claude/skills/ - Generated screencasts, so you never open a screen recorder again
- A sound and shot library that makes video number ten cheaper than video number one
Ok, let's start!
I record myself talking. Claude Code builds everything else: the cut, the animations, the screen recordings, the voice cleanup, the sound effects, the thumbnail, and the upload to YouTube.
Cutting the raw footage is the quick part. The work that makes a video feel finished is everything after it: the visuals, the voice, the sound, the packaging, and getting it published. This pipeline does all of it, in six steps, from a raw file to a video on YouTube. And it is one free open repo.
Watch it edit a real video
The fastest way to see what this does is to watch it do it. The video below was made with the repo, end to end. The cut, the animations, the screen recordings, the voice, the sound effects, the music, and the thumbnail, all of it built by Claude Code.
What you record vs what it builds
You record: yourself, talking. That is the entire shot list.
It builds the picture: every full-screen statement, diagram, UI walkthrough, browser and terminal mockup, title card, and transition. All of it as Remotion code, composited over your cut, synced to what you actually said.
And it handles the sound: it isolates your voice out of the room, drops music under the whole thing, and lands each sound effect on the exact word. Picture and audio, both built for you.
Six skills, in order, each handing its output to the next:
A seventh skill, /brand-setup, makes all of it look like your channel instead of mine. An eighth, /vidtsx-2d-generator, holds the low-level rules that keep a Remotion render from crashing. More on both later.
See it before you shoot anything
Before you record a single frame, you can see exactly what this produces.
The repo ships 37 real shots from a video I already published. Not toy examples. The actual shots, from the actual video. They render standalone, with no footage:
git clone https://github.com/hassancs91/claude-youtube-editor
cd claude-youtube-editor

python -m venv venv
venv/Scripts/python -m pip install -r requirements.txt

cd remotion && npm install && npm run gen && npm run studio
That opens Remotion Studio with every shot in a list. Click one and it plays.
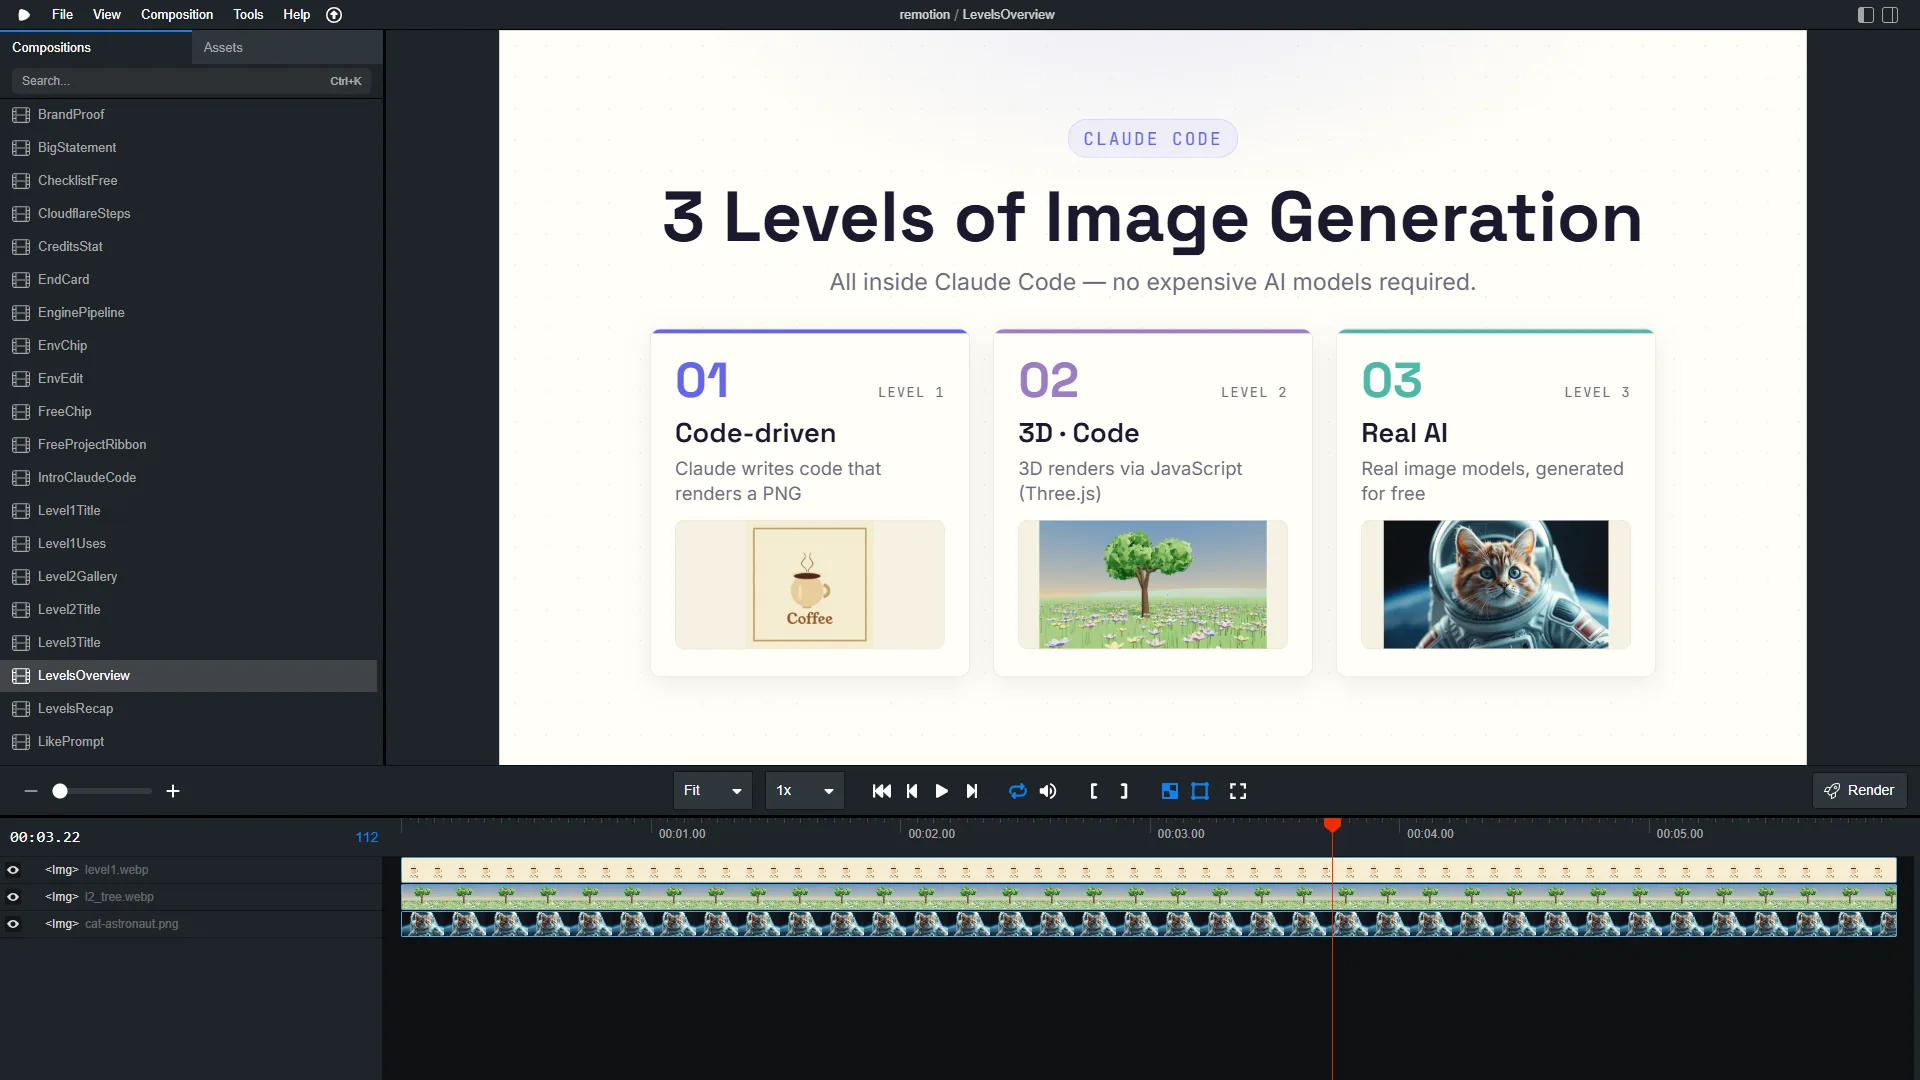
Reading a few of those shots is also the fastest way to learn what the kit can do, because they use the same shared libraries you will be building on: the browser frame, the screencast engine, the VS Code shell, and the motion kit in remotion/src/lib/.
Two notes that will save you ten minutes. Run everything from the repo root, because the tools resolve project paths against your working directory. And the Remotion registry is generated, so npm run gen is not optional after you add or rename a shot. The render scripts do not run it for you.
Step 1: The cut
Step one removes the silences, the filler words, and the bad takes, so the video is ready for the actual work.
You tell Claude to cut the video. That part is not new. Everybody shows this part.
Here is the part they skip.
I transcribe with AssemblyAI, not Whisper. No affiliate, no sponsor. The reason is that a better transcript is not a nicer text file, it is a better cut. Claude reads the transcript and understands my tone and my talking style, so it can tell a real point from a false start. Cutting from a flat wall of text is guessing.
Then Claude authors cuts.json by reading that transcript. There is no second AI call doing the judging. The tools handle audio, encoding, and QA. The judgment about what is a retake, a false start, filler, or fluff is Claude's, working from what you actually said.
Step one also produces the thing the whole rest of the pipeline runs on: edited-transcript.json, a word-level map of your final cut. Every word, with a timestamp.
⚠️ Every later step rides on this one. Step 4 can only land a sound effect on an exact word because step 1 wrote down when that word happens. If the cut is wrong, everything downstream is wrong, and it will not announce itself. Get step 1 right before you move on.
Now watch what happens in the steps nobody ever shows you.
Step 2: The visuals, and the recording I never recorded
This is where everybody stops at the surface. Some title cards. Some text flying in. That is the easy part.
The /make-tsx skill builds the visual beats as Remotion shots over your master cut, and syncs every reveal to the word times from step 1. So a word appears on screen exactly when you say it, because the pipeline knows exactly when you say it.
But here is my favourite one.
The /fake-screencast skill takes static screenshots and turns them into a screen recording that never happened. A cursor eases along a curve to each click target and ripples when it clicks. The URL bar changes per page. Navigation is a hard cut. An in-page filter is a short crossfade. It scrolls smoothly, drifts constantly so it never looks like a slideshow, and does a slow ken-burns zoom onto the payoff.
I never recorded it. It looks like a screen recording because it does what a screen recording does, not because a screen recorder was involved.
Here is one of those shots, open in the studio. Look closely at the browser:
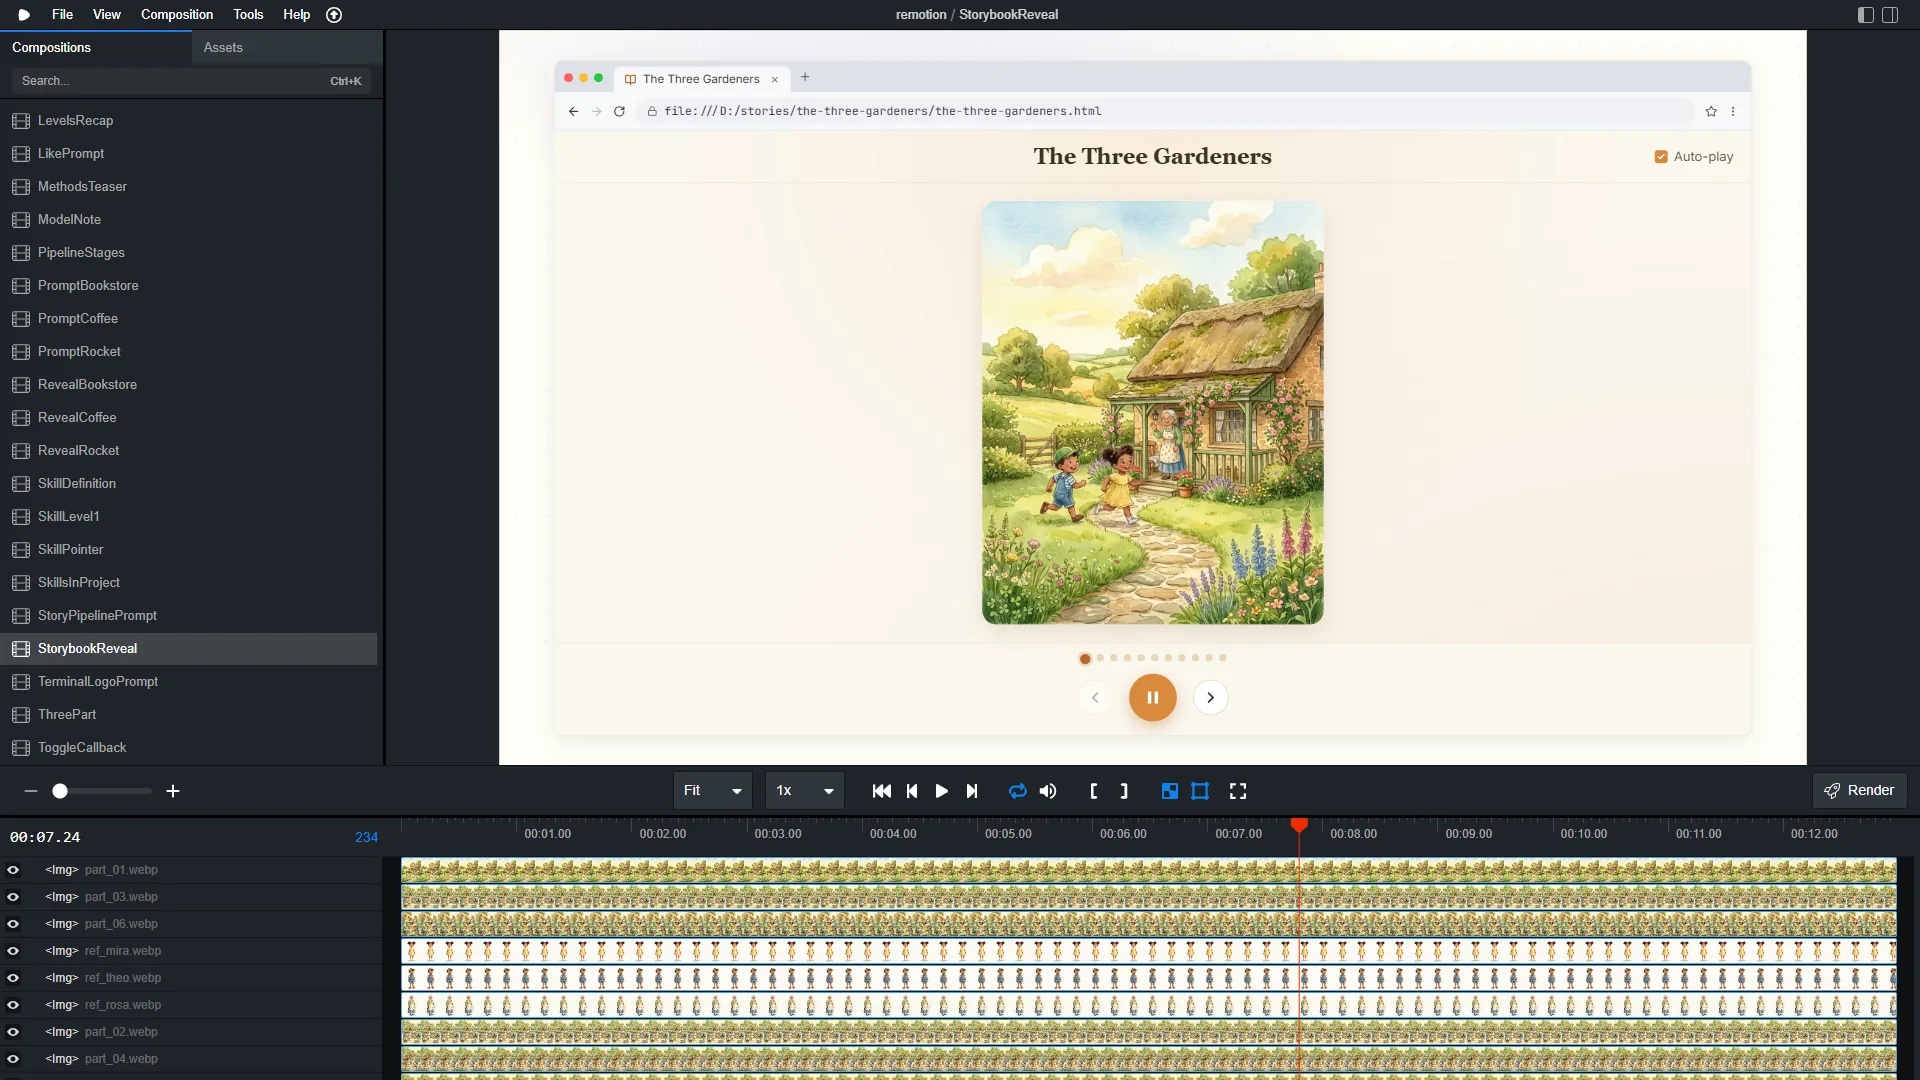
That window is not a screenshot of a browser. It is a browser drawn in code, which is why the timeline underneath it can scrub through it frame by frame like any other shot. There is no recording anywhere in it.
So the only thing I actually record is my face. Everything else on screen was built, not captured.
🧭 New to Claude Code skills? A skill is a folder with an instructions file: a playbook you write once and Claude follows forever. This whole pipeline is eight of them handing work down a line. Going from "I understand skills" to shipping a real product on that pattern is what Build With AI 1.0 covers.
And that is still the part people at least try. Now the steps nobody even attempts.
Step 3: The voice
Step three is voice isolation. The room disappears. The levels stay.
/clean-audio looks at the noise first, on a spectrogram, and picks a method based on what it actually sees. Room tone, hum, hiss, and outdoor noise are different problems. Then it isolates the voice and writes a cleaned master, copying the video stream untouched.
The detail I care about: it preserves your levels by matching RMS, not by normalizing loudness. Final loudness is the mixing step's job, later. This step is denoise only. A tool that "fixes" your levels here quietly wrecks the mix you build in step 4.
You do not need a paid key for this one. /clean-audio has a local RNNoise method that runs on your machine for nothing. ElevenLabs is the better result on hard noise. RNNoise is free and often enough.
This one matters more than people think. Nobody leaves your video because your cut was loose. They leave because your voice sounds like a bathroom.
Step 4: The sound effects
Music is easy. One track under everything and you are done. Claude does that too.
Sound effects are hard, because they have to land on the exact word.
The /suggest-sfx skill reads your visual timeline and your word-level transcript, then plans every cue against a real timestamp into a sfx-plan.json. Not near the word. On it. That is only possible because step 1 wrote down when every word happens.
Two things about it I would defend to anyone.
It looks in the library before it generates anything. The repo ships 33 sound effects and 6 music beds, each one catalogued with its tags, duration, peak, loudness, and the exact prompt that made it. They are all loudness-normalized to about -20 LUFS with a -1.5 dBFS ceiling, which is what makes a per-cue gain in the plan mean something instead of being a guess.
There is a hard stop before the mix. You audit the cue sheet. The skill will not mix until you have looked at it. Sound is the fastest way to make a good video feel cheap, and it is the last thing you want a machine doing unsupervised.
And here is the part I like most. Those sounds do not disappear when the video ships. They go into the library. Named, sorted, saved. Same for the screencast component from step 2.
So next video, Claude does not build any of it again. It picks it up. Video ten is faster and cheaper than video one. It is not a tool I run. It is a tool that builds itself.
Step 5: The packaging
Step five is the title and the thumbnail.
The /packaging skill does one specific thing: one locked title, three different thumbnail bets. That shape is deliberate. YouTube runs a native A/B/C test on thumbnails, so three real bets under one title is the format that actually feeds it. Then it renders the three as real images.
It optimizes for one number, click-through rate. If you have your own channel data, it calibrates against your numbers instead of the defaults, and your data beats my defaults every time.
One honest limit: thumbnails with your face need reference photos of your face, which you supply in media/library/faces/. Mine are not in the repo, for reasons I hope are obvious. No face kit, no face thumbnails.
Step 6: The upload
Before it uploads, it checks itself.
tools/verify_cut.py looks for the words that got cut in half, and it makes sure your audio has not drifted away from your mouth. Run it on every cut render.
This is the step I would keep if you made me delete five of the six. Because that is how AI editing actually fails. Not loudly. Quietly. A render does not crash, it just ships with a syllable missing and 200 milliseconds of drift, and you find out in the comments.
Then tools/yt_upload.py uploads it to YouTube from the terminal, over OAuth rather than an API key, as a private draft. Not live. A draft you look at before the world does.
Raw file in. Published video out.
Make it look like your channel
The repo ships with a house brand, a calm indigo look. It is real and you can keep it.
But if you change nothing, your videos will look like my channel. So run this first, once, before your first video:
/brand-setup
It interviews you about palette, fonts, wordmark, motion energy, and sound taste. Then it rewrites the three files that hold your brand, checks your fonts actually exist and your palette is actually readable, and renders a proof card so you see your brand before you build a video in it.
That "three files together" part is the one gotcha worth knowing. Your brand lives in brand.md, remotion/src/brand.ts, and remotion/src/fonts.ts. Nothing errors when they disagree. The docs just quietly stop describing your videos. Change them together, or let /brand-setup do it.
What it costs
The project is free. The models are not. I would rather tell you now than let you find out later.
| Service | For | Notes |
|---|---|---|
| Claude Code | Driving the whole thing | Paid plan or API credits |
| AssemblyAI | Transcription (step 1) | Free tier is enough to try it |
| ElevenLabs | Voice isolation, SFX, music (steps 3 and 4) | Paid. /clean-audio also has a free local RNNoise method |
| Gemini | Thumbnails (step 5) | Paid, and only if you render thumbnails |
| YouTube | Upload (step 6) | Free, OAuth |
These are your own keys, in your own .env. Nothing here is a subscription to me. Prices drift, so check each provider before you plan a big batch around any number.
The repo itself is genuinely free. It is an MIT repo on GitHub. Clone it, keep it, change it, and sell what you make with it.
Get the pipeline (free)
Everything on this page is one open repo. The eight skills, the Python tools, the Remotion kit, the sound library, and the 37 example shots.
claude-youtube-editor
Record the talking head. Claude Code does the rest. MIT licensed, and I am keeping it updated: transitions, effects, and filters are next.
Star it if you want to see where it goes. That is genuinely how I decide what to build next. Issues and pull requests are welcome, and if you tell me which step you want to go deeper on, that is the one I will do.
If you want to see the rest of what I make Claude Code do outside video, the sibling guides are the place: consistent AI characters across a whole narrated story, free AI images through Cloudflare, and real graphics from pure code with no image model at all. The 37 example shots in this repo are from the video behind those first two.
FAQ
Do I need to know Remotion or React to use this?
No. Claude writes the shots. You describe the beat you want and review what comes back. It helps to read a few of the 37 example shots that ship with the repo, because that is the fastest way to learn what the kit can do, but you are never required to write TSX yourself. The skills carry the low-level rules that keep a Remotion render from crashing.
Does this really replace CapCut, Premiere, or Descript?
For a talking-head video with screen content, yes. That is what it does for me, and that is the shape it is tuned for out of the box. But the core is not locked to that one shape. The cut, the voice cleanup, the sound design, the packaging, and the upload all work on any raw footage. Point it at a different kind of video and you can adapt it to edit almost anything. Talking-head is where it starts, not where it stops.
How much does one video cost to edit?
The repo is free and MIT licensed. The models are not. You pay for Claude Code, AssemblyAI for transcription, ElevenLabs for voice isolation and sound effects, and Gemini for thumbnails, all on your own keys in your own .env file. AssemblyAI's free tier is enough to try the cut, and the clean-audio step has a local RNNoise method that needs no key at all. Nothing here is a subscription to me. Full breakdown above.
Do I still need to screen record anything?
No, and that is the part most people do not believe. Every screen moment is built as Remotion code and composited over your cut. The fake-screencast skill takes static screenshots and animates a cursor along a bezier path to each click target, ripples on click, changes the URL bar per page, cuts hard on navigation, and does a slow ken-burns zoom onto the payoff. It looks like a screen recording because it does what a screen recording does, not because it captured one.
What do I actually record, then?
Yourself, talking. That is the whole shot list. Everything else on the screen, every diagram, UI walkthrough, terminal mockup, title card, and transition, is built as code over your cut and synced to what you actually said.
Does it work on Mac and Linux?
It should. The requirements are Claude Code, Python 3.10+, Node 18+, and ffmpeg and ffprobe on your PATH, all of which are cross-platform, and the repo documents both the Windows and the macOS or Linux venv paths. But I build on Windows 11, so that is what I have actually tested. If you hit a platform bug, open an issue and I will fix it.
Can I use it commercially?
The repo is MIT, so yes. The bundled sound effect and music clips were generated by me with ElevenLabs and are redistributed in the repo, with per-clip provenance recorded in the catalog files. Product logos like Claude and VS Code belong to their owners. Anything you generate with your own keys is governed by the terms of the service that generated it, so check ElevenLabs and Gemini before you build a business on a batch.
What this is part of
Strip away the video and this guide taught one move: break a hard job into small skills, give each one a narrow contract, and let each hand its work to the next. Here the job was a YouTube video. In a real product it is your architecture, your data flow, your deploy steps, wired exactly the same way.
The compounding library is the same idea pointed at time. The reason video ten is cheaper than video one is not that Claude got smarter. It is that the work got saved in a place the next run can find. That is a design decision, not a model feature, and it is the difference between a demo and a system.
That is what I cover in Build With AI 1.0. The full course is 38 lessons that walk through:
- Building a full AI SaaS with Python and Django, from empty folder to deployed product
- Wiring LLMs and AI APIs into real features, the same pattern this pipeline uses, at product scale
- Directing AI with skills and playbooks instead of copy-paste-and-pray
- Auth, payments, and shipping to real users
Course
Want the full system?
Related

Get the free Vibe Engineering Blocks guide
The exact building blocks I use to ship real products with AI — yours as a free PDF.
Questions & Discussion
Ask a question about this guide →Have a question? Ask it in the community — it's tagged #guide and linked back here. Reading is open to everyone; posting needs a free account.
Loading questions…