You are using ChatGPT the Wrong way or at least missing The Real Power of ChatGPT when combined with Chaining.
I hope every ChatGPT user reads and tries what is covered in this post.
What is a ChatGPT Chain?
I think the best way to understand this concept is by showing a practical example.
Let’s assume that you are a YouTuber! and you have the video production workflow as follows:
Topic -> Title Ideas -> Thumbnail Ideas -> Script -> Record -> Edit -> Publish -> Promote.
💡 By the way, I am a YouTuber, and here is my Ad-Free Channel if you wanna take a look. I share videos to help you 10X your marketing and online business with the Power of AI, ChatGPT, Automation, and Python 💡
Anyway, the above YouTube workflow usually takes an average of 10–30 hours, depending on the channel. For me, it takes around ~10 hours.
Let’s forget about recording and editing tasks for now, as they are out of scope in our case here; the other tasks will take about 3-5 hours.
So, in short, we want to cut down the time to 1 hour or less with the help of ChatGPT, and here are the main tasks that we have in our workflow:
Topic > Title Ideas > Thumbnail Ideas > Script > Promote.
You may tell me that with some advanced ChatGPT prompts and other AI tools, we can save time doing all this!
Yeah, maybe you are right! But it is not the best approach. We want something more powerful and stable! Remember that we are talking about a specific scenario here (the YouTube workflow) with 4–5 tasks.
We may have 20, 50, or even 100 Tasks in other workflows and scenarios! I will show you another example later in this post.
So I don’t think you want to go to ChatGPT every time and Start Chatting and asking for 50 or 100 tasks. Memorize the same prompts; maybe ChatGPT is down sometimes. It will probably take more time than the manual process! 🧐
So, the idea is to create what we call an “Automated-GPT-Chaining” Python Script.
Running The Script
Let me show you the power of this simple chaining technique in this 28 seconds demo video:
Cool Huh!
The Power of This Script
There are 4 main aspects of this project:
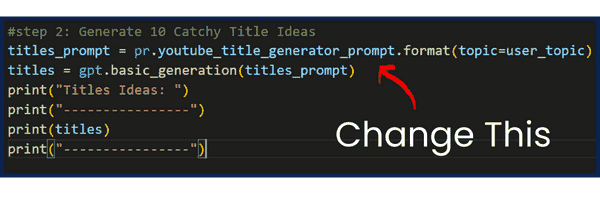
1- Advanced Prompts
If you open the prompts.py file, you will find a list of prompts used. Feel free to customize and test if you want. These are the prompts used in our case to help generate ideas, script, and other stuff.
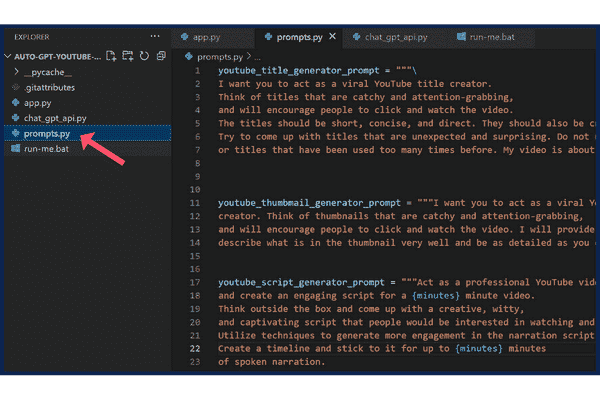
These prompts must be customized based on your workflow (we will have an example later in this post)
2- Automation:
You don’t need to go every time and manually ask ChatGPT for each task. Everything is automated in 1 click!
Since this Python script runs automatically, you won’t have to memorize prompts, open ChatGPT every time, and chat with it. All this will be automated, and you’ll get the results in less than 30 seconds.
3- Chaining:
Here is the core part. If you check the main script file, you will see that we are chaining the outputs. For example:
The output of the first task (title ideas) is the input of the second (thumbnail ideas). The output of the third task (script) is the input of the fourth task (creating a Twitter thread). And so on.
This idea is very important as we are automatically feeding the results and building on top of them! Take a look at the code here.

4- Simplicity:
This script is not written according to best practices. I made it simple for beginners so anyone can edit and customize it based on their specific workflow.
Setup The Script
It is very easy to set up and run this script. All you need to do is download the script files, install Python, install the required modules, and run!
1- Get The Script
2- Install Python
Go to Download Python | Python.org and download the setup file.
Run it and make sure to tick the “Add Python to Path” checkbox.
3- Install the required modules.
Just open any terminal like Powershell or terminal inside Visual Studio code, and run the following command:
pip install openai
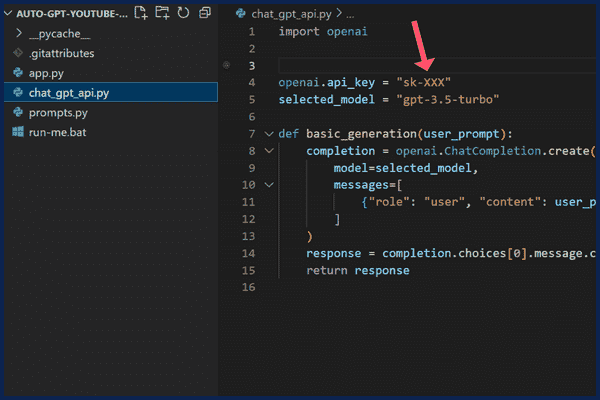
4- Set OpenAI API Key
Open the [chat_gpt_api.py] File and paste the OpenAI key from your account.
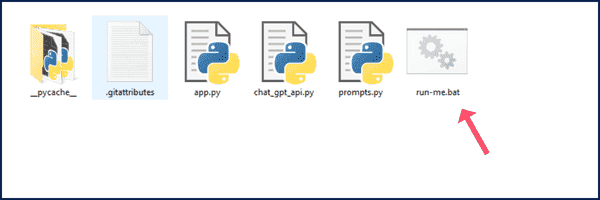
5- Run the script file
In the downloaded project folder, you will find a batch file called “run-me.bat.” Double-click to see the magic.
Customize The Script.
In the prototype discussed above, we went through the YouTube production workflow.
What if you want to customize it for something else? Add more tasks?
Let’s see a simple example of how to do that.
Let’s say you are a blogger, and you have this workflow:
Topic -> SEO Optimized Titles -> Writing The Blog -> Convert Into Twitter Thread
First, you will need to change the prompts; for example, a prompt that generates SEO optimizer Titles is:
Act as a professional blog title generator. Think of titles that are SEO optimized and attention-grabbing at the same time, and will encourage people to click and read the blog post. They should also be creative and clever. Try to come up with titles that are unexpected and surprising. Do not use titles that are too generic, or titles that have been used too many times before. I want to generate 5 to 7 titles maximum. My blog post is about [Topic]Then, change the main script file to use these prompts instead.
You may be thinking now: “I need to learn Python, prompt engineering, and some other tech skills!“
Why not! Come on; we are in 2023. Wake up!
And the good news is: I am here to help 🙂
Check out my free courses on my YouTube channel (No disturbing ads, no signups). Just click and learn. You can thank me by sharing this post and helping others 🙂
And don’t forget if you have any questions, I am here to help, waiting for you in the comments 🙂
hey I’m having this problem
openai.error.RateLimitError: You exceeded your current quota, please check your plan and billing details.
its showing rate limit but its working just fine in there website!!
should I change the selected model?? its gpt-3.5-turbo by default.. is there any basic model or something??
enable billing in yout openAI account, this is not free
Sir , first of all i want to give you a very big thanks and respect your work. Sir can I ask your motivation of doing all these amazing stuff at free of cost .
Brother i have same issue , because we have to purchase the api key from chat gpt
How to run it on mac?
you can install visual studio for mac
nice informative lecture and video
Sir , make a tutorial how to make full fledged website like you have created your promoterkit.Please……
Preparing it 🙂
Hi Hasan,
I’m brand new to Python and Visual Studio but when I run the .bat file I pick up the error shown here: https://imactionsheets.com/Error.jpg
I’m assuming the piece I have circled has been created because I am still on the free version of ChatGPT. Would you agree?
Are all the other comments relative to my free version of ChatGPT or can you see anything else I may have done wrong?
I will be purchasing ChatGPT soon enough.
Loving your stuff.
Neill
did you setup billing in your OpenAI account?
Hi Hasan, I’m so thankful for your teaching. I have a question, I can’t seem to get gpt-4 working on this code. I have a paid subscription and I can use 4 in chat and Playground.
Please advise.
import openai
openai.api_key = “sk-;kj;kvjz;vjz;LBJ;zljv;lK:ZLvkx…….”
selected_model = “gpt-4”
temprature = 1.0
what is the error?
OK. I’ve joined the waitlist here. https://openai.com/waitlist/gpt-4-api
Thanks very much . can you help us with a prompt to do literature review on a specific topic. ChatGPT have some times problems to enter databases like google scholar
please explain the workflow you are looking for in detail
Love from India broo..
Your efforts are outstanding and your explanation is miraculous..
Continue the spirit brother…
Thank you!
Hi Hassan…
I am new to blogging and I am learning so much from you.
I am a little in the dark on this post and python and the rest, but I am however ready to learn.
Is it possible to make a video on the installation as you have explained it.
I have a MacBook pro, please take this into consideration.
Thanks and Regards
Ephron
I will try my best, but I think there are many tutorials on youtube in installing python on mac
HI Hassan…
Found this video of yours: https://www.youtube.com/watch?v=-RGgYsufBQY
But I am struggling to find the site where I need to register for an API key.
I typed in platform.openai.com and then I get to chatgpt window?
Please assist.
Thanks…
Ephron
https://openai.com/ then signup
Hi Hasan!
Thank you for the video! I am trying to do it on my own and I seem to be running a trouble on Visual studio, whenever I follow step 3 from the mentioned above the “modules” im having an error that says, “The term pip is not recognized”.
Should i have subscription in open AI to have token to integrate with ?
No, just after signing up you can access your key.
Thank you very very much Mr. Hasan you are a genius man, with this post or script I’ll make WordPress checklist, to design new wordpress websites without forgeting anything like before in designing my websites, if you have any suggestions about my idea you can reply to this comment. Thank you very much again, I appreciate it.
Hasan, you are a true inspiration to many YouTube channels. In the YouTube landscape, there tends to be a strong emphasis on two things: subscribers and views. When I watch those channels, I often notice a striking similarity in their content. However, due to the limited options available, viewers didn’t necessarily demand more variety.
But you stand out as an exception. I have always been confident that creating outstanding content is your utmost priority. It’s not merely about that; it’s about your unwavering dedication to producing the absolute best. Hasan, you serve as a shining example for numerous YouTube channels. You remind us all that success extends beyond subscriber counts and view numbers.
Heyy Hasan I’m having a problem downloading zip file from file upload link
Can you help me
Please try again, I fixed the link: https://learnwithhasan.com/sdm_downloads/auto-gpt-youtube-prototype/
Pingback: ChatGPT Earthquake Edition: Get Mind-Blowing Results!