Recently, I’ve discovered a new way to monetize Streamlit apps using WordPress, and I’m excited to share it with you.
The Core Idea and Benefits
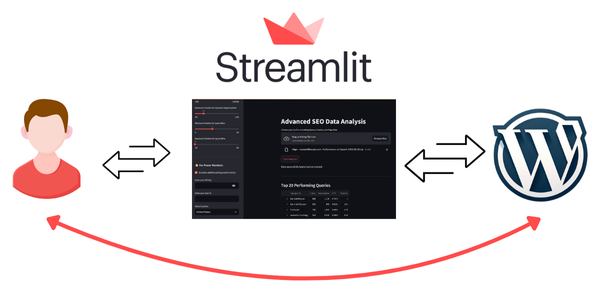
In this post, I’ll guide you through the process of connecting WordPress with Streamlit using custom API endpoints.
This approach allows users to purchase credits on your WordPress site and use them to access your Streamlit tools.
It’s a game-changer for those looking to monetize their skills quickly and efficiently.
Here are some compelling reasons why you might want to consider this approach:
- Freelance Service Protection: Easily secure your tools with API key authentication for client billing.
- Rapid Monetization: If you have a WordPress site, you can build and sell tools to your visitors quickly.
- Prototype and MVP Development: Create and sell minimum viable products in hours instead of weeks or months.
- API Development Skills: Learn to work with custom API keys and endpoints on WordPress, opening doors to building and selling APIs directly.
- Advanced WordPress Usage: Gain insights into turning WordPress into a SaaS platform, expanding your knowledge beyond traditional tutorials.
Step 1: Setting Up Unique API Keys
First, we need to create unique API keys for each user on our WordPress website.
We’ll use the Advanced Custom Fields (ACF) plugin to add a custom field called “api_key” to user profiles.
We’ll use some custom code snippets to allow users to generate their API keys from the front end.
Don’t worry if you’re not a programmer—I’ll provide the snippets for you to plug in and test directly.
Install the WP Code Snippets plugin, add a new snippet, and paste the following code:
function generate_acf_user_api_key($user_id) {
// Generate a unique API key
$api_key = bin2hex(random_bytes(16));
// Update the ACF field with the generated API key
update_field('api_key', $api_key, 'user_' . $user_id);
}
add_action('user_register', 'generate_acf_user_api_key');
function regenerate_user_api_key() {
// Check if the user is logged in
if (!is_user_logged_in()) {
return;
}
// Get the current user's ID
$user_id = get_current_user_id();
// Generate a new API key
$new_api_key = bin2hex(random_bytes(16));
// Update the ACF field with the new API key
update_field('api_key', $new_api_key, 'user_' . $user_id);
// Redirect to the same page to avoid form resubmission
wp_redirect($_SERVER['REQUEST_URI']);
exit;
}
function display_acf_user_api_key_with_regenerate() {
// Check if the user is logged in
if (!is_user_logged_in()) {
return '<p>You need to be logged in to see your API key and User ID.</p>';
}
// Handle the API key regeneration
if (isset($_POST['regenerate_api_key'])) {
regenerate_user_api_key();
}
// Get the current user's ID
$user_id = get_current_user_id();
// Retrieve the API key using ACF
$api_key = get_field('api_key', 'user_' . $user_id);
// Output the API key and the regeneration form
ob_start();
?>
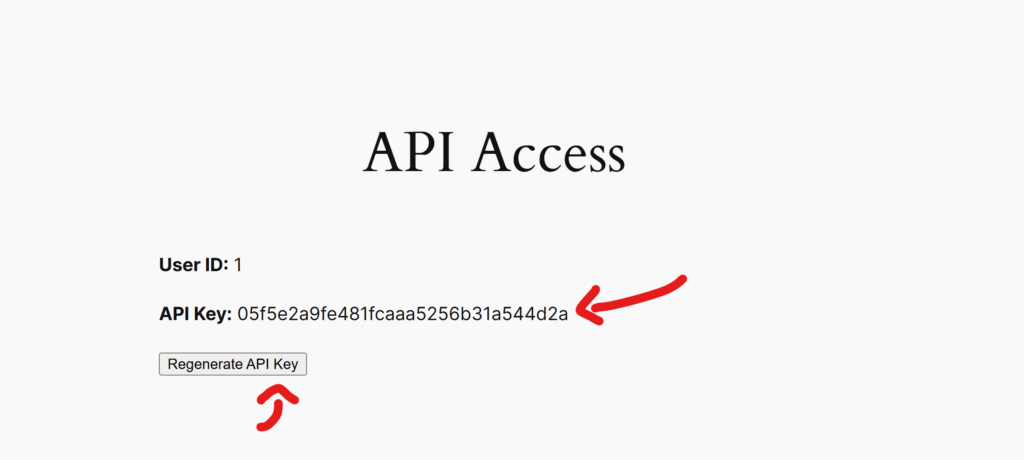
<p><strong>User ID:</strong> <?php echo esc_html($user_id); ?></p>
<p><strong>API Key:</strong> <?php echo esc_html($api_key); ?></p>
<form method="post">
<input type="submit" name="regenerate_api_key" value="Regenerate API Key" />
</form>
<?php
return ob_get_clean();
}
add_shortcode('show_acf_api_key_with_regenerate', 'display_acf_user_api_key_with_regenerate');Let’s break down these functions for beginners:
- generate_acf_user_api_key: This function generates a unique API key when a new user registers.
- regenerate_user_api_key: This function allows users to generate a new API key if needed.
- display_acf_user_api_key_with_regenerate: This function creates a shortcode to display the user’s API key and a button to regenerate it.
Now, create a new page on your WordPress site and add the shortcode [show_acf_api_key_with_regenerate] to display the API key generation interface.
Step 2: Setting Up the Credits System
To implement a credit system, we’ll use the myCRED plugin. This plugin adds a full credits or points system to WordPress, allowing users to buy, earn, and spend credits.
Install and activate the myCRED plugin from the WordPress plugin repository.
This plugin will add a complete credits system to your WordPress site, which allows users to buy points/credits on your sites.
Step 3: Creating Custom API Endpoints
Now, let’s create custom API endpoints to connect external applications (like our Streamlit app) with our WordPress website and credit system.
We’ll use the API key to identify each user.
Create a new snippet in the WP Code Snippets plugin and add the following code:
function register_custom_api_endpoint() {
    register_rest_route('custom/v1', '/check-balance', array(
        'methods' => 'POST',
        'callback' => 'check_user_balance',
        'permission_callback' => '__return_true', // Handle permissions inside the callback
    ));
}
add_action('rest_api_init', 'register_custom_api_endpoint');

function validate_user_api_key($user_id, $api_key) {
    // Get the stored API key from user meta
    $stored_api_key = get_user_meta($user_id, 'api_key', true);

    // Compare the provided API key with the stored API key
    if ($stored_api_key && $stored_api_key === $api_key) {
        return true;
    }

    return false;
}

function check_user_balance(WP_REST_Request $request) {
    // Get parameters from the request
    $user_id = $request->get_param('user_id');
    $api_key = $request->get_param('api_key');
    $required_points = 50; // Set your required points threshold here

    // Validate the user ID and API key
    if (!validate_user_api_key($user_id, $api_key)) {
        return new WP_REST_Response(array(
            'status' => 'fail',
            'message' => 'Invalid User ID or API Key'
        ), 401);
    }

    // Get the user's points balance using MyCred
    if (function_exists('mycred_get_users_balance')) {
        $points_balance = mycred_get_users_balance($user_id);
    } else {
        return new WP_REST_Response(array(
            'status' => 'fail',
            'message' => 'MyCred plugin is not active or function not available'
        ), 500);
    }

    // Check if the points balance is larger than the required points
    if ($points_balance >= $required_points) {
        return new WP_REST_Response(array(
            'status' => 'success',
            'message' => 'Sufficient points balance',
            'points_balance' => $points_balance
        ), 200);
    } else {
        return new WP_REST_Response(array(
            'status' => 'fail',
            'message' => 'Insufficient points balance',
            'points_balance' => $points_balance
        ), 403);
    }
}


function register_simulate_api_call_endpoint() {
    register_rest_route('custom/v1', '/api-call', array(
        'methods' => 'POST',
        'callback' => 'simulate_api_call',
        'permission_callback' => '__return_true',
    ));
}
add_action('rest_api_init', 'register_simulate_api_call_endpoint');


function simulate_api_call(WP_REST_Request $request) {
    // Get parameters from the request
    $user_id = $request->get_param('user_id');
    $api_key = $request->get_param('api_key');
    $points_to_deduct = 50; // Points to deduct on successful API call

    // Validate the user ID and API key
    if (!validate_user_api_key($user_id, $api_key)) {
        return new WP_REST_Response(array(
            'status' => 'fail',
            'message' => 'Invalid User ID or API Key'
        ), 401);
    }

    // Simulate an external API call (e.g., a simple success response)
    $api_success = true; // Simulate a successful API response

    if ($api_success) {
        // Get the user's current points balance using MyCred
        if (function_exists('mycred_get_users_balance')) {
            $current_balance = mycred_get_users_balance($user_id);
        } else {
            return new WP_REST_Response(array(
                'status' => 'fail',
                'message' => 'MyCred plugin is not active or function not available'
            ), 500);
        }

        // Check if the user has enough points
        if ($current_balance < $points_to_deduct) {
            return new WP_REST_Response(array(
                'status' => 'fail',
                'message' => 'Insufficient points balance',
                'current_balance' => $current_balance
            ), 403);
        }

        // Deduct the points from the user's balance
        if (function_exists('mycred_subtract')) {
            mycred_subtract('simulate_api_call', $user_id, $points_to_deduct);
            $new_balance = mycred_get_users_balance($user_id);

            return new WP_REST_Response(array(
                'status' => 'success',
                'message' => 'API call successful, points deducted',
                'new_balance' => $new_balance
            ), 200);
        } else {
            return new WP_REST_Response(array(
                'status' => 'fail',
                'message' => 'Failed to deduct points, MyCred function not available'
            ), 500);
        }
    } else {
        return new WP_REST_Response(array(
            'status' => 'fail',
            'message' => 'API call failed'
        ), 500);
    }
}
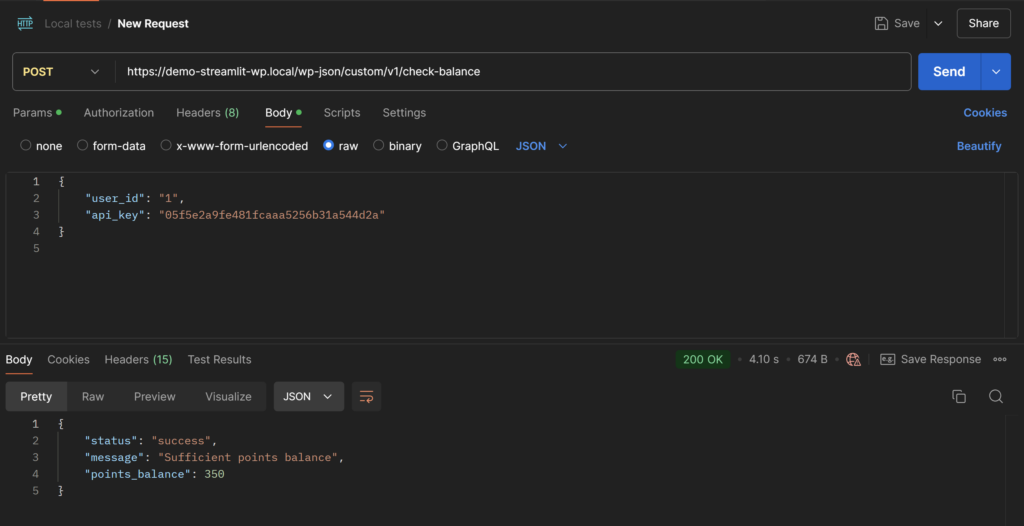
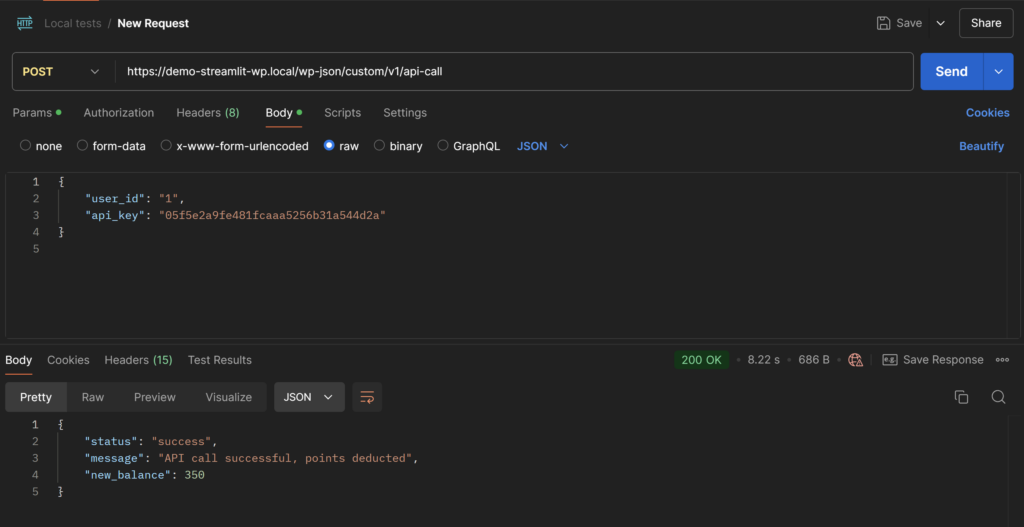
These endpoints allow us to check a user’s balance and simulate an API call that deducts points. Let’s test them using a tool like Postman.
To test the /check-balance endpoint:
To test the /api-call endpoint:
Step 4: Connecting Streamlit to WordPress
Now that our WordPress site is set up with custom API endpoints let’s create a simple Streamlit app to demonstrate the connection:
import streamlit as st
import requests
# WordPress API URL
api_url = "http://your-wordpress-site.com/wp-json/custom/v1/api-call"
# Streamlit UI
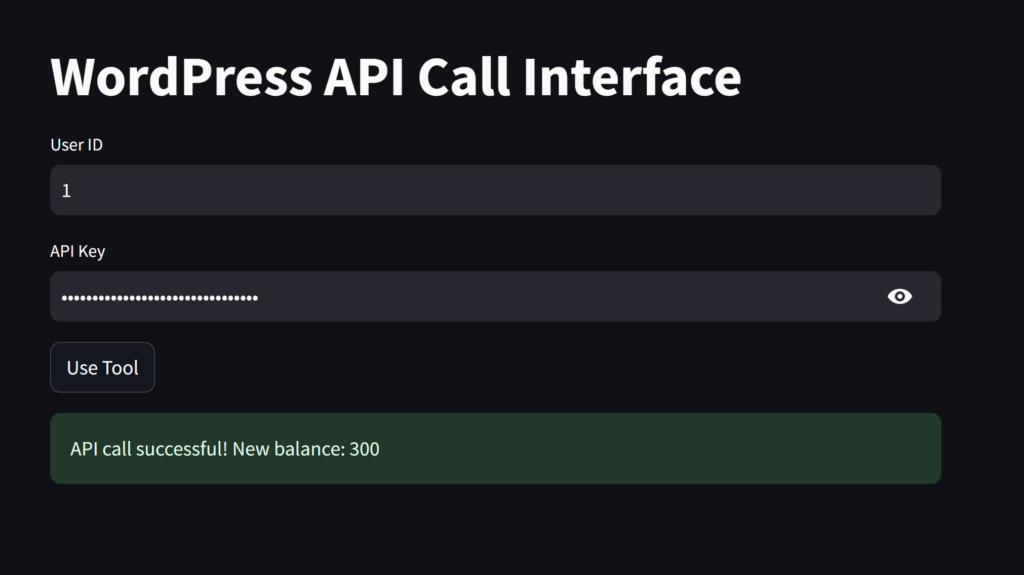
st.title("WordPress API Call Interface")
# Input fields for API Key and User ID
user_id = st.text_input("User ID")
api_key = st.text_input("API Key", type="password")
if st.button("Use Tool"):
if not user_id or not api_key:
st.error("Please enter both User ID and API Key.")
else:
# Prepare the API request payload
payload = {
"user_id": user_id,
"api_key": api_key
}
# Call the WordPress API
response = requests.post(api_url, json=payload)
# Handle the API response
if response.status_code == 200:
data = response.json()
if data.get("status") == "success":
st.success(f"API call successful! New balance: {data.get('new_balance')}")
else:
st.error(f"Failed: {data.get('message')}")
elif response.status_code == 401:
st.error("Authentication failed: Invalid User ID or API Key.")
elif response.status_code == 403:
st.warning("Insufficient points balance.")
else:
st.error(f"API call failed with status code: {response.status_code}")This Streamlit app allows users to enter their User ID and API Key. It then calls the WordPress API to simulate using a tool and deducting points.
Another approach: Building and Selling APIs on WordPress
The custom API endpoints we’ve created can be extended to build and sell APIs directly on WordPress.
This approach allows you to monetize your data or services without the need for external platforms.
To create a sellable API:
- Design your API endpoint to provide valuable data or functionality.
- Set up a pricing structure using the myCRED plugin.
- Create a landing page on your WordPress site to market your API.
Here’s an example of how you might structure an API endpoint for a weather data service:
<?php
function get_weather_data(WP_REST_Request $request) {
    $user_id = $request->get_param('user_id');
    $api_key = $request->get_param('api_key');
    $location = $request->get_param('location');

    if (!validate_user_api_key($user_id, $api_key)) {
        return new WP_REST_Response(array(
            'status' => 'fail',
            'message' => 'Invalid User ID or API Key'
        ), 401);
    }

    // Check if user has enough credits
    $required_points = 10;
    $current_balance = mycred_get_users_balance($user_id);

    if ($current_balance < $required_points) {
        return new WP_REST_Response(array(
            'status' => 'fail',
            'message' => 'Insufficient points balance',
            'current_balance' => $current_balance
        ), 403);
    }

    // Simulate fetching weather data
    $weather_data = array(
        'location' => $location,
        'temperature' => rand(0, 35),
        'conditions' => array('Sunny', 'Cloudy', 'Rainy', 'Windy')[rand(0, 3)]
    );

    // Deduct points for successful API call
    mycred_subtract('weather_api_call', $user_id, $required_points);

    return new WP_REST_Response(array(
        'status' => 'success',
        'data' => $weather_data,
        'points_deducted' => $required_points,
        'new_balance' => mycred_get_users_balance($user_id)
    ), 200);
}

add_action('rest_api_init', function () {
    register_rest_route('weather-api/v1', '/get-weather', array(
        'methods' => 'GET',
        'callback' => 'get_weather_data',
        'permission_callback' => '__return_true',
    ));
});
?>
This example demonstrates how you can create a weather API that charges users credits for each request.
You can expand on this concept to create more complex and valuable APIs.
Check out my full course on building and selling APIs here:

Conclusion
Connecting Streamlit to WordPress using custom API endpoints and a credit system opens up a world of possibilities for monetizing your skills and tools.
This approach provides a flexible, low-overhead way to start selling your services or data without the need for complex infrastructure.
By leveraging WordPress’s extensibility and the power of Streamlit, you can quickly prototype, deploy, and monetize your ideas. Whether you’re a freelancer looking to secure your tools, a developer wanting to sell APIs, or an entrepreneur aiming to build a SaaS product, this method provides a solid foundation to start from.
Remember always to prioritize security, user experience, and the value you’re providing to your customers.
As you grow, you may want to consider more advanced solutions, but this approach is an excellent way to validate your ideas and start generating revenue with minimal upfront investment.
See this in action
I also created a video version of this article to see this in action with some more examples:
Need Support
If you have problems implementing this strategy, please join us on the forum, I will be there almost everyday to answer your questions. (it is free)
FAQs
Q: Is this approach suitable for large-scale applications?
A: While this method is great for getting started and validating ideas, for large-scale applications with high traffic, you might want to consider a more robust infrastructure.
Q: Can I use this method with other Python frameworks besides Streamlit?
A: Absolutely! The WordPress API endpoints we’ve created can be used with any programming language or framework that can make HTTP requests.
Q: How secure is this method?
A: This method uses API keys for authentication, which provides a basic level of security. For production use, you should implement additional security measures such as SSL, rate limiting, and possibly OAuth2 for more secure authentication.
Q: Can I sell subscriptions instead of using a credit system?
A: Yes, you can modify this approach to work with subscriptions. You would need to use a WordPress membership plugin in conjunction with the API system we’ve set up.
Q: How do I handle user support and API documentation?
A: You can create documentation pages on your WordPress site and use a support plugin or helpdesk software to handle user inquiries. For API documentation, consider using tools like Swagger UI to create interactive API documentation.

greate content. Love to read.