Build Your Own Data Library With AI Automation: A Complete Guide for Beginners

In this post, I’ll show you how to build a structured data library on WordPress with no-code AI automation and JSON structures, as I did in my Apps Library on Self Host School.
But before, what is JSON? JSON stands for JavaScript Object Notation, but don’t let the name scare you. It is a straightforward way to organize information that is both easy for humans and computers to read.
Imagine you’re organizing your closet. Instead of throwing everything in randomly, you create sections: shirts, pants, shoes. Each section has specific attributes: color, size, brand, and price.
JSON works the same way:
{
  "shirt": {
    "color": "blue",
    "size": "medium",
    "brand": "Nike",
    "price": "$25"
  }
}
For the sake of this tutorial, I’ll build a VPS provider data library, where the JSON structure will contain information like pricing, features, specifications, and more. This structure ensures every provider’s information follows the same format, making it easy to compare and display.
Step 1: Design Your JSON Structure
Before we scrape any data, we need to define what information we want to collect. We start with what information we have in mind, like pricing, features, and specifications; then we go chat with AI to brainstorm more information we might need.
Then we get such a JSON structure that we can use for our example:
{
  "provider_name": "",
  "website_url": "",
  "pricing": {
    "billing_cycle_options": [],
    "tiers": [
      {
        "tier_name": "",
        "monthly_price": "",
        "annual_price": "",
        "specifications": {
          "cpu_cores": "",
          "ram_gb": "",
          "storage_gb": "",
          "bandwidth": ""
        }
      },
    ]
  },
  "features": {
    "operating_systems": [],
    "backup_included": "",
    "support_level": ""
  },
  "datacenter_locations": [],
  "free_trial": "",
  "affiliate_link": "",
  "last_updated": ""
}
This should be enough for this example; if you’re looking to make it production-ready, it’s better to do more research and improve it.
Step 2: Set Up Your Make.com Automation Workflow
Make.com is our no-code automation software of choice. It’s free to start, and we’ll use it to scrape the data and process it with AI without writing any code.
So, let’s sign up for a free account on Make, create a new scenario, and add these modules in order (I’ll attach the blueprint at the end so you can easily import it into your scenario):
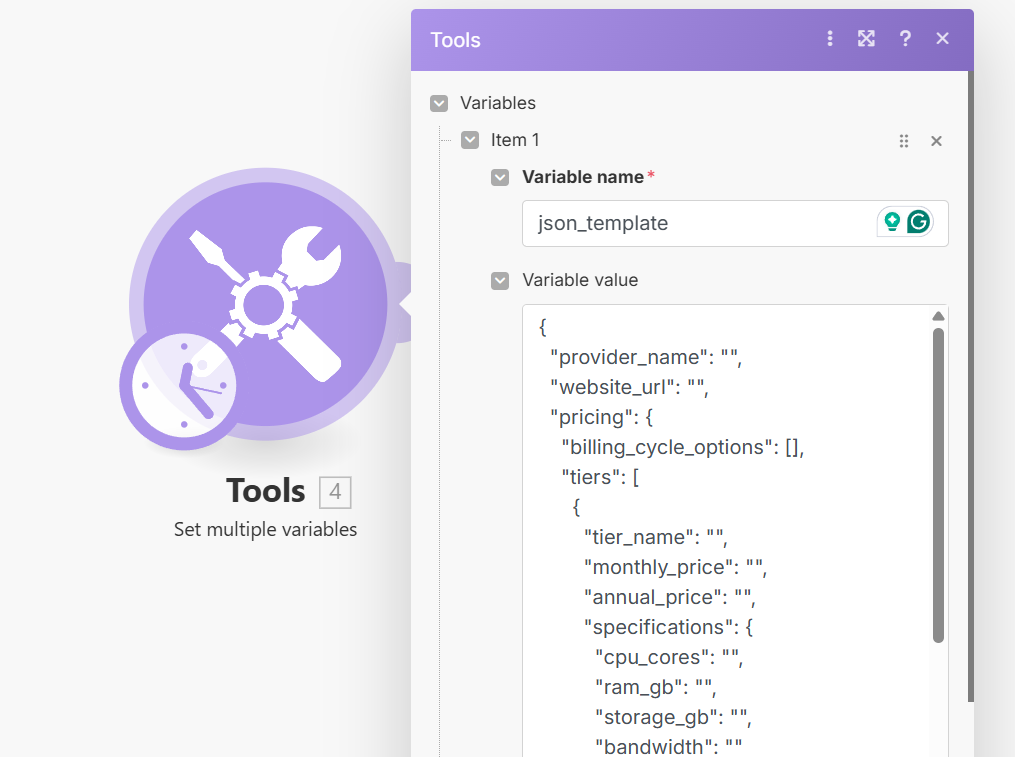
Module 1: Set Multiple Variables (Your JSON Template + Target URL)
- Add a “Set Multiple Variables” module
- We’ll add 2 variables for our JSON structure:
- Name:
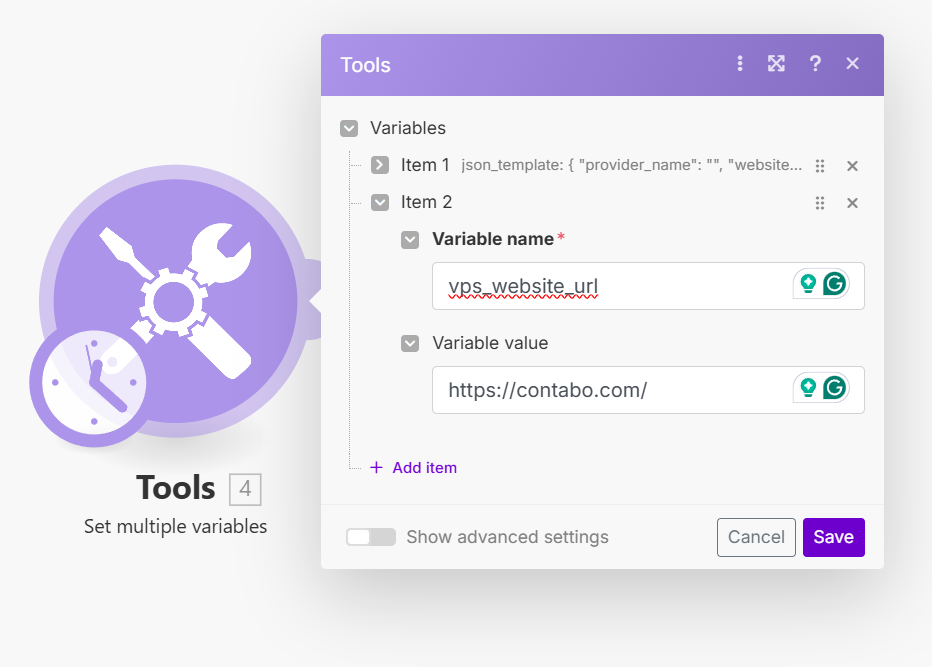
json_template; Value: JSON structure from Step 1 - Name:
vps_website_url; Value: URL of the VPS provider (e.g., https://contabo.com/)
- Name:
Module 2: HTTP Request (Web Scraping)
In this module, we’ll use Serper API for better data extraction. Serper provides free tokens to start and gives us clean, structured content instead of raw HTML.
Note: If you don’t want to use a third-party API, you can directly use the “Make a request” module inside Make to get raw HTML, but you’ll need a “Text parser” module afterward to clean the data.
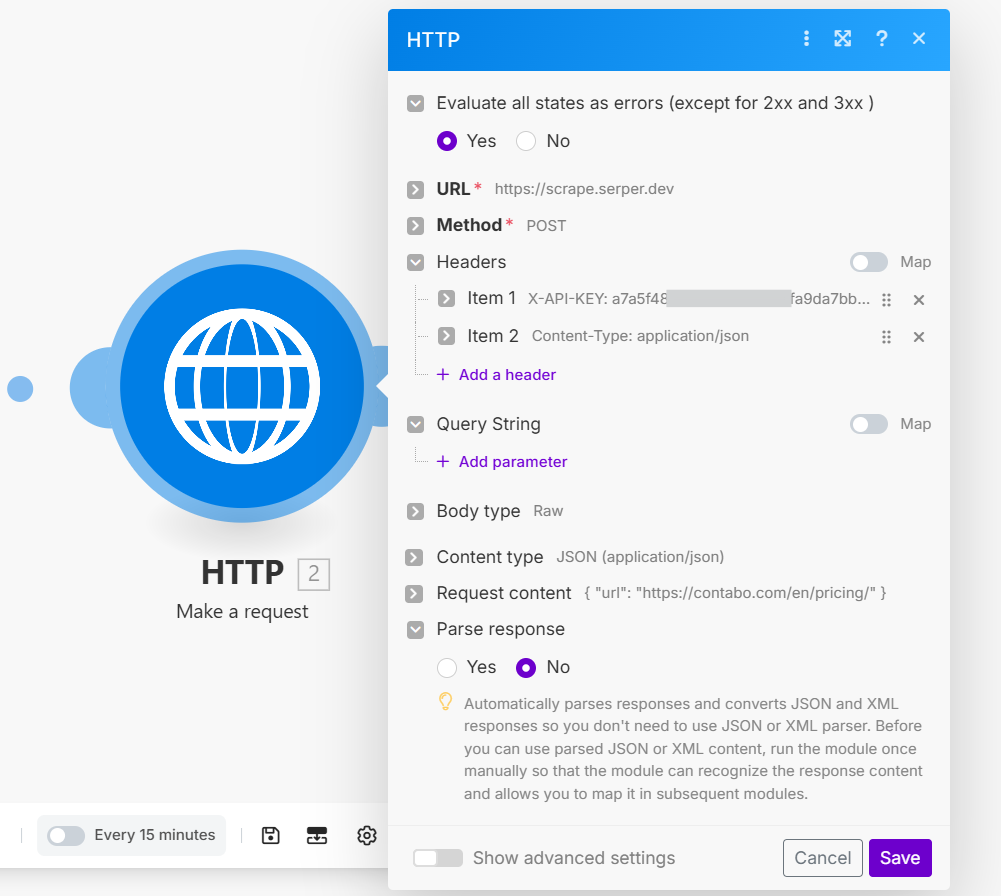
To add the Serper API request:
- Add an “HTTP” module → “Make a request”
- URL:
https://scrape.serper.dev - Method: POST
- Headers:
X-API-KEY: Your Serper API keyContent-Type:application/json
- Body: { “url”: “{{4.vps_website_url}}”}
Module 3: ChatGPT Integration
- Add “OpenAI ChatGPT” → “Create a completion”
- Connection: Your OpenAI connection
- Model: Select
gpt-4o-mini (system). It’s cheap and good to start with. - User prompt:
You are a data extraction expert specializing in VPS provider information. Extract accurate pricing, specifications, and features from website content and fill JSON structures precisely.

Here's a JSON template for VPS providers: {{4.json_template}}

Here's the scraped website content from Serper API: {{2.data}}

Please fill the JSON structure with accurate information extracted from this content.

IMPORTANT GUIDELINES:
- Extract actual pricing from the content (look for specific dollar amounts)
- List real features mentioned in the text
- For specifications, look for CPU, RAM, and storage details
- If information isn't available, use "Not specified"
- For arrays, include actual items mentioned or leave empty []
- Be precise with the data center locations mentioned
- Extract the actual uptime guarantee if mentioned

Return only a valid JSON format.
Here is what it would look like in Make:

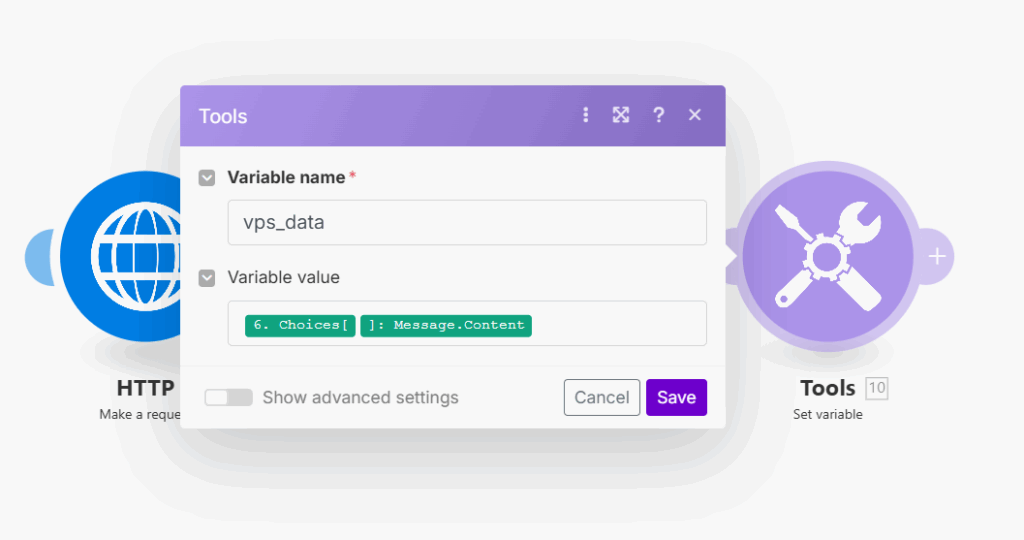
Module 4: Set Variable (Save the Extracted Data)
This final module captures the JSON output from ChatGPT and saves it as a variable for easy access:
- Add a “Set Variable” module
- Variable name:
vps_data - Variable value: Map to
{{6.choices[].message.content}}(This captures ChatGPT’s JSON response from Module 3)
That’s it! Your automation now extracts VPS provider data from any website and stores it in a clean, structured format. The vps_data variable contains your complete JSON structure ready to be used in other applications or saved to a database.
Now, download the scenario below and import it directly into your Make account to test the workflow. Don’t forget this is just a testing workflow.
The Result: What The Automation Will Extract
Now, when we run the scenario after setting up everything, this is what our automation will extract from a VPS provider like Contabo:
{
  "provider_name": "Contabo",
  "website_url": "https://contabo.com/en-us/pricing/",
  "pricing": {
    "billing_cycle_options": ["monthly", "annual"],
    "tiers": [
      {
        "tier_name": "Cloud VPS 10",
        "monthly_price": "€5.36 / month (incl. 19% VAT)",
        "annual_price": "Not specified",
        "specifications": {
          "cpu_cores": "3 vCPU Cores",
          "ram_gb": "8 GB RAM",
          "storage_gb": "75 GB NVMe or 150 GB SSD",
          "bandwidth": "32 TB Traffic* Unlimited Incoming"
        }
      },
      {
        "tier_name": "Cloud VPS 20",
        "monthly_price": "€8.33 / month (incl. 19% VAT)",
        "annual_price": "Not specified",
        "specifications": {
          "cpu_cores": "6 vCPU Cores",
          "ram_gb": "12 GB RAM",
          "storage_gb": "100 GB NVMe or 200 GB SSD",
          "bandwidth": "32 TB Traffic* Unlimited Incoming"
        }
      },
      {
        "tier_name": "Cloud VPS 30",
        "monthly_price": "€16.66 / month (incl. 19% VAT)",
        "annual_price": "Not specified",
        "specifications": {
          "cpu_cores": "8 vCPU Cores",
          "ram_gb": "24 GB RAM",
          "storage_gb": "200 GB NVMe or 400 GB SSD",
          "bandwidth": "32 TB Traffic* Unlimited Incoming"
        }
      },
      {
        "tier_name": "Cloud VPS 40",
        "monthly_price": "€29.75 / month (incl. 19% VAT)",
        "annual_price": "Not specified",
        "specifications": {
          "cpu_cores": "12 vCPU Cores",
          "ram_gb": "48 GB RAM",
          "storage_gb": "250 GB NVMe or 500 GB SSD",
          "bandwidth": "32 TB Traffic* Unlimited Incoming"
        }
      },
      {
        "tier_name": "Cloud VPS 50",
        "monthly_price": "€44.03 / month (incl. 19% VAT)",
        "annual_price": "Not specified",
        "specifications": {
          "cpu_cores": "16 vCPU Cores",
          "ram_gb": "64 GB RAM",
          "storage_gb": "300 GB NVMe or 600 GB SSD",
          "bandwidth": "32 TB Traffic* Unlimited Incoming"
        }
      },
      {
        "tier_name": "Cloud VPS 60",
        "monthly_price": "€58.31 / month (incl. 19% VAT)",
        "annual_price": "Not specified",
        "specifications": {
          "cpu_cores": "18 vCPU Cores",
          "ram_gb": "96 GB RAM",
          "storage_gb": "350 GB NVMe or 700 GB SSD",
          "bandwidth": "32 TB Traffic* Unlimited Incoming"
        }
      },
      {
        "tier_name": "Storage VPS 10",
        "monthly_price": "€5.36 / month (incl. 19% VAT)",
        "annual_price": "Not specified",
        "specifications": {
          "cpu_cores": "2 vCPU Cores",
          "ram_gb": "4 GB RAM",
          "storage_gb": "300 GB SSD",
          "bandwidth": "32 TB Traffic* Unlimited Incoming"
        }
      },
      {
        "tier_name": "Storage VPS 20",
        "monthly_price": "€8.33 / month (incl. 19% VAT)",
        "annual_price": "Not specified",
        "specifications": {
          "cpu_cores": "3 vCPU Cores",
          "ram_gb": "8 GB RAM",
          "storage_gb": "400 GB SSD",
          "bandwidth": "32 TB Traffic* Unlimited Incoming"
        }
      },
      {
        "tier_name": "Storage VPS 30",
        "monthly_price": "€16.66 / month (incl. 19% VAT)",
        "annual_price": "Not specified",
        "specifications": {
          "cpu_cores": "6 vCPU Cores",
          "ram_gb": "18 GB RAM",
          "storage_gb": "1 TB SSD",
          "bandwidth": "32 TB Traffic* Unlimited Incoming"
        }
      },
      {
        "tier_name": "Storage VPS 40",
        "monthly_price": "€29.75 / month (incl. 19% VAT)",
        "annual_price": "Not specified",
        "specifications": {
          "cpu_cores": "8 vCPU Cores",
          "ram_gb": "30 GB RAM",
          "storage_gb": "1.2 TB SSD",
          "bandwidth": "32 TB Traffic* Unlimited Incoming"
        }
      },
      {
        "tier_name": "Storage VPS 50",
        "monthly_price": "€44.03 / month (incl. 19% VAT)",
        "annual_price": "Not specified",
        "specifications": {
          "cpu_cores": "14 vCPU Cores",
          "ram_gb": "50 GB RAM",
          "storage_gb": "1.4 TB SSD",
          "bandwidth": "32 TB Traffic* Unlimited Incoming"
        }
      }
    ]
  },
  "features": {
    "operating_systems": ["Linux", "Windows"],
    "backup_included": "AUTO BACKUP",
    "support_level": "24/7 human agents, extensive self-help resources, live chat"
  },
  "datacenter_locations": ["Australia", "Japan", "Europe"],
  "free_trial": "Not specified",
  "affiliate_link": "Not specified",
  "last_updated": "2023-10"
}
Step 3: The Alternative Approach [Pure AI Method]
If you prefer a simpler approach, you can skip adding a Make workflow to scrape the web and let ChatGPT do everything:
I need you to research [VPS Provider Name] and fill this JSON structure with accurate, up-to-date information:

[Paste your JSON structure]

Please visit their website, check their current pricing and features, and fill the structure. Double-check all pricing information and specifications for accuracy.
Important Note: This method is less reliable because AI models can’t always access real-time information or might hallucinate details. Always verify critical information like pricing and specifications manually.
I recommend the Make.com approach for accuracy and automation.
Step 4: Build a Simple Display Interface
Now that we have structured data, let’s create a simple way to display it. We’ll use AI to generate a clean HTML/CSS interface.
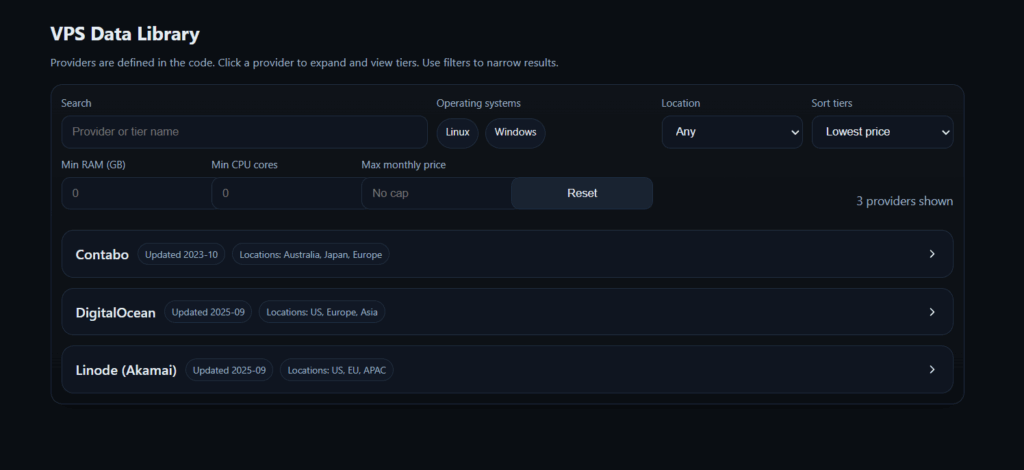
And then if users want to go deeper into 1 of the providers, they can simply expand it like this:
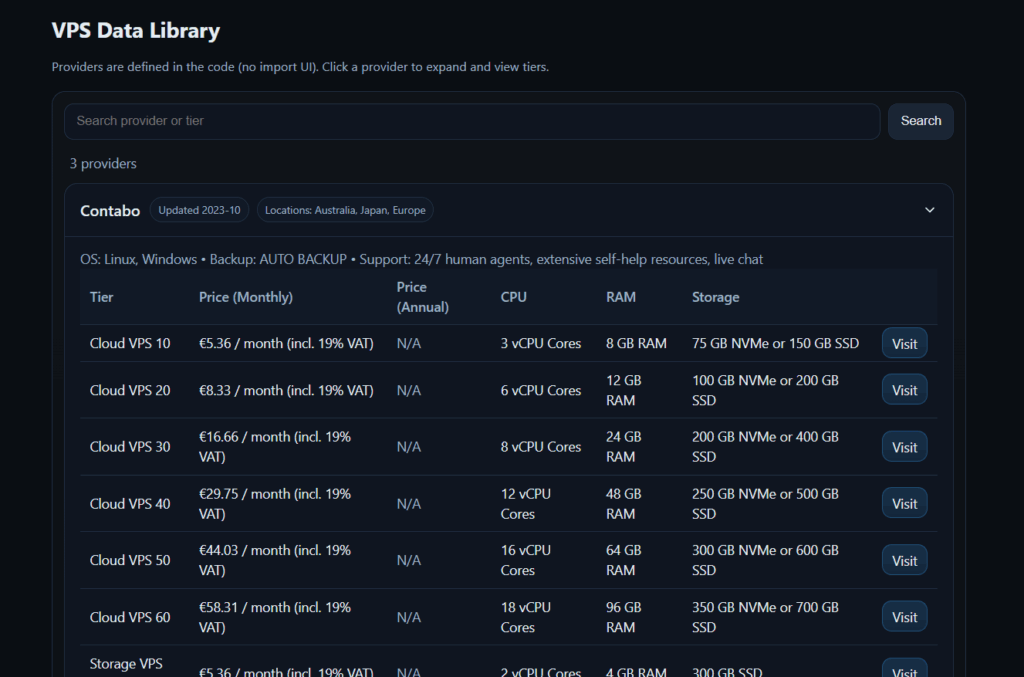
Finally, when users click visit, it will take them to the proper page using your own affiliate link, which I’ll talk about more about in the section below.
Important Note: When building apps and UIs with AI, make sure you’re following proper development practices. Apply the 20 principles from my AI Vibe Coding guide to ensure your interface is not just functional, but professional, secure, and maintainable.
These principles will help you get clean code that actually works in production.
Step 5: Monetize Your Library
Here’s where things get exciting. You can transform your data library into a profitable product using WordPress. The best way to make money from such a tool is to put your own affiliate links for each provider, so you’d make a commission every time a user buys a package using your own link.
However, you can turn such a tool into a mini-SaaS and make recurring income by doing something like this:
- Free tier: Basic comparison of 5-10 providers
- Premium tier: Full database with 50+ providers, advanced filtering, and regular updates
- API access: Let other developers use your data
However, for this to work, you’ll have to provide better data for the users, not just a simple VPS comparison; there should be more value in your data library to make the user think: “I will pay 10$ a month and get ALL this?”
The better your data provided, the more the perceived value of your product is from the customer’s POV, so make sure you brainstorm ideas in your niche to find that perfect idea!
If you want to learn how to build this into a complete SaaS. Check out my WordPress SaaS Course, where I’ll show you exactly how to monetize projects like this with proven systems, ready-to-use code, and step-by-step guidance.
Making Your Data Library Successful
Start Small: Begin with one category (like VPS providers) before expanding to hosting, domains, or SaaS tools. It’s better to have 20 well-researched, accurate entries than 100 incomplete ones.
Automate Smartly: Set your Make.com scenario to run weekly, and save data into a database, keeping your data fresh and organized.
Don’t trust AI blindly: AI can make mistakes. Always double-check critical information, especially pricing and specifications.
Your Action Plan: Start Building Today
- Define your niche: What type of data library will you build? (VPS, hosting, SaaS tools, courses)
- Create your JSON structure: Use ChatGPT to brainstorm the perfect structure for your niche.
- Sign up for Make.com: Start your free account and build your first automation.
- Start with 5 providers: Don’t overwhelm yourself. Perfect the process with a small dataset first.
- Build your display interface: Use AI to generate a clean, professional interface.
- Share and monetize: Turn your library into a resource others will pay for.
What data library will you build first? Share your ideas on the forum, and I’ll help you structure the perfect JSON template for your project.