Secure Your VPS Like a Pro: 10 Essential Steps to Lock Down Your Self-Managed Server

If you’re tired of throwing money at expensive hosting plans, you’re in the right place.
I’ve been running my entire online business on a self-managed VPS setup, and it’s saving me a $700 every single month.
That’s over $8,000 per year going back into my business instead of to hosting companies!
Want to see exactly how I do it? Check out my detailed breakdown: Self-Managed Hosting for Solopreneurs: How I Save $700/Month with Coolify
But here’s the thing – with great power comes great responsibility.
When you manage your own server, security becomes YOUR job. Skip this step, and you’re basically leaving your digital front door wide open to attackers.
In this guide, I’ll walk you through the exact steps I take to lock down and protect my VPS and keep my business safe.
I’ve been running this exact setup for more than a year now, and everything is running smoothly without any security incidents.
These aren’t theoretical tips – this is the actual security setup I use to protect my Hosting setup.
Let’s dive in!
10 Critical Steps to Secure Your VPS (That Anyone Can Follow)
1. Create a New Admin “Sudo” User
When you first log into your VPS, you’re usually logged in as the root user. While that’s convenient, it’s also risky.
Here’s how to create a new admin user:
# Create new user
adduser yourname

# Add user to sudo group
usermod -aG sudo yourname
Why this matters: The root user has unlimited power on your system. If someone hacks your root account, they own everything. By creating a regular user with sudo privileges, you add an extra layer of protection while still being able to run admin commands when needed.
2. Disable Root Login
Now that you have your admin user, it’s time to block root logins completely:
⚠️ Before You Continue…
Make sure you can log in with your new user via SSH.
# Edit SSH config
sudo nano /etc/ssh/sshd_config

# Find and change this line:
PermitRootLogin no

# Save and restart SSH
sudo systemctl restart ssh
Why this matters: Most automated bots scan the internet for open port 22 and try logging in with root.
When root login is disabled, you’ve immediately dodged 95% of automated attacks.
3. Set Up SSH Key Authentication
Passwords can be guessed or cracked. SSH keys are nearly impossible to break:
# On your local machine, create SSH key pair
ssh-keygen -t ed25519 -C "[email protected]"

$OR use your ssh client like Termiu or Putty as explained in My Self Managed Hosting Course.

# Copy the public key to your server
mkdir -p ~/.ssh
nano ~/.ssh/authorized_keys
chmod 700 ~/.ssh
chmod 600 ~/.ssh/authorized_keys

# Disable password authentication
sudo nano /etc/ssh/sshd_config
Find and set these options:
PasswordAuthentication no
PubkeyAuthentication yes
# Restart SSH
sudo systemctl restart ssh
Why this matters: SSH keys use powerful encryption that’s virtually unbreakable. Unlike passwords, keys can’t be guessed through brute force attacks. This single change eliminates most common SSH attacks.
4. Add Two-Factor Authentication (2FA)
Even with SSH keys, adding 2FA creates an extra security layer:
# Install required packages
sudo apt update
sudo apt install libpam-google-authenticator

# Run the authenticator setup
google-authenticator

# Answer 'y' to all questions

# Configure PAM
sudo nano /etc/pam.d/sshd
Add this line at the end:
auth required pam_google_authenticator.sothen:
# Update SSH config
sudo nano /etc/ssh/sshd_config

#Find and edit/Add these lines:
ChallengeResponseAuthentication yes
AuthenticationMethods publickey,keyboard-interactive

#Modify PAM configuration for SSH
sudo nano /etc/pam.d/sshd

#Find and comment out (add # at the beginning) the line containing:
@include common-auth


# Then Restart SSH to Apply Changes
sudo systemctl restart ssh
Why this matters: Even if someone somehow gets your SSH key, they’ll still need the time-based code from your authenticator app. This follows the security principle of “something you have and something you know.”
5. Keep Ubuntu Updated
Outdated systems are vulnerable systems:
# Update package lists
sudo apt update

# Upgrade packages
sudo apt upgrade -y

# Remove unnecessary packages
sudo apt autoremove -y

# Set up automatic security updates
sudo apt install unattended-upgrades
sudo dpkg-reconfigure -plow unattended-upgrades
Why this matters: Security vulnerabilities are discovered daily. Regular updates patch these holes before attackers can exploit them. Automatic updates ensure you don’t forget this critical task.
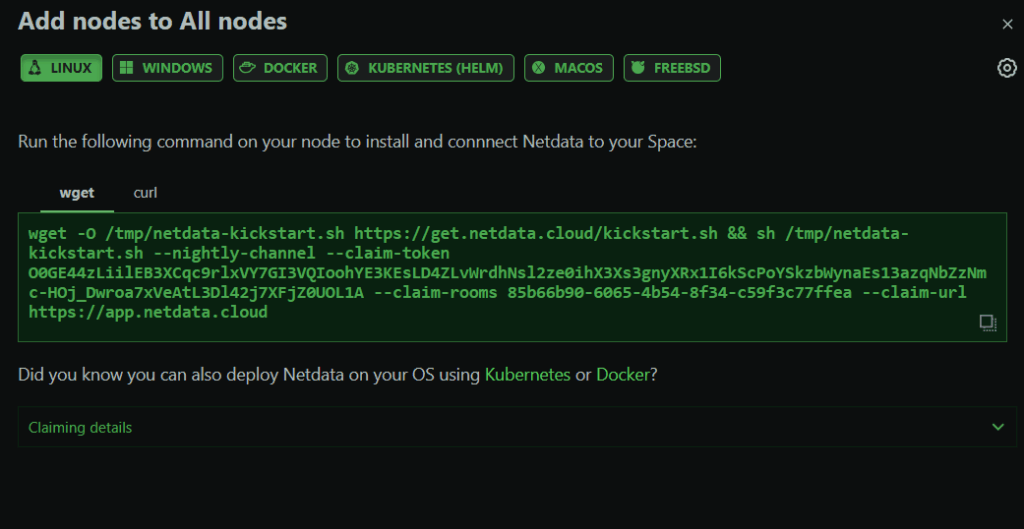
6. Monitor Your Server with Netdata
You can’t fix what you don’t know is happening!
Just Signup on Netdata for a Free Account, add a Node, and run the command you see on the screen

Why this matters: Netdata gives you real-time insights into what’s happening on your server. Unusual spikes in CPU, memory, or network traffic often indicate a security issue. Early detection means faster response.
7. Configure UFW Firewall
Block everything except what you specifically need:
# Install UFW if not already installed
sudo apt install ufw

# Set default policies
sudo ufw default deny incoming
sudo ufw default allow outgoing

# Allow SSH (always do this first!)
sudo ufw allow ssh

# Allow web traffic if needed
sudo ufw allow 80/tcp
sudo ufw allow 443/tcp

# If you run other services, allow only their ports
# Example for MongoDB
# sudo ufw allow 27017/tcp

# Enable the firewall
sudo ufw enable
Why this matters: Your server has thousands of potential entry points (ports). The firewall acts like a bouncer, only allowing traffic through specific doors. Everything else gets blocked automatically.
8. Install Fail2ban
Automatically block suspicious activity:
# Install Fail2ban
sudo apt install fail2ban

# Create a local config
sudo cp /etc/fail2ban/jail.conf /etc/fail2ban/jail.local
sudo nano /etc/fail2ban/jail.local
Find the [sshd] section and update:
enabled = true
maxretry = 3
bantime = 1h
# Restart Fail2ban
sudo systemctl restart fail2ban
Why this matters: Fail2ban watches for repeated login attempts and automatically blocks suspicious IPs. This stops brute force attacks before they can make enough guesses to break in.
9. Put Your Domains Behind Cloudflare
Add an extra layer of protection with Cloudflare:
- Sign up for a free Cloudflare account
- Add your domain and follow their setup instructions
- Enable Cloudflare’s security features:
- Always Use HTTPS
- Enable Web Application Firewall (WAF)
- Turn on Bot Protection
Why this matters: Cloudflare acts as a shield between your server and the internet. It blocks many attacks before they even reach your VPS, reduces server load, and provides free SSL certificates.
10. Create a Special User for Coolify
If you’re using Coolify like me (which I teach in my course), you’ll need to make some adjustments after implementing 2FA:
# Create a coolify user
sudo adduser --disabled-password coolify

# Set up SSH keys for coolify
sudo mkdir -p /home/coolify/.ssh
sudo nano /home/coolify/.ssh/authorized_keys
# Paste Coolify's public key here

# Set proper permissions
sudo chmod 700 /home/coolify/.ssh
sudo chmod 600 /home/coolify/.ssh/authorized_keys
sudo chown -R coolify:coolify /home/coolify/.ssh

# Exempt coolify user from 2FA
sudo nano /etc/pam.d/sshd

#Add this block at the end:
Match User coolify-service
    AuthenticationMethods publickey
    PasswordAuthentication no
    ChallengeResponseAuthentication no
Why this matters: Coolify needs reliable server access to deploy your applications. This setup gives Coolify the access it needs while keeping your security intact for all other accounts.
Is This All Just Too Technical?
If you’re feeling overwhelmed by all these steps, I totally get it. Server security is complex, but it’s absolutely critical if you want to run a reliable online business.
That’s exactly why I created my Self-Managed Hosting 2.0 course. I walk you through every single step of setting up a secure, reliable hosting environment for your digital business – from choosing the right VPS to deploying your first applications with Coolify.
The course includes:
- Step-by-step video tutorials for complete beginners
- Pre-made security scripts you can just copy and paste
- My personal server monitoring setup
- 24/7 access to all future updates
- Direct access to me for questions
And the best part? The money you’ll save on hosting costs will pay for the course in less than a month.
Click here to learn more about Self-Managed Hosting 2.0
Taking Action Is What Matters
Remember – reading this guide isn’t enough. You need to actually implement these security measures to protect your business.
Set aside 30-60 minutes today to tackle at least the first three steps. Tomorrow, do three more. By the end of the week, you’ll have a professional-grade secure server.
Every day you postpone is another day your server remains vulnerable. Take action now!
Have questions about server security or self-managed hosting? Drop them in the comments below, and I’ll personally answer them.
Frequently Asked Questions (FAQs)
Is self-managed hosting hard for beginners?
It can seem scary at first, but it’s actually easier than you think. If you can follow step-by-step instructions, you can manage your own server. The key is to start small, learn the basics, and build from there. That’s exactly why I created my course – to break down the complex stuff into bite-sized, actionable steps.
What if I lock myself out of my server?
It happens! Even experienced admins mess up sometimes. Always keep a backup access method when making security changes. Most VPS providers offer emergency console access through their dashboard that bypasses SSH. If you follow my instructions carefully and test each change before moving on, you’ll avoid most lockout scenarios.
How much technical knowledge do I need?
You don’t need to be a Linux expert, but basic command line comfort helps. If you can copy and paste commands and understand what they do (which I explain in simple terms), you’re good to go. The beauty of learning this stuff is that each small step builds your confidence for the next one.
What happens if my server gets hacked anyway?
No security is 100% perfect, but having good backups is your safety net. Always keep recent backups of your data, preferably stored off-server. In my course, I show you exactly how to set up automatic backups that you can restore from in minutes if anything goes wrong.
Which VPS provider should I use?
I personally use DigitalOcean for my business, but Linode, Vultr, and Hetzner are also excellent choices. Look for providers with good uptime, SSD storage, and responsive support. Don’t chase the absolute cheapest option – reliability matters more than saving a few dollars.
How long does it take to secure a server properly?
If you follow this guide step by step, you can have basic security in place within 1-2 hours, even as a beginner. The ongoing maintenance (updates, monitoring) takes just minutes per week. It’s a small time investment for significant cost savings and control over your online business.
Can I host multiple websites on one VPS?
Absolutely! That’s one of the biggest benefits. I host over 15 different websites and applications on a single $20/month VPS. With Coolify (which I teach in my course), you can easily deploy and manage multiple sites without the configuration headaches.
What’s the biggest mistake beginners make with self-hosting?
Skipping security steps because they seem complicated. Many new self-hosters set up their sites but never properly secure their server. That’s like building a store but forgetting to put locks on the doors! Take security seriously from day one – it’s much easier than trying to clean up after a breach.


