Beginner’s Guide: Python Setup on VS Code
Setting up Python and its environment can be confusing for beginners, but it’s simpler than it looks! This guide will walk you through the steps needed to install Python, set up a virtual environment, and install the necessary libraries. By the end, you’ll be ready to run any Python script easily.
1. Installing Python
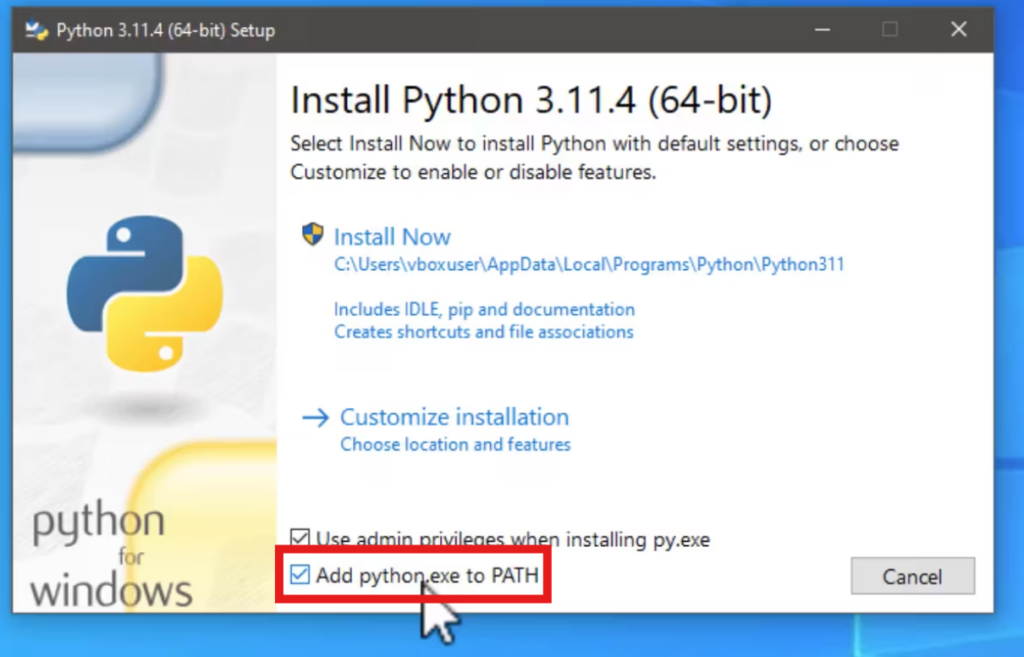
First, go to the official Python website and download the latest Python version (3.x) for your operating system. Then, run the installer and follow the instructions.
🔴 Make sure to check the box that says “Add Python to PATH” during the installation process. This will allow you to run Python from the command line and make it much easier to manage later.
Verify the Installation:
Open a terminal on your PC (Command Prompt, PowerShell, or VS Code terminal). Type python --version and press Enter. If Python is installed, the version number will be displayed like this:

You may have a newer version, so it will display your version. However, if it doesn’t display the version, it means you did something wrong, so go over the steps again.
2. Installing Visual Studio Code (VS Code)
Why VS Code? VS Code is a popular and lightweight code editor that is perfect for writing and running Python scripts.
To install VS code, go to the VS Code website, and download the installer for your operating system (Windows, macOS, or Linux).
Then, run the installer and follow the instructions. Make sure the “Add to PATH” option is selected during installation, as we did when installing Python.
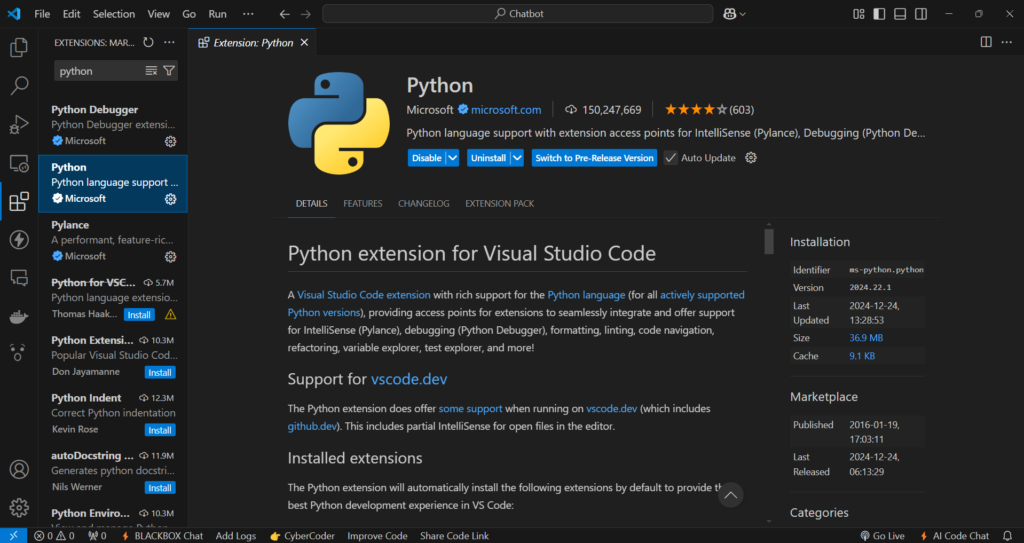
Finally, open VS Code, go to Extensions on the left sidebar and install Microsoft’s Python Extension. This one:
3. Setting Up a Virtual Environment
A virtual environment helps you manage dependencies for Python projects without impacting your system’s setup or causing conflicts between installed libraries.
Create a Virtual Environment:
In VS Code, open the folder where your Python script will be saved and open a new terminal by clicking ctrl + shift + `
Then, run the command:
python -m venv venv
This creates a folder named “venv” in your project directory. Now, you’ll have to activate it to use it by running this command:
- Windows:
venv\Scripts\activate - macOS/Linux:
source venv/bin/activate
Once activated, the terminal will show (venv) before the command prompt.

If you want to deactivate the virtual environment just type deactivate and press Enter.
4. Installing Libraries
Libraries are collections of pre-written code that provide additional functionality, allowing you to perform specific tasks or solve problems without writing the code from scratch. For example, you can use the requests library for web requests or pandas for data analysis.
Installing any libraries is very simple; all you have to do is use the pip command in this way:
pip install requests
Here are some other functionalities you can do with libraries:
- See all installed libraries:
pip list - Save the list of installed libraries to a file:
pip freeze > requirements.txt - Install a list of libraries from a text file:
pip install -r requirements.txt
Running a Python Script
- Open VS Code and create a new file (e.g.,
script.py). - Write or paste your Python code into the file and save it.
- Open the terminal
ctrl + shift + ` - Ensure the virtual environment is activated.
- Run the script:
python script.py
By following these steps, you’ll be ready to set up Python, manage dependencies, and execute Python scripts.




Responses