Make vs n8n as Backend Platforms: Stress Test for SaaS

When you’re building a SaaS, Micro-SaaS, MVP, or any online tool, one of the most critical decisions you’ll make is choosing your backend.
Among the popular no-code/low-code options, n8n and Make stand out as flexible and powerful choices.
But most comparisons focus on pricing and features.
What about real-world performance?
How do these platforms handle stress, response time, and reliability when used as the backend engine for a live product?
To find out, I ran a head-to-head benchmark. I built identical backend workflows in both n8n and Make, then stress-tested them with 100 API calls in 5 minutes across three complexity levels — from simple webhook handling to AI-powered content generation.
Method
To test them based on real-life case scenarios, I built three automations that mirror real business needs:
Level 1: Simple Webhook Response
- Task: Receive webhook with JSON input → Return JSON input received
- Purpose: Test basic platform overhead and response times
- Real-world use: Simple form submissions, basic data logging
Level 2: Google Search Scraping
- Task: Receive webhook → Scrape Google’s first page for keyword → Return scraped data
- Purpose: Test external API handling and data processing
- Real-world use: Competitor monitoring, keyword research automation
Level 3: AI-Powered Content Analysis
- Task: Receive webhook → Scrape Google → Analyze with AI → Generate content ideas
- Purpose: Test complex multi-step workflows with AI integration
- Real-world use: Content strategy automation, competitor analysis
Each test involves:
- 100 API calls in 5 minutes (realistic load)
- Identical workflows in both platforms
- Standardized WordPress endpoints as triggers
WordPress Backend Setup
For this benchmark, I used WordPress as the trigger point for both platforms.
This mirrors my typical approach when building MVPs or Micro-SaaS tools — where WordPress acts as a lightweight gateway to backend automation platforms like n8n or Make.
This method lets me launch fully functional tools in days. That said, you can run the same tests using Python scripts, Postman, or any other API testing tool — WordPress just makes the setup fast and repeatable for real-world use cases.
Now Before jumping into the platform comparison, let me quickly show you how I set up the WordPress endpoints that both n8n and Make called.
Since our main target is a comparison of the no-code tools, I kept the WordPress setup simple by using the Code Snippets plugin to add our code, so install it by:
- Log in to your WordPress admin dashboard
- Go to Plugins > Add New
- Search for “Code Snippets”

4. Once you find the one above (it should be the first one), click “Install Now” and then “Activate.”
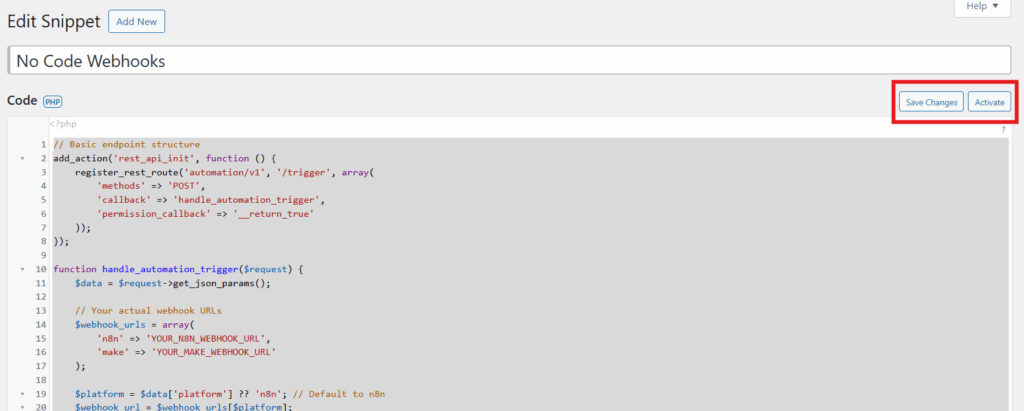
Once installed, you’ll have a new “Snippets” menu item in your WordPress admin, so click on it and add a new snippet:

And, paste the code below in it, which registers a REST API endpoint, and triggers the automation platforms:
// Basic endpoint structure
add_action('rest_api_init', function () {
    register_rest_route('automation/v1', '/trigger', array(
        'methods' => 'POST',
        'callback' => 'handle_automation_trigger',
        'permission_callback' => '__return_true'
    ));
});

function handle_automation_trigger($request) {
    $data = $request->get_json_params();

    // Your actual webhook URLs
    $webhook_urls = array(
        'n8n' => 'YOUR_N8N_WEBHOOK_URL',
        'make' => 'YOUR_MAKE_WEBHOOK_URL'
    );

    $platform = $data['platform'] ?? 'n8n'; // Default to n8n
    $webhook_url = $webhook_urls[$platform];

    // Send to automation platform
    $response = wp_remote_post($webhook_url, array(
        'body' => json_encode($data),
        'headers' => array('Content-Type' => 'application/json'),
        'timeout' => 30
    ));

    return rest_ensure_response($response);
}
Once pasted, don’t forget to activate the code snippet as shown below:

Now, we’ll need to add our webhooks to both platforms, configure them correctly, and test them.
Setting Up N8N and Make
The first step is to obtain the webhook URLs that your WordPress endpoint will use to make calls. Here’s where to find them:
N8N Webhook Setup:
- Create a new workflow in your n8n instance
- Add a Webhook node as the trigger
- Set HTTP Method to POST
- Set the Respond field to Using ‘Respond to Webhook’ Node
- Copy the webhook URL, it looks like:
https://your-n8n-instance.com/webhook/unique-id

So just click on it, copy it, and paste it into your code instead of the YOUR_N8N_WEBHOOK_URL placeholder.
Now, in order to return the data from our webhook, we’ll have to add a Respond to Webhook node, which will give us this complete setup:

Make Webhook Setup:
Now, for Make it’s the same, just with some tweaks, so:
- Create a new scenario in Make
- Add Webhooks > Custom webhook as the trigger
- Name it anything for now, I named it WordPress Benchmark Webhook.
- Copy the webhook URL

Again, just copy it and paste it into your code instead of the YOUR_MAKE_WEBHOOK_URL placeholder.
But, before we should set up the response data, so click on edit, then click on show advanced settings, and set the data structure to content, and the JSON pass-through to Yes, as shown below:

And, finally, to return the data, add a Webhook Response node and add the value of the input to it, giving us the following workflow:

Testing Your Setup with Postman
Before running the benchmark, let’s test each connection to see if they’re working or not using Postman:
1. Set up Postman Request
- Create a new POST request to your WordPress endpoint:
https://YOUR_DOMAIN.com/wp-json/automation/v1/trigger - Set Body (raw JSON):
{
    "platform": "n8n",
    "test_data": "benchmark_test",
    "timestamp": "2024-01-01T12:00:00Z"
}
You should have it looking something like this:

2. Test n8n Connection
- Send the request with
"platform": "n8n"in the body as shown above - Go to your N8N dashboard and click on “Test Workflow.”
- Go back to Postman and click on “Send” to start the request.
- Check response status – should return 200 with success data

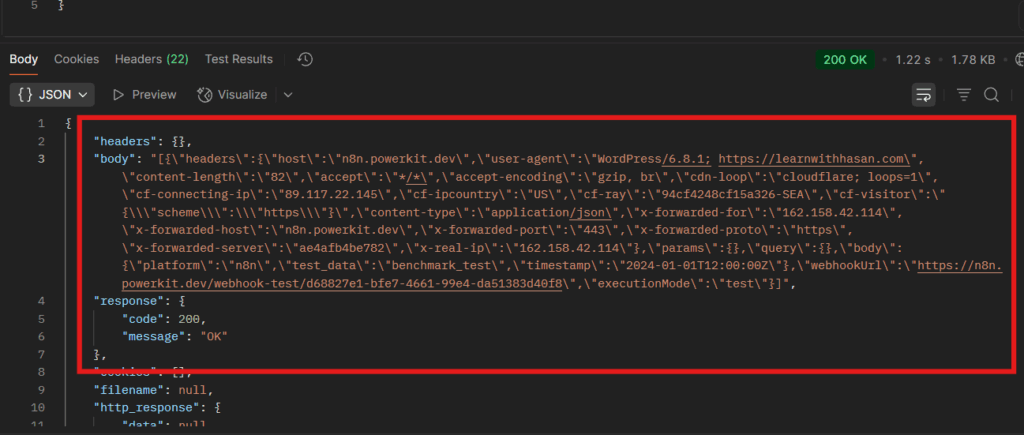
As you can see, it successfully worked, but it returned the whole N8N response, so in order to return only the input JSON in the body, go back to N8N to your Respond Webhook, change the response to JSON, and add the following:

If we test it again, we’ll now get only the JSON input in the body in Postman, as you can see:

Finally, since N8N is all set, go back to your webhook and get the production URL instead of the test URL:

Copy it, and paste it in your PHP code snippet instead of the test URL, and we’re all set, like this:

3. Test Make Connection
Now, it’s time to set up our make connection:
- Change the platform in the JSON input
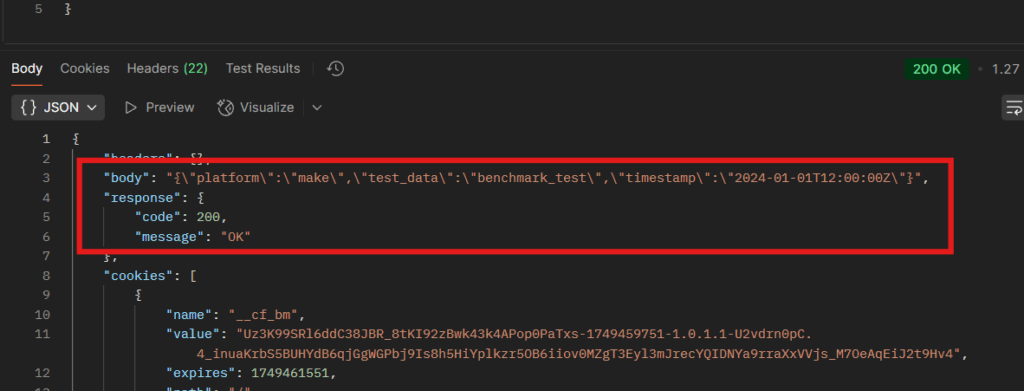
"platform": "make" - Send the request from Postman like this:

- Check response status – should return 200 with success data

These are just basic setups for both platforms, if you want to learn more in details how you can set them up, host them, and build robust WordPress backends using them, I cover this in my WordPress SAAS Course, where I show you how to build scalable automation systems that can handle real business loads.
Level 1: Basic Webhook Processing
Simple data processing and JSON response, as we just did above. So, to stress test it, I updated the code to do 100 calls in 5 minutes after I sent the request from Postman, and I got the following results:
| Metric | n8n | Make |
|---|---|---|
| Average Response Time | 208 ms | 414 ms |
| Fastest Response | 128 ms | 252 ms |
| Slowest Response | 613 ms | 848 ms |
| Error Rate | 0% | 0% |
| Success Rate | 100% | 100% |
Level 2: Google Scraping Integration
Now, to make it a little more complex, I’ll edit both workflows and modify the JSON input to include a keyword to search for on Google using an external API call, and retrieve the top 10 results.
| Metric | n8n | Make |
|---|---|---|
| Average Response Time | 1,206 ms | 1,258 ms |
| Fastest Response | 829 ms | 843 ms |
| Slowest Response | 3,274 ms | 3,370 ms |
| Error Rate | 0% | 0% |
| Success Rate | 100% | 100% |
Level 3: AI-Powered Content Analysis
Now, in the final level, we’ll replicate the workflow of a simple production tool, specifically a content idea generator. This workflow will perform the same function as level 2, but after obtaining the results, it will call OpenAI’s API and extract potential content ideas from our competitors’ top web pages on Google.
| Metric | n8n | Make |
|---|---|---|
| Average Response Time | 4,350 ms | 3,352 ms |
| Fastest Response | 2,928 ms | 296 ms |
| Slowest Response | 11,825 ms | 13,531 ms |
| Error Rate | 0% | 0% |
| Success Rate | 100% | 100% |
Performance Analysis: What The Numbers Tell Us
The most striking finding from this benchmark? Both platforms achieved 100% success rates across all complexity levels. Zero errors, zero timeouts, zero failures. This indicates that both n8n and Make (with free cloud plans) are genuinely reliable for production workloads.
But the performance differences reveal some interesting patterns:
Response Times Overview
Level 1 – Simple Processing: n8n showed a clear advantage with 50% faster response times (208ms vs 414ms average). This suggests n8n has lower platform overhead for basic operations.
Level 2 – External API Integration: Performance became nearly identical (1,206ms vs 1,258ms) – only a 4% difference. When external API calls dominate the workflow, platform differences become negligible.
Level 3 – Complex AI Workflows: Make actually performed 23% better (3,352ms vs 4,350ms average), showing it handles complex multi-step workflows more efficiently.
Scaling Behavior Under Load
Both platforms handled the burst load (100 calls in 5 minutes) without any degradation:
- No timeouts despite 30-second limits
- No rate-limiting issues
- Consistent performance throughout the test period
- No memory or resource exhaustion
This suggests both platforms can handle realistic production loads without issues.
The Verdict: Which Platform Wins?
The answer depends entirely on your use case:
For Simple Automations (Level 1):
Winner: n8n – Nearly 2x faster for basic webhook processing. If you’re building simple form handlers, data loggers, or basic API endpoints, n8n’s lower overhead gives you a significant speed advantage.
For API-Heavy Workflows (Level 2):
Winner: Tie – When external API calls dominate (like web scraping), both platforms perform identically. Your choice should be based on other factors, such as pricing, UI preference, or integration ecosystem.
For Complex AI Integrations (Level 3):
Winner: Make – 23% faster for multi-step AI workflows. If you’re building complex automation with multiple API calls, data transformations, and AI processing, Make’s architecture handles this complexity more efficiently.
Important Note: We Used Free Plans!
Something crucial to mention: all these results were achieved using the free plans (free trial in n8n) of both platforms with their cloud setups. The fact that we got 100% success rates across all complexity levels on free tiers is impressive and speaks to the reliability of both platforms.
Since we achieved perfect reliability on free plans, there’s significant room for improvement if you need more performance:
n8n Scaling Options
If you want full control and better performance, self-hosting n8n is the way to go. It lets you:
- Deploy on your own VPS with dedicated resources
- Ensure full data privacy (no workflows leave your server)
- Scale based on your CPU/RAM needs
- Avoid execution limits imposed by cloud providers
💡 I show exactly how to install, configure, and manage n8n on your own server in my Self-Managed Hosting 2.0 course.
You’ll learn how to set it up with Docker, secure it, connect it to your WordPress site, and scale it confidently for production-grade automations.
👉 Enroll in the course if you’re ready to unlock the real power of self-hosted tools like n8n, Coolify, and more.
Another option is n8n Cloud paid plans: Upgrade for more executions and advanced features
- Higher execution limits: Beyond the free plan restrictions
- Priority support: Faster response times for issues
- Advanced nodes: Access to enterprise-level integrations
Make Scaling Options
Paid plans required: For anything beyond basic testing
- Higher operation limits: More monthly executions
- Advanced features: Complex data manipulation, premium apps
- Faster execution: Priority processing for paid accounts
- Enterprise integrations: Access to business-level connectors
Getting Started with Your Own WordPress Automation
Based on this benchmark, here’s how to approach building your own WordPress automation systems:
Start Simple, Scale Smart
- Begin with Level 1 testing – verify your basic setup works
- Choose based on your primary use case – simple vs. complex workflows
- Test under realistic load before going live
- Monitor performance consistently as you add complexity
And, if you’re serious about building WordPress-based automation businesses, my WordPress SAAS Course covers everything from basic automation setup to building scalable, profitable systems that can handle enterprise loads.


