The Complete AI Vibe Coding Guide: 10 Rules To Build Production-Ready Apps With AI - LearnWithHasan
 Hasan
Hasan
AI vibe coding is everywhere. You see it on social media – quick videos showing people “building apps” with AI in minutes.
But here’s the truth: 95% of people are doing it completely wrong.
I’ve been a developer for 13+ years, but everything changed when I started using AI to code.
Using “AI Vibe Coding,” I built PowerKit, several tools on PromoterKit, TubeDigest, and many other production-ready projects – without writing a single line of code myself.
The difference? I follow 10 specific AI Vibe Coding rules that most people ignore.
Even if you’ve never coded in your life, these rules will help you build real, production-ready apps from scratch and launch your ideas super fast.
I’m sharing exactly what I do, step by step, with practical examples.
The Problem With Most AI Coding
Here’s what I see developers doing wrong every single day:
Generating entire apps in one shot (and wondering why nothing works)
Publishing without security analysis (hello, SQL injection vulnerabilities!)
Using the same chat session for hours (causing the AI to hallucinate with massive context)
Skipping the planning phase (then getting frustrated when the AI doesn’t read their mind)
I made these same mistakes when I started. But after building dozens of production apps, I’ve cracked the code.
Let me show you how to do it right.
Case Study: Building an AI Landing Page Analyzer
Throughout this guide, I’ll walk you through how I built a complete Landing Page Analyzer tool using these 10 rules.
This tool:
Scrapes any webpage content
Takes automated screenshots
Uses AI to analyze design, clarity, and value proposition
Generates detailed improvement reports
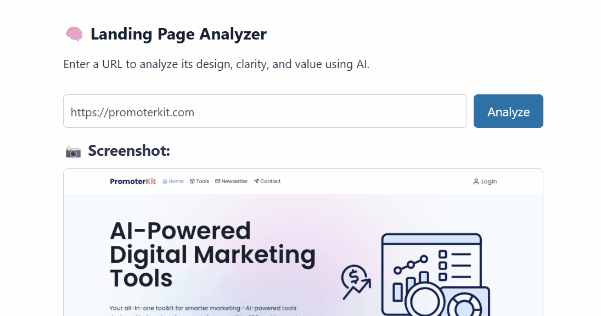
The best part? I built this entire tool in about 2 hours, and it’s production-ready.
Rule #1: Start With Solid Planning
Most people skip this step. Don’t be most people!
Before you write a single prompt, you need to plan two critical things:
1. Your Tech Stack
You have options, like:
Next.js + Vercel (great for modern web apps)
Python scripts (perfect for automation tools)
React Native/Expo (for mobile apps)
My secret weapon: WordPress (more on this below)
For the Landing Page Analyzer, I chose my WordPress SaaS 2.0 stack:
WordPress REST API endpoints (backend)
Simple shortcodes with HTML/CSS/JS (frontend)
Code Snippets plugin for rapid deployment
Why WordPress? Because AI knows WordPress inside and out.
You can build microsaas tools incredibly fast, and deployment is instant.
2. Your App Logic Flow
Map out exactly what your app needs to do:
Landing Page Analyzer Flow:
1. User enters URL
2. Scrape webpage content
3. Take screenshot
4. Send both to AI for analysis
5. Display results with recommendations
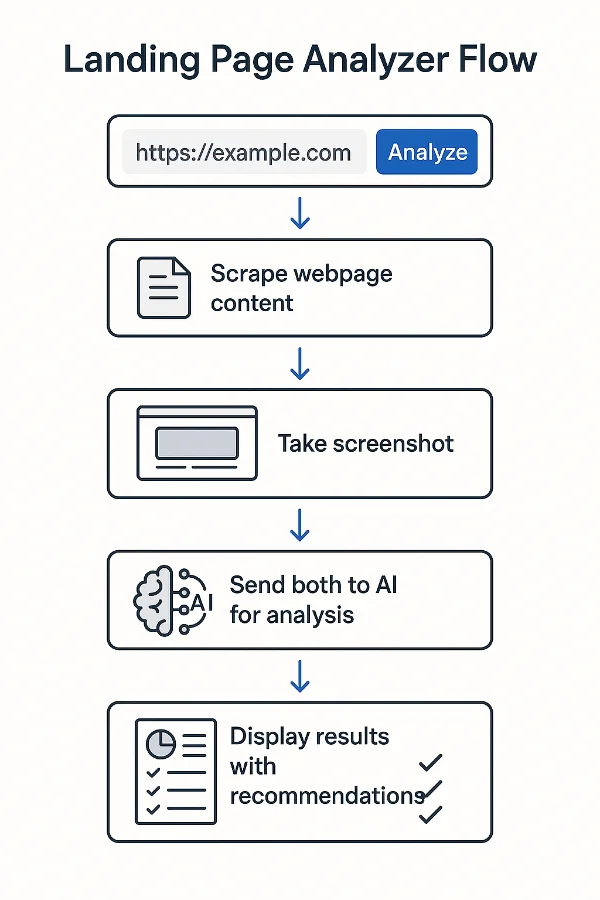
This planning phase saves you hours later. Trust me.
Rule #2: Split Into Tiny Tasks
Here’s where most people fail: They try to build everything at once.
Instead, break your project into LEGO blocks:
For my Landing Page Analyzer:
✅ Task 1: Create scraping function
✅ Task 2: Create AI analysis function
✅ Task 3: Combine both functions
✅ Task 4: Build simple UI
One task = One chat session. This is crucial.
Each task should be small enough that you can complete it in 30-60 minutes max.
Rule #3: Be Specific When Prompting
Vague prompts = garbage output.
Bad prompt:
"Create a function to scrape websites"
Better prompt:
Your task is to create a complete WordPress function that takes a URL as input, scrapes the webpage using ScraperAPI, takes a screenshot, and returns the data.

Requirements:
- Handle errors gracefully
- Return structured data with success/error status
- Include screenshot URL in response
- Prefix function name with 'lwh_landing_analyzer'

API Documentation: [include relevant docs]

Before generating code, ask me clarifying questions.
See the difference? The second prompt gives the AI everything it needs to succeed.
Rule #4: Focus on Core Function Only
Your first version should do ONE thing well. That’s it.
For my scraping function, I resisted the urge to add:
❌ User authentication
❌ Rate limiting
❌ Data caching
❌ Email notifications
I focused on the core: Scrape URL → Return data.
Rule #5: Pass Documentation in Context
Always include relevant docs in your prompt.
Don’t make the AI guess how APIs work. Give it the documentation.
For ScraperAPI, I included:
API endpoint format
Available parameters
Response headers structure
Error handling examples
// Example of what the AI generated with proper docs:
function lwh_landing_analyzer_get_url_data($url) {
    $api_key = 'your_key_here';
    $api_url = 'https://api.scraperapi.com/';

    $query = http_build_query([
        'api_key' => $api_key,
        'url' => $url,
        'screenshot' => 'true',
        'ultra_premium' => 'true',
        'premium' => 'true',
        'output_format' => 'markdown'
    ]);

    $response = wp_remote_get($api_url . '?' . $query, [
        'timeout' => 120
    ]);

    // Error handling...
    // Return structured data...
}
Rule #6: Always Tell AI to Ask Questions
End every prompt with: “Before generating any code, ask me several clarifying questions.”
This simple phrase prevents 90% of miscommunications.
When I prompted for the AI analysis function, Claude asked:
“What specific aspects should the AI analyze?”
“Do you want structured output or free-form text?”
“Should we include scoring/ratings?”
“How should we handle analysis failures?”
These questions helped me clarify my requirements and get better output.
Rule #7: Read and Understand the Output
Don’t just copy-paste. Learn!
When the AI generates code, read through it. Understand what each part does.
For example, when I got my OpenAI integration:
$post_fields = json_encode([
    'model' => 'gpt-4o',
    'messages' => [
        [
            'role' => 'user',
            'content' => [
                [
                    'type' => 'text',
                    'text' => $prompt . "\n\n" . $html_content
                ],
                [
                    'type' => 'image_url',
                    'image_url' => ['url' => $screenshot_url]
                ]
            ]
        ]
    ]
]);
I learned that:
gpt-4ocan analyze imagesContent array can mix text and images
JSON structure matters for API calls
Take a 1-hour crash course in your chosen language. It’ll save you days of confusion.
Rule #8: Test Everything Thoroughly
I created a simple test endpoint:
add_action('rest_api_init', function () {
    register_rest_route('lwh_landing_analyzer/v1', '/test', [
        'methods' => 'POST',
        'callback' => 'test_scraper_function',
        'permission_callback' => '__return_true',
    ]);
});
Then I tested with different URLs:
✅ Regular websites
✅ Redirected URLs
✅ HTTPS vs HTTP
✅ Non-existent pages
✅ Timeout scenarios
If other tasks update your original code, test everything again.
Just Make Sure your code works before moving on
Rule #9: Critical Security Analysis
This rule will save your app in production!
Before deploying ANYTHING, ask AI to analyze for security vulnerabilities:
Analyze this WordPress code for CRITICAL SECURITY VULNERABILITIES that cannot go to production:
[paste your code]
Focus specifically on: – SQL injection possibilities – CSRF vulnerabilities – API keys exposed client-side – Input validation issues – Authentication bypasses – XSS potential Be brutally honest about risks.
For my analyzer, Claude caught several issues:
Missing input sanitization
No rate limiting on endpoints
CORS headers too permissive
I fixed these before launch. Learn basic security concepts – it’s not optional.
Rule #10: Restart Session for Each Task
Large context = AI hallucinations.
When you start a new task, open a fresh chat session.
I see people using the same Claude conversation for 6 hours, then wondering why it’s generating nonsense code.
My workflow:
Complete Task 1 in Session A
Save the working code
Start Session B for Task 2
Provide only relevant context from Task 1
This keeps the AI focused and prevents context confusion.
Building the Complete UI
For the final task, I needed a user interface.
Here’s the prompt I used:
Create a WordPress shortcode that provides a clean UI for the landing page analyzer.

Requirements:
- Input field for URL
- Analyze button
- Loading state
- Results display with screenshot and AI analysis
- Error handling
- Responsive design
- Prefix classes with 'lwh-landing-analyzer'

The shortcode should call our REST API endpoint and display results using JavaScript.

Include inline CSS for styling and use marked.js for rendering markdown analysis.

Our API Docs:
[Share the codes we generated before]
The AI generated a complete shortcode with:
Clean, responsive design
Proper loading states
Error handling
Markdown rendering for AI analysis
Using AI-Powered IDEs
Once you master these rules, you can level up with AI coding assistants.
I use Cline AI coder extension in VS Code with Anthropic’s API. It has:
Planning mode for project architecture
Coding mode for implementation
File editing across multiple files
But the same 10 rules apply:
Plan before coding
Split into tasks
Be specific
Test thoroughly
Analyze security
Check out my full My AI Coding Setup
Common Mistakes That Kill Projects
Here are the biggest mistakes I see (and made myself):
1. The “One-Shot App” Trap
Trying to generate an entire application in one prompt. This NEVER works for production apps.
2. Publishing Without Security Review
I’ve seen developers deploy WordPress plugins with SQL injection vulnerabilities because they skipped security analysis.
3. Context Overload
Using the same chat session for hours, causing the AI to generate inconsistent or broken code.
4. Feature Creep from Day One
Adding user authentication, payment processing, and advanced features before the core function works.
5. Ignoring Error Handling
Generating happy-path code without considering what happens when APIs fail or users input bad data.
WordPress SaaS 2.0: My Secret Weapon
Throughout this guide, I’ve mentioned my WordPress approach.
Here’s why it’s perfect for AI coding:
Advantages:
AI has deep WordPress knowledge
Instant deployment with Code Snippets plugin
Built-in user management
Proven hosting solutions
Massive ecosystem
Perfect for:
Microsaas tools
Internal business apps
MVP development
Client projects
I teach this entire methodology in my WordPress SaaS 2.0 course, where students learn to build production-ready microsaas tools in days, not months.
The Results: What You Can Build
Following these 10 rules, I’ve built:
PowerKit – Complete marketing toolkit
TubeDigest – YouTube content analyzer
Landing Page Analyzer – The tool from this guide
Multiple client tools – Each taking 2-4 hours to build
The key is consistency. Follow the rules, resist shortcuts, and test everything.
Quick Reference: The 10 AI Vibe Coding Rules
Start With Solid Planning – Define tech stack and app logic flow
Split Into Tiny Tasks – One task per chat session, 30-60 minutes max
Be Specific When Prompting – Include requirements, constraints, and examples
Focus on Core Function Only – No feature creep in version 1
Pass Documentation in Context – Include relevant API docs and examples
Always Tell AI to Ask Questions – Prevent miscommunication upfront
Read and Understand the Output – Learn while building, take crash courses
Test Everything Thoroughly – After each task and when integrating
Critical Security Analysis – Review for vulnerabilities before deployment
Restart Session for Each Task – Prevent context overload and hallucinations
Your Next Steps
AI vibe coding isn’t magic. It’s a systematic approach that anyone can learn.
Start with a simple tool. Follow these 10 rules religiously. Build something small but complete.
Then scale up.
Ready to build your first microsaas in 7 days?
Join my free email course where I walk you through building a complete microsaas tool from scratch using these exact methods. You’ll get:
Daily step-by-step lessons
Real prompts I use with AI
code examples
Deployment guides
Access To Support Forum – Yes, I will Help you launch your first app online!
Get the free 7-day microsaas course →
Stop watching AI coding videos. Start building real products!
What will you build first?
Hasan
Thats Hasan
Related Articles

The Complete Docker Tutorial for Beginners
When you’re building apps or websites, getting them to run the same way everywhere is a constant headache. Maybe it works fine on your laptop, but it crashes on your server. One project needs Python ...
Hasan

How to Build a Chrome Extension with AI in 2025: A Complete Step-by-Step Guide - LearnWithHasan
Have you ever needed a specific tool for your workflow but didn’t have the technical knowledge to build it? That was exactly my situation. I needed a Chrome extension to organize my digital assets, ...
Hasan
WebJSON Prompting: Build an AI Carousel Generator with Claude
TL;DR WebJSON is a prompting technique that forces AI models like Claude to search the web for real-time data, then output structured JSON you can use in applications. I used this technique to build ...
Hasan