This Project is for anyone at any skill level who wants to have some fun with python. We’ll be using Python & Selenium.

So, whether you’re a beginner looking to expand your knowledge in python, by doing a hands-on project or a professional who is just interested in exploring possibilities and trying new things.
This Python Project is for you! Let’s get into it…
First, let’s answer a few questions and discuss the basic flow of this project.
How to take a Website Screenshot with Python?
A popular way to capture a website screenshot with python is to use python with selenium. Selenium has several functions, and one of the most significant and useful is the ability to take screenshots. To take a screenshot of a webpage, the save_screenshot() method is used.
How to Bypass Cloudflare while taking a Website screenshot with Python and Selenium?
We can Bypass Cloudflare by using the user_agent argument. But this works sometimes. So, to really be safe and make our project work every time, we use selenium stealth. The details are explained in this Post.
Let’s Start
Below is the Final Source Code for taking a Website Screenshot with Python and Selenium While also Bypassing Cloudflare and most major bot tests.
You can download it Here or Check it out on GitHub.
Let’s discuss everything step-by-step
Method 1. Website Screenshot with Selenium using the save_screenshot method
In this section, let’s write a Python Script that captures screenshots of any website without using any third parties or APIs.
We will use selenium with some extra tweaks to bypass any captchas or Cloudflare security measurements.
Selenium has several functions, and one of the most significant and useful is the ability to take screenshots. To take a screenshot of a webpage save_screenshot() method is used. The save screenshot method allows the user to save a png file of any webpage opened but the web driver.
#
Basic Syntax : driver.save_screenshot("screenshot.png")
#
So, how is it possible to capture screenshots of any given website?
We’ll use Selenium web Driver to open the web page, capture it, and then save it.
Code Explanation
So, for using Selenium Web Driver, we need to import it by;
#
from selenium import webdriver
#
If you don’t have Selenium Installed…
Go to the top menu bar, and hover on the terminal. And from the dropdown, select a new terminal. Now type PIP install Selenium in the terminal, and press enter.
Selenium will be installed in a few moments. Like this
Now we will include something known as Chrome options to pass arguments and relevant commands to the WebDriver.
#
from selenium.webdriver.chrome.options import Options
#
For measuring how many seconds our code takes to capture a screenshot from a particular website, we’ll be using the time
#
import time
#
Let’s declare a new variable to keep track of the time using the time function like this.
#
start_time = time.time()
#
Now let’s add some options to our Chrome browser.
So, define a new Options object.
#
options = Options()
options.add_argument('--headless')
#
And an argument called headless.
Headless means that it will open the website within the code and not apparently open the website on the screen.
options.add_argument(‘–headless’)
Now define the web driver you will launch or run for taking a screenshot.
#
driver = webdriver.Chrome("E:\TechVideos\Python\chromedriver.exe" , chrome_options=options)
#
Above, we Defined a new driver called the Chrome method in the web driver model, and the first parameter is the path of the chrome driver.
Download Chrome Driver
Also, you have to download the chrome driver executable for this to Work.
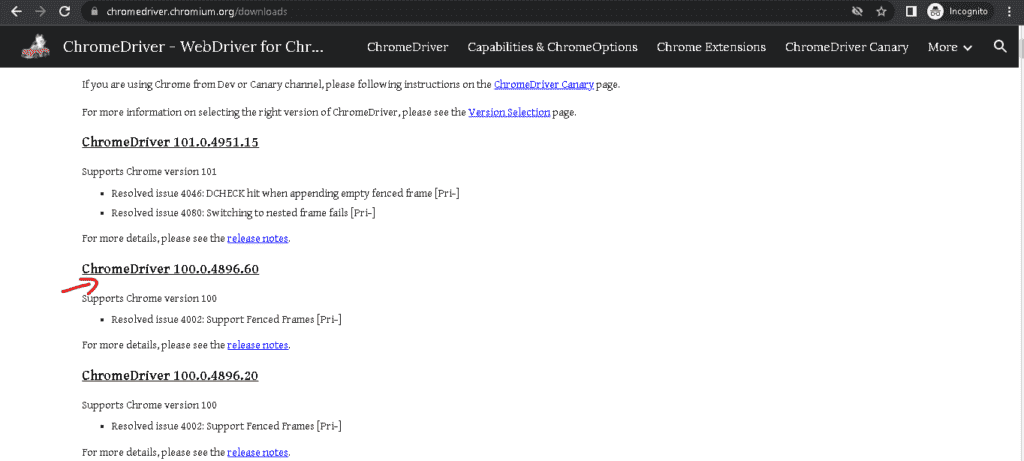
To download the Chrome Driver, you have to go here
https://www.chromedriver.chromium.org/downloads
From here, you must select a version of the driver that matches the version of the chrome browser you’re currently using.
For example, If my chrome browser version is 100, then I’ll download the chromedriver version 100
Below is my current version of Chrome.
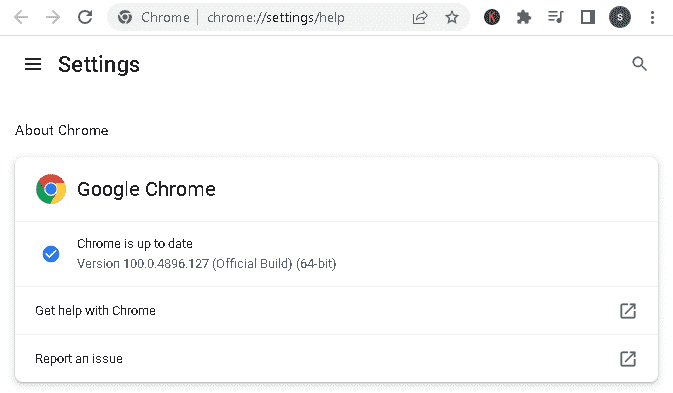
And I’ll download this version of the Driver
After downloading the Chrome Driver, save it in a location that is easy to access. Then Copy that path and give it in the argument. Like this????
#
driver = webdriver.Chrome("E:\TechVideos\Python\chromedriver.exe" , chrome_options=options)
#
Chrome Driver Done. Let’s Move back to the Code Explanation.
Code Explanation
Now let’s set up a URL form where we want to take a screenshot.
#
url = "https://learnwithhasan.com"
#
Now to open the URL
#
driver.get(url)
#
After Opening, we’ll take the screenshot with the following method.
Remember to pass your name, with which you want your screenshot to be saved, in the arguments of the following method.
#
driver.save_screenshot("test.png") # i want my screenshot to be saved as test.png
#
Then we want to calculate the time elapsed for the overall process of taking the screenshot.
#
elapsed = "%s seconds" % (time.time() - start_time) # the time now minus the start time
#
Now let’s print the elapsed time on the screen
#
print("Done in” + elapsed)
#
Source Code for Python & Selenium Screenshot with save_screenshot method
#start
from optparse import OptParseError
from selenium import webdriver
from selenium.webdriver.chrome.options import Options
import time

start_time = time.time()

options = Options()
options.add_argument('--headless')

driver = webdriver.Chrome(
    "E:\TechVideos\Python\chromedriver.exe" , chrome_options=options)

url = "https://learnwithhasan.com"

#Now for opening the URL

driver.get(url)

#After Opening we’ll take the screenshot with the following method.

#Remember to pass your name, with which you want your screenshot to be saved, in the arguments of the following method.


driver.save_screenshot("test.png") # i want my screenshot to be saved as test.png

#Then we want to calculate the time elapsed for the overall process of taking the screenshot.

elapsed = "%s seconds" % (time.time() - start_time) # the time now minus the start time

#Now let’s print the elapsed time on the screen

print("Done in" + elapsed)

#end
The output of ScreenShot with save_screenshot
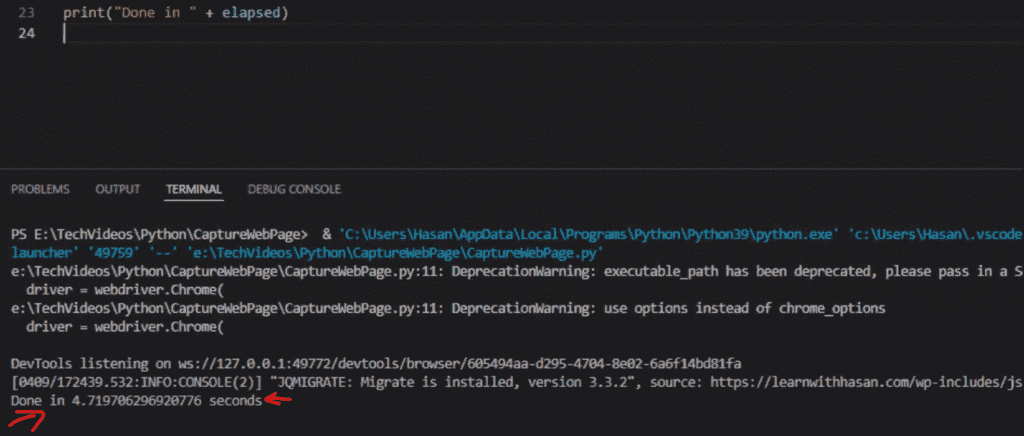

So, we successfully took a website Screenshot. But this website was not protected by Cloudflare or any Protective measures.
What if a website has Cloudflare Protection? Let’s discuss a workaround for that.
Method 2. Bypass Cloudflare for Website Screenshots with Selenium using user_agent()
Let’s take another example for taking a website screenshot.
But this time on a Cloudflare Protected website.
So replace https://learnwithhasan.com with https://www.neilpatel.com
#
url = "https://www.neilpatel.com"
#
And study the Output
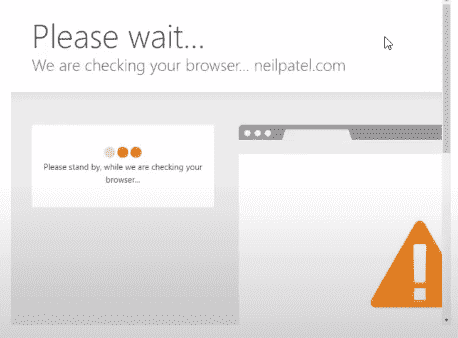
This means this website is protected by Cloudflare, Software reCapthca, etc.
So, how to solve this problem?
Let’s see…
Now we will add an argument known as a user agent.
Like this
#
options.add_argument(
    'user-agent-Mozilla/5.0 (Windows NT 10.0; Win64; x64) AppleWebKit/537.36 (KHTML, like Gecko) Chrome/74.0.3729.169 Safari/537.36'
)
#
This user agent will tell the website that we are normal users and not a bot.
Let’s try to see if it works.

And it worked!
We successfully bypassed Cloudflare with the user agent argument.
Source Code for Python & Selenium Screenshot with user_agent() argument
#start
from optparse import OptParseError
from selenium import webdriver
from selenium.webdriver.chrome.options import Options
import time

start_time = time.time()

options = Options()
options.add_argument('--headless')
options.add_argument(
    'user-agent-Mozilla/5.0 (Windows NT 10.0; Win64; x64) AppleWebKit/537.36 (KHTML, like Gecko) Chrome/74.0.3729.169 Safari/537.36'
)

driver = webdriver.Chrome(
    "E:\TechVideos\Python\chromedriver.exe" , chrome_options=options)

url = "https://www.neilpatel.com"

#Now for opening the URL

driver.get(url)

#After Opening we’ll take the screenshot with the following method.

#Remember to pass your name, with which you want your screenshot to be saved, in the arguments of the following method.


driver.save_screenshot("test.png") # i want my screenshot to be saved as test.png

#Then we want to calculate the time elapsed for the overall process of taking the screenshot.

elapsed = "%s seconds" % (time.time() - start_time) # the time now minus the start time

#Now let’s print the elapsed time on the screen

print("Done in" + elapsed)

#end
But sometimes, even if you add this, the Cloudflare or browser’s firewall will still detect you as a bot.
So, how can we be on the safe side?
What can we use to stay strong and Bypass almost 99% of the security measurements?
Let’s use our Final and Most Effective method
Method 3. Bypass Cloudflare and Major bots for Python Website Screenshots using Selenium Stealth
While I was doing my research, I found this project on GitHub Known as Selenium stealth
- It will even pass all the public bot tests
- It can perform Google account logins if required
- It can even help with maintaining a normal ReCaptcha V3 score.
So, essentially it would look like a normal person is browsing the website.
So how to use it and integrate it into our python script?
Simply install it by ‘pip install selenium-stealth in the terminal
And it should install in a moment
After a few tweaks to the previous code. Here are the changes.
WebDriver is normal; We add headless and Some arguments.
#
options = webdriver.ChromeOptions()
options.add_argument("start-maximized")
options.add_argument("--headless")
options.add_experimental_option("excludeSwitches", ["enable-automation"])
options.add_experimental_option('useAutomationExtension', False)
driver = webdriver.Chrome(
    options=options, executable_path="E:\TechVideos\Python\chromedriver.exe")
#
And Most Importantly, the stealth function. Arguments like renderer, platform, languages, and vendor make it seem like a real person is browsing the website.
#
stealth(driver,
        languages=["en-US", "en"],
        vendor="Google Inc.",
        platform="Win32",
        webgl_vendor="Intel Inc.",
        renderer="Intel Iris OpenGL Engine",
        fix_hairline=True,
        )
#
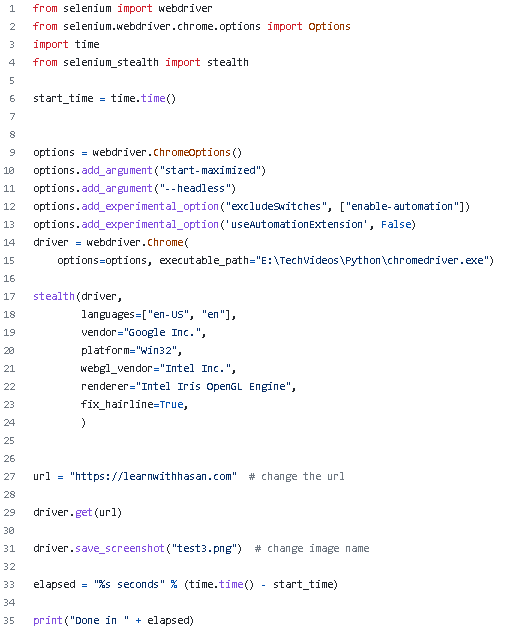
Source Code for Python Screenshot of a webpage using selenium-stealth
#start
from optparse import OptParseError
from selenium import webdriver
from selenium.webdriver.chrome.options import Options
import time
from selenium_stealth import stealth

start_time = time.time()


options = webdriver.ChromeOptions()
options.add_argument("start-maximized")
options.add_argument("--headless")
options.add_experimental_option("excludeSwitches", ["enable-automation"])
options.add_experimental_option('useAutomationExtension', False)
driver = webdriver.Chrome(
    options=options, executable_path="E:\TechVideos\Python\chromedriver.exe")

stealth(driver,
        languages=["en-US", "en"],
        vendor="Google Inc.",
        platform="Win32",
        webgl_vendor="Intel Inc.",
        renderer="Intel Iris OpenGL Engine",
        fix_hairline=True,
        )


url = "https://www.neilpatel.com"

#Now for opening the URL

driver.get(url)

#After Opening we’ll take the screenshot with the following method.

#Remember to pass your name, with which you want your screenshot to be saved, in the arguments of the following method.


driver.save_screenshot("test.png") # i want my screenshot to be saved as test.png

#Then we want to calculate the time elapsed for the overall process of taking the screenshot.

elapsed = "%s seconds" % (time.time() - start_time) # the time now minus the start time

#Now let’s print the elapsed time on the screen

print("Done in" + elapsed)

#end
The output of ScreenShot with selenium_stealth
Here we are!!!
Now you will look like a normal person browsing the web.
Test it again, and it works perfectly.
Take care and Happy Coding!
🟥Master the Most In-Demand Skill of the Future!
Enroll in the ‘Become a Prompt Engineer‘ program. We’ll take you from novice to expert in scripting AI workflows. Start your journey here!

What Will You Get?
- Access to our premium Prompt Engineering Course
- Access our private support forum to get help along your journey.
- Access to our Premium Tested Prompts Library.
Hello Hasan Sir,
I am not a Computer Science (or) even any technical background student..
But this article looks impressive…
First, after seeing this article it looks like heavy content.. But finally, by reading slowly, i got the point…
Really, Thank you, sir…